background image

All rights reserved © AAT SYSTEMY BEZPIECZEŃSTWA Sp. z o.o. 


22


User Manual for NMS NVR and NVSO 


version 1.2


All rights reserved © AAT SYSTEMY BEZPIECZEŃSTWA Sp. z o.o. 


22


FIRST START

-

UP


4. FIRST START

-

UP 


At  the  first  startup  of  the  recorder,  for  security  reasons  user  have  to  assign  a  new  password  to  the 

administrator  account.  To  do  this,  select  the  interface  language 

(1) 

and  then  enter  the  new 

administrator password in the window 

(2) 

and confirm it typing a second time. The password is saved 

by clicking 

OK.


ATTENTION!!!


The  newly  created  password  should  be  remembered  because  it  will  be  the  default  administrator 

password on the device. If the password is lost, restoring is a paid service. 


Next the activation window appears. The activation process is described in the NMS software manual 

which is available on the website:


https://www.novuscctv.com/en/nms

-

novus

-

management

-

system


Activations can be done at any time before the end of the trial period. If activation will be performed 

in other time click the 

Register Later 

button. 


To  return  to  the  activation  window,  go  to 

Help  >  Activation 

in  the  top  bar  of  the  running  NMS 

software.


1


2


Summary of Contents for NMS NVR 3-4U-III

Page 1: ...NMS NVR 3 T III NMS NVR 5 T III NMS NVR 7 T III NMS NVR 3 4U III NMS NVR 5 4U III NMS NVR 7 4U III NVSO 3 T III NVSO 5 T III NVSO 7 T III NVSO 3 4U III NVSO 5 4U III NVSO 7 4U III Start up guide ...

Page 2: ...ices 3 Do not enable the Windows Firewall Firewall Windows Defender 4 Do not install anti virus software firewalls etc 5 Do not install software provided by third parties 6 Do not carry out repairs yourself 7 Do not modify the units without the manufacturer s authorization 8 Do not make copies of system disks to other media and move modify or perform any other tasks related to OS disks 9 Do not mo...

Page 3: ...nt designed for use within certain voltage limits DIRECTIVE 2014 30 EU OF THE EUROPEAN PARLIMENT AND OF THE COUNCIL of 26 February 2014 on the harmonisation of the laws of the Member States relating to electromagnetic compatibility OJ L 96 29 3 2014 p 79 106 with changes DIRECTIVE 2012 19 EU OF THE EUROPEAN PARLIAMENTAND OF THE COUNCIL of 4 July 2012 on waste electrical and electronic equipment WE...

Page 4: ...undertaking any action please consult the following manual and read all the safety and operating instructions before starting the device 2 Please keep this manual for the lifespan of the device in case referring to the contents of this manual is necessary 3 All the safety precautions referred to in this manual should be strictly followed as they have a direct influence on user s safety and durabil...

Page 5: ... All maintenance actions and repairs should be conducted only by qualified service personnel 14 Unplug the camera from the power source immediately and contact the proper maintenance department when the following occurs Damages to the power cord or to the plug itself Liquids getting inside the device or exposure to strong mechanical shock Device behaves in a way not described in the manual and all...

Page 6: ...e table below presents the differences between NMS NVR and NVSO workstations Other parameters of the units are identical ATTENTION To support more than two monitors it is necessary to use the Display Port output An additional license key is required to support more than 1 RTSP channel and 1 ONVIF channel INTRODUCTORY INFORMATION Unit OS Unit OS NMS NVR 3 4U III Windows 10 IoT NVSO 3 4U III Windows...

Page 7: ... x 428mm H x 410mm D Weight 10 kg without HDDs for recording Power Supply built in 700W with 230VAC input Power consumption heatprint 250W 200W without HDD for recording Operating Temperature 5 C 35 C DISPLAY Monitor Output 1 x HDMI 2 0b 1 x Display Port 1 4 1 x Dual link DVI D up to 3 monitors simultaneously Maximum Resolution 3 x 4K UltraHD AUDIO Audio input 1 x Line in 3 5mm 1 x Mic in 3 5mm Au...

Page 8: ... x 428mm H x 410mm D Weight 10 kg without HDDs for recording Power Supply built in 700W with 230VAC input Power consumption heatprint 260W 210W without HDD for recording Operating Temperature 5 C 35 C DISPLAY Monitor Output 1 x HDMI 2 0b 1 x Display Port 1 4 1 x Dual link DVI D up to 3 monitors simultaneously Maximum Resolution 3 x 4K UltraHD AUDIO Audio input 1 x Line in 3 5mm 1 x Mic in 3 5mm Au...

Page 9: ... x 408mm H x 475mm D Weight 10 kg without HDDs for recording Power Supply built in 700W with 230VAC input Power consumption heatprint 280W 230W without HDD for recording Operating Temperature 5 C 35 C DISPLAY Monitor Output 1 x HDMI 2 0b 1 x Display Port 1 4 1 x Dual link DVI D up to 3 monitors simultaneously Maximum Resolution 3 x 4K UltraHD AUDIO Audio input 1 x Line in 3 5mm 1 x Mic in 3 5mm Au...

Page 10: ...graphics cards Do not use the monitor outputs available on the motherboard 3 2 MOTHERBOARD CONNECTOR 1 USB 2 0 2 USB 3 2 Type C 3 USB 3 2 Type A gen 2 4 USB 3 2 Type A gen 1 5 Optical port S PDIF 6 Audio connectors mini Jack 3 5mm 7 Ethernet RJ45 up to 2 5Gb s 3 3 ADDITIONAL ETHERNET CARD CONNECTIONS Applies to NMS NVR 7 T III NMS NVR 7 4U III NVSO 7 T III NVSO 7 4U III A F CONNECTORS HDMI 2 0b Di...

Page 11: ... reserved AAT SYSTEMY BEZPIECZEŃSTWA Sp z o o 11 CONNECTORS 3 4 SATA PORTS 3 5 FRONT PANEL CONNECTIONS AND DISK MOUNTING PROCEDURE Applies to NMS NVR 7 4U III NVSO 7 4U III 1 Reset Button 2 Front USB connectors 3 ON OFF Button 4 Indicator lights for system operation and disk activity SATA Ports up to 6 Gb s 1 2 3 4 ...

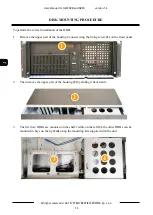
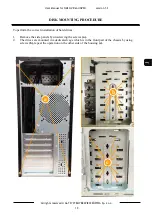
Page 12: ...E To perform the correct installation of the HDD 1 Remove the upper part of the housing by unscrewing the fixing screw 1 on the front panel 2 Then remove the upper part of the housing 2 by sliding it backwards 3 The first two HDDs are mounted on the shelf visible on the left 3 the other HDDs can be mounted in bays on the right 4 using the mounting kits supplied with the unit A 1 2 3 4 ...

Page 13: ... the shelf for the first two HDDs unscrew 4 screws the first two 1 are inside the housing the others in the front part 2 5 The installation of the disks is as follows the disks must be screwed securely For this use all four threaded holes in the disks 3 Fastening discs with a smaller number of bolts may damage them during transport or during operation due to vibrations of the whole unit C 1 2 3 3 ...

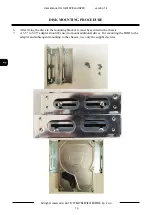
Page 14: ...rved AAT SYSTEMY BEZPIECZEŃSTWA Sp z o o 14 DISK MOUNTING PROCEDURE 6 After fixing the discs to the mounting bracket it must be secured in the chassis 7 A 3 5 to 5 25 adapter should be used to mount additional drives For mounting the HDD to the adapter and subsequent mounting to the chassis use only the supplied screws ...

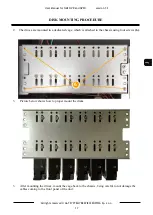
Page 15: ...fastening screws 1 and be cautious of the grounding wire The cage has four drive bays three of them are 5 25 and should accommodate drives equipped with 3 5 to 5 25 converters while the lowest space is 3 5 and is designed for a drive without a converter 9 After removing the disk cage install previously prepared drives starting from the upper part of the cage 10 Then screw the cage with the mounted...

Page 16: ...TIONS AND DISK MOUNTING PROCEDURE Applies to NMS NVR 3 4U III NMS NVR 5 4U III NVSO 3 4U III NVSO 5 4U III 1 Reset Button 2 Front USB connectors 3 On Off button 4 Indicator lights for system operation and disk activity To perform the correct installation of hard drives 1 Remove the upper part of the chassis by unscrewing the fixing screws 5 then slide out the upper part of the chassis 1 2 4 3 5 ...

Page 17: ...TWA Sp z o o 17 DANE TECHNICZNE 2 The drives are mounted in a dedicated cage which is attached to the chassis using four screws 6 3 Picture below shows how to proper mount the disks 3 After mounting the drives mount the cage back to the chassis being careful to not damage the cables coming to the front panel of the unit DISK MOUNTING PROCEDURE B 6 ...

Page 18: ... rights reserved AAT SYSTEMY BEZPIECZEŃSTWA Sp z o o 18 CONNECTORS 3 7 FRONT PANEL CONNECTIONS AND DISK MOUNTING PROCEDURE Applies to NMS NVR 7 T III NVSO 7 T III 1 Reset Button 2 Indicator lights for system operation and disk activity 3 Front USB connectors 4 Audio I O 3 5mm Jack 5 On Off Button 1 2 2 3 4 5 ...

Page 19: ... SYSTEMY BEZPIECZEŃSTWA Sp z o o 19 DISK MOUNTING PROCEDURE To perform the correct installation of hard drives 1 Remove the side panels by unscrewing the screws a 2 The drives are mounted in a dedicated cage which is in the front part of the chassis by using screws b repeat the operation on the other side of the housing c a b c ...

Page 20: ...YSTEMY BEZPIECZEŃSTWA Sp z o o 20 DANE TECHNICZNE 3 8 FRONT PANEL CONNECTIONS AND DISK MOUNTING PROCEDURE Applies to NMS NVR 3 T III NMS NVR 5 T III NVSO 3 T III NVSO 5 T III 1 On Off Button 2 Reset Button 3 Indicator lights for system operation and disk activity 4 Front USB connectors 5 Audio I O 3 5mm Jack CONNECTORS 2 3 1 4 5 ...

Page 21: ... BEZPIECZEŃSTWA Sp z o o 21 DANE TECHNICZNE To perform the correct installation of hard drives 1 Remove the side panels by unscrewing the screws 1 2 The drives are mounted in a dedicated cage which is in the front part of the chassis by using screws 2 repeat the operation on the other side of the housing 3 DISK MOUNTING PROCEDURE 1 2 3 ...

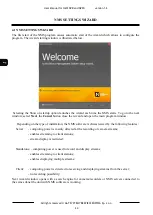
Page 22: ...me The password is saved by clicking OK ATTENTION The newly created password should be remembered because it will be the default administrator password on the device If the password is lost restoring is a paid service Next the activation window appears The activation process is described in the NMS software manual which is available on the website https www novuscctv com en nms novus management sy...

Page 23: ...ts the NMS application pressing the Disable button closes the NMS application pressing the X button in the upper right corner of the window closes it without entering any data It does not close the NMS application To log in use the default root login and password used in the previous step Remember that the software is case sensitive When user log in for the first time a setup wizard window appears...

Page 24: ...button close the wizard and open the main program window Depending on the type of installation the NMS software is characterized by the following features Server computing power is mainly directed at the recording of camera streams enables streaming to client stations stream display is restricted Standalone computing power is used to record and display streams enables streaming to client stations ...

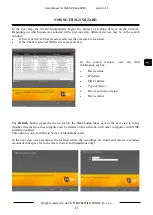
Page 25: ...are searched If the Client is selected NMS servers are searched In the search window user can find information such as Device name IP Adress MAC address Type of device Device software version Device status The Refresh button repeat the device search the Next button takes user to the next step to select whether streams from this computer can be shared on the network with other computers with NMS so...

Page 26: ...enetered is incorrect user can delete the account from the list by clicking the Delete button After adding the desired number of user accounts and pressing Next the last wizard window opens allowing to apply the settings and save them in the program configuration To apply the settings the program automatically logs off the user and then displays the window to log in again The appropriate settings ...

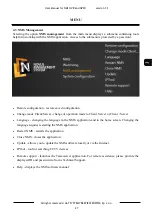
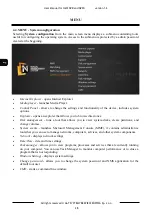
Page 27: ...ed configuration Change mode Client Server change of operation mode to Client Server or Client Server Language changing the language in the NMS application and in the home screen Changing the language requires restarting the NMS application Restart NMS restarts the application Close NMS closes the application Update allows you to update the NMS software locally or via the Internet IPTool tool for ...

Page 28: ... Explorer opens an explorer that allows you to browse directories Disk management runs a tool that allows you to view system disks create partitions and change volumes System events launches Microsoft Management Console MMC it contains administrative tools that you can use to manage networks computers services and other system components Network displays network settings Date Time date and time se...

Page 29: ...system settings menu select the Network option A window with available network connections appears Right click on the desired connection 1 and select Properties 2 from the list Select Internet Protocol Version 4 TCP IPv4 3 Press the Proterties button 4 In the newly displayed window fill in the fields 5 IP address IP address Subnet mask Default gateway Preffered DNS server Alternate DNS server 6 an...

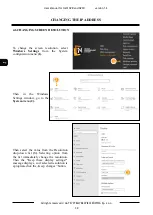
Page 30: ...UTION To change the screen resolution select Windows Settings from the System configuration menu 1 Then in the Windows Settings window go to the System menu 2 Then select the value from the Resolution drop down list 3 Selecting option from the list immediately change the resolution Then the Keep these display settings message displays so if selected resolution is apropriate click the Keep changes ...

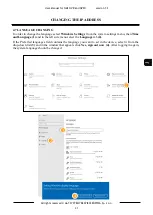
Page 31: ... In order to change the language select Windows Settings from the system settings menu then Time and Language 1 and in the left side menu select the Language tab 2 If the Preferred languages field contains the language you want to set in the device select it from the drop down list 3 and in the window that appears click Yes sign out now 4 After logging in again the system language should be change...

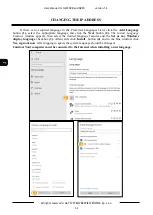
Page 32: ...the Add Language button 1 select the appropriate language and click the Next button 2 The Install Language Features window appears then select the desired language features and the Set as my Windows display language checkbox 3 Afterwards click Install button 4 and in the blue window click Yes sign out now After logging in again the system language should be changed Caution Your computer must be co...

Page 33: ...oses The user may be asked to log out of the NMS application using a login and password The device can also be turned off from the home screen To do it minimalize the NMS window and use the power button located in the lower right corner of the screen In the image above it has been indicated by the white arrow After pressing ON OFF button in the lower right corner of the screen appears menu that al...

Page 34: ...2022 03 08 DK MK AAT SYSTEMY BEZPIECZEŃSTWA Sp z o o 431 Pulawska St 02 801 Warsaw Poland tel 4822 546 0 546 kontakt aat pl www novuscctv com ...

Page 35: ...R 3 T III NMS NVR 5 T III NMS NVR 7 T III NMS NVR 3 4U III NMS NVR 5 4U III NMS NVR 7 4U III NVSO 3 T III NVSO 5 T III NVSO 7 T III NVSO 3 4U III NVSO 5 4U III NVSO 7 4U III Instrukcja pierwszego uruchomienia ...

Page 36: ...ia dostarczonego przez firmy trzecie 6 Nie należy wykonywać samodzielnych napraw 7 Nie należy wykonywać modyfikacji jednostek bez autoryzacji producenta 8 Nie należy wykonywać kopii dysków systemowych na inny nośnik oraz przenosić modyfikować oraz wykonywać innych czynności związanych z dyskami systemowymi 9 Nie należy wykonywać modyfikacji ustawień BIOS tj Overclocking redundancji dysków RAID etc...

Page 37: ... UE z dnia 26 lutego 2014 r w sprawie harmonizacji ustawodawstw państw człon kowskich odnoszących się do kompatybilności elektromagnetycznej Dz U L 096 z 29 3 2014 str 79 106 z późniejszymi zmianami zwana Dyrektywa EMC DYREKTYWA PARLAMENTU EUROPEJSKIEGO I RADY 2012 19 UE z dnia 4 lipca 2012 r w sprawie zużytego sprzętu elektrycznego i elektronicznego WEEE Dz U L 96 z 29 3 2014 str 79 106 z później...

Page 38: ... wykonywane przez instalatorów i użytkowników muszą być realizowane zgodnie z opisem zawartym w instrukcji 5 W czasie czynności konserwatorskich urządzenie musi być odłączone od zasilania 6 Nie wolno stosować żadnych dodatkowych urządzeń lub podzespołów nie przewidzianych i nie zalecanych przez producenta 7 Nie należy instalować tego urządzenia w miejscu gdzie nie można zapewnić właściwej wentylac...

Page 39: ...dy zostało ono narażone na silny uraz mechaniczny Urządzenie działa w sposób odbiegający od opisanego w instrukcji a regulacje dopuszczone przez producenta i możliwe do samodzielnego przeprowadzenia przez użytkownika nie przynoszą spodziewanych rezultatów Obudowa została uszkodzona Można zaobserwować nietypowe zachowanie urządzenia 15 W przypadku konieczności naprawy urządzenia należy upewnić się ...

Page 40: ...ce pomiędzy rejestratorami NMS NVR oraz stacjami roboczymi NVSO Pozostałe parametry jednostek są identyczne UWAGA Do obsługi więcej niż dwóch monitorów konieczne jest użycie wyjścia Display Port Do obsługi więcej niż 1 kanału RTSP oraz 1 kanału ONVIF wymagany jest dodatkowy klucz licencyjny INFORMACJE WSTĘPNE Jednostka System operacyjny Jednostka System operacyjny NMS NVR 3 4U III Windows 10 IoT N...

Page 41: ...x 410 mm gł Masa 10 kg bez dysków do rejestracji Zasilacz wbudowany zasilacz 230VAC o mocy 700W Pobór mocy ślad cieplny 250W 200W bez dysków do rejestracji Temperatura pracy 5 C 35 C WYŚWIETLANIE Wyjścia monitorowe 1 x HDMI 2 0b 1 x Display Port 1 4 1 x Dual link DVI D do 3 monitorów jednocześnie Rozdzielczość maksymalna 3 x 4K UltraHD AUDIO Wejścia audio 1 x liniowe 3 5mm 1 x mikrofonowe 3 5mm Wy...

Page 42: ...x 410 mm gł Masa 10 kg bez dysków do rejestracji Zasilacz wbudowany zasilacz 230VAC o mocy 700W Pobór mocy ślad cieplny 260W 210W bez dysków do rejestracji Temperatura pracy 5 C 35 C WYŚWIETLANIE Wyjścia monitorowe 1 x HDMI 2 0b 1 x Display Port 1 4 1 x Dual link DVI D do 3 monitorów jednocześnie Rozdzielczość maksymalna 3 x 4K UltraHD AUDIO Wejścia audio 1 x liniowe 3 5mm 1 x mikrofonowe 3 5mm Wy...

Page 43: ...475 mm gł Masa 10 kg bez dysków do rejestracji Zasilacz wbudowany zasilacz 230VAC o mocy 700W Pobór mocy ślad cieplny 280W 230W bez dysków do rejestracji Temperatura pracy 5 C 35 C WYŚWIETLANIE Wyjścia monitorowe 1 x HDMI 2 0b 1 x Display Port 1 4 1 x Dual link DVI D do 3 monitorów jednocześnie Rozdzielczość maksymalna 3 x 4K UltraHD AUDIO Wejścia audio 1 x liniowe 3 5mm 1 x mikrofonowe 3 5mm Wyjś...

Page 44: ...ć monitorowych dostępnych na płycie głównej 3 2 ZŁĄCZA ELEKTRYCZNE PŁYTY GŁÓWNEJ 1 Porty USB 2 0 2 Porty USB 3 2 Typu C 3 Porty USB 3 2 Typu A gen 2 4 Porty USB 3 2 Typu A gen 1 5 Port optyczny S PDIF 6 Złącza audio mini Jack 3 5mm 7 Złącze Ethernet RJ45 do 2 5Gb s 3 3 ZŁĄCZA ELEKTRYCZNE DODATKOWEJ KARTY SIECIOWEJ Posiadają ją jednostki NMS NVR 7 T III NMS NVR 7 4U III NVSO 7 T III NVSO 7 4U III D...

Page 45: ... NVSO wersja 1 2 ZŁĄCZA 3 4 ZŁĄCZA SATA PŁYTY GŁÓWNEJ 3 5 ZŁĄCZA PANELU PRZEDNIEGO ORAZ MONTAŻ DYSKÓW Jednostki NMS NVR 7 4U III NVSO 7 4U III posiadają na przednim panelu 1 Przycisk reset 2 Złącza USB 3 Przycisk Włącz Wyłącz 4 Diody sygnalizujące pracę systemu oraz aktywność dysku Złącza SATA do 6 Gb s 1 2 3 4 ...

Page 46: ...rejestracji należy 1 Zdjąć górną część obudowy poprzez odkręcenie śruby mocującej 1 na panelu przednim 2 Następnie należy wysunąć górną część obudowy 2 przesuwając ją w kierunku tylnej części komputera 3 Dwa dyski należy zamontować na półce umieszczonej w lewej części obudowy 3 natomiast pozostałe dyski należy zamontować po prawej stronie 4 w przeznaczonej do tego ramce A 1 2 3 4 ...

Page 47: ... cztery śruby dwie pierwsze 1 znajdują się wewnątrz obudowy pozostałe w przedniej części 2 5 Dyski muszą zostać przykręcone w sposób bezpieczny i niepozwalający na ich ruch Należy wykorzystać do tego wszystkie cztery nagwintowane otwory w dyskach 3 Zamocowanie dysków na mniejszą ilość śrub może spowodować ich uszkodzenie w transporcie bądź podczas pracy poprzez wibracje całej jednostki C 1 2 3 3 ...

Page 48: ...BEZPIECZEŃSTWA SP z o o 14 MONTAŻ DYSKÓW 6 Po zamocowaniu dysków do półki należy ją zamocować w obudowie 7 Do montażu trzech kolejnych dysków należy wykorzystać konwerter 3 5 na 5 25 Do montażu dysku do konwertera i późniejszego montażu do obudowy należy wykorzystać jedynie śruby dostarczone w zestawie ...

Page 49: ...ący Klatka ma cztery miejsca na dyski trzy z nich mają wymiar 5 25 i w nich należy zamontować dyski wyposażone w konwertery 3 5 na 5 25 natomiast najniżej położone miejsce ma wymiar 3 5 i przeznaczone jest na dysk bez konwertera 9 Po wymontowaniu klatki należy przystąpić do montażu wcześniej przygotowanych dysków rozpoczynając od górnej części klatki 10 Klatkę z zamontowanymi dyskami należy przykr...

Page 50: ... III NMS NVR 5 4U III NVSO 3 4U III NVSO 5 4U III posiadają na przednim panelu 1 Przycisk reset 2 Złącza USB 3 Przycisk Włącz Wyłącz 4 Diody sygnalizujące pracę systemu oraz aktywność dysku Aby wykonać poprawny montaż dysków do rejestracji należy 1 Zdjąć górną część obudowy poprzez odkręcenie śrub mocujących 5 następnie wysunąć górną część obudowy przesuwając w kierunku tylnej części jednostki 1 2...

Page 51: ...1 2 DANE TECHNICZNE 2 Dyski należy zamontować w dedykowanej klatce która jest zamocowana do obudowy wykorzystując cztery śruby 6 3 Poniżej przedstawiono sposób montażu dysków 4 Po zamontowaniu dysków należy ponownie zamontować klatkę do obudowy uważając na przewody dochodzące do panelu przedniego jednostki B MONTAŻ DYSKÓW 6 ...

Page 52: ...one AAT SYSTEMY BEZPIECZEŃSTWA SP z o o 18 ZŁĄCZA 3 7 ZŁĄCZA PANELU PRZEDNIEGOORAZ MONTAŻ DYSKÓW Dla jednostek NMS NVR 7 T III NVSO 7 T III 1 Przycisk reset 2 Diody sygnalizujące pracę systemu oraz aktywność dysku 3 Złącza USB 4 Wejście Wyjście audio 5 Przycisk Włącz Wyłącz 1 2 2 3 4 5 ...

Page 53: ...NVR oraz NVSO wersja 1 2 MONTAŻ DYSKÓW Aby wykonać poprawny montaż dysków do rejestracji należy 1 Zdjąć boczne panele odkręcając śruby a 2 Dyski należy zamontować w dedykowanej klatce która jest w przedniej części obudowy przykręcając śrubami b czynność należy powtórzyć po drugiej stronie obudowy c a b c ...

Page 54: ...CZEŃSTWA SP z o o 20 DANE TECHNICZNE 3 8 ZŁĄCZA PANELU PRZEDNIEGO ORAZ MONTAŻ DYSKÓW Dla jednostek NMS NVR 3 T III NMS NVR 5 T III NVSO 3 T III NVSO 5 T III 1 Przycisk Włącz Wyłącz 2 Przycisk reset 3 Diody sygnalizujące pracę systemu oraz aktywność dysku 4 Złącza USB 5 Wejścia Wyjścia audio ZŁĄCZA 2 3 1 4 5 ...

Page 55: ... NVSO wersja 1 2 DANE TECHNICZNE Aby wykonać poprawny montaż dysków do rejestracji należy 1 Zdjąć boczne panele odkręcając śruby 1 2 Dyski należy zamontować w dedykowanej klatce która jest w przedniej części obudowy przykręcając śrubami 2 czynność należy powtórzyć po drugiej stronie obudowy 3 MONTAŻ DYSKÓW 1 2 3 ...

Page 56: ...przycisk OK UWAGA Nowo stworzone hasło należy zapamiętać gdyż będzie ono domyślnym hasłem administratora na jednostce Przywrócenie hasła jest płatną usługą serwisową W następnej kolejności wyświetli się okno aktywacji Proces aktywacji opisany jest w instrukcji do oprogramowania NMS która jest dostępna na stronie https www novuscctv com pl nms novus management system Aktywacje można przeprowadzić w...

Page 57: ...yka aplikację NMS naciśnięcie przycisku X w prawym górnym rogu okna zamyka je bez konieczności wprowadzania danych Nie powoduje natomiast zamknięcia aplikacji NMS Do zalogowania należy użyć domyślnego loginu root i hasła nadanego w poprzednim kroku Należy pamiętać o tym iż oprogramowanie rozróżnia wielkość liter Po pierwszym zalogowaniu zostanie wyświetlone okno kreatora konfiguracji który służy d...

Page 58: ...oprogramowanie NMS charakteryzuje się następującymi cechami Serwer moc obliczeniowa skierowana jest głównie na rejestrację strumieni z kamer umożliwia przesyłanie strumieni do stacji klienckich wyświetlanie strumieni jest ograniczone Serwer Klient moc obliczeniowa wykorzystywana jest do rejestracji i wyświetlania strumieni umożliwia przesyłanie strumieni do stacji klienckich umożliwia wyświetlanie...

Page 59: ... to wyszukiwane są serwery NMS W oknie wyszukiwania można znaleźć informacje takie jak Nazwa urządzenia Ades IP Adres MAC Typ urządzenia Wersja oprogramowania urządzenia Status urządzenia Przycisk Odśwież ponawia wyszukiwanie urządzeń natomiast kliknięcie przycisku Dalej powoduje przejście do następnego kroku w którym należy wybrać czy strumienie z tego komputera mogą być udostępniane innym komput...

Page 60: ...owadzenia danych możliwe jest usunięcie konta z listy poprzez przycisk Usuń Po dodaniu pożądanej liczby kont użytkowników i przyciśnięciu Dalej otwierane jest ostatnie okno kreatora pozwalające na zastosowanie ustawień i zapisanie ich w konfiguracji programu Aby zastosować ustawienia program automatycznie wylogowuje użytkownika a następnie wyświetli okno do ponownego zalogowania Odpowiednie ustawi...

Page 61: ... zamknięcia aplikacji NMS Zmień tryb Klient Serwer zmiana trybu pracy na Klient Serwer Klient Serwer Język zmianę języka w aplikacji NMS i w ekranie głównym Zmiana języka wymaga ponownego uruchomienia aplikacji NMS Restartuj NMS uruchamia ponownie aplikację Zamknij NMS zamyka aplikację Aktualizacja umożliwia aktualizację oprogramowania lokalnie lub poprzez Internet IPTool narzędzie umożliwiające w...

Page 62: ...orator umożliwiający przeglądanie katalogów Zarządzanie dyskami uruchamia narzędzie umożliwiające podgląd dysków systemowych tworzenie partycji i zmianę woluminów Zdarzenia systemowe uruchamia program Microsoft Management Console MMC zawiera on narzędzia administracyjne których można używać do zarządzania sieciami komputerami usługami i innymi składnikami systemu Sieć wyświetla dostępne połączenia...

Page 63: ...dostępnymi połączeniami sieciowymi Nacisnąć prawym przyciskiem myszy na pożądanym połączeniu 1 i z listy wybrać Properties 2 Zaznaczyć Internet Protocol Version 4 TCP IPv4 3 Nacisnąć przycisk Proterties 4 W nowo wyświetlonym oknie uzupełnić pola 5 IP address adres IP Subnet mask maska podsieci Default gateway brama domyślna Preffered DNS server preferowany serwer DNS Alternate DNS server alternaty...

Page 64: ...z menu Ustawienia Systemowe wybrać opcję Ustawienia Windows 1 Wyświetli się wtedy okno Ustawienia systemu Windows w którym należy przejść do menu System 2 Następnie z rozwijanej listy Rozdzielczość 3 można wybrać wymaganą wartość Po kliknięciu na wybraną opcje z listy rozdzielczość zostanie natychmiastowo zmieniona i wyświetli się komunikat Czy chcesz zachować te ustawienia w którym należy kliknąć...

Page 65: ...stemu windows należy z menu ustawień systemowych wybrać opcję Ustawienia Windows następnie Czas i język 1 i w menu po lewej stronie wybrać zakładkę Język 2 Jeżeli w polu Preferowane języki jest język który ma zostać ustawiony w urządzeniu to należy wybrać go z listy rozwijanej 3 w oknie które się pojawi kliknąć przycisk Tak wyloguj teraz 4 Po ponownym zalogowaniu język systemu powinien być zmienio...

Page 66: ...język a następnie kliknąć przycisk Dalej 2 Pojawi się okno Instalowanie funkcji językowych w którym należy zaznaczyć wybrane funkcje językowe i pole Ustaw jako mój język wyświetlania systemu Windows 3 a następnie kliknąć Zainstaluj 4 Następnie pojawi się niebieskie okno w którym należy kliknąć przycisk Tak wyloguj teraz Po ponownym zalogowaniu język systemu powinien być zmieniony Uwaga Podczas ins...

Page 67: ...kownik może zostać poproszony o wylogowanie się z aplikacji NMS za pomocą loginu i hasła Urządzenie można również wyłączyć z ekranu głównego Można go wyświetlić po przez zminimalizowanie okna oprogramowania NMS Następnie wykorzystać przycisk zasilania umiejscowiony w prawym dolnym rogu ekranu Po naciśnięciu zostanie wyświetlone menu umożliwiające wyłączenie urządzenia lub uruchomienie go ponownie ...

Page 68: ...2021 08 13 DK MM AAT SYSTEMY BEZPIECZEŃSTWA Sp z o o ul Puławska 431 02 801 Warszawa Polska tel 22 546 0 546 kontakt aat pl www novuscctv com pl ...

Reviews: