background image

EN 20

Replacing the lamps

Please allow the lights to cool down sufficiently
before touching them. Cover and protect delicate
surfaces underneath the hood when changing
lamps. The hood needs to be disconnected from
the current before proceeding.

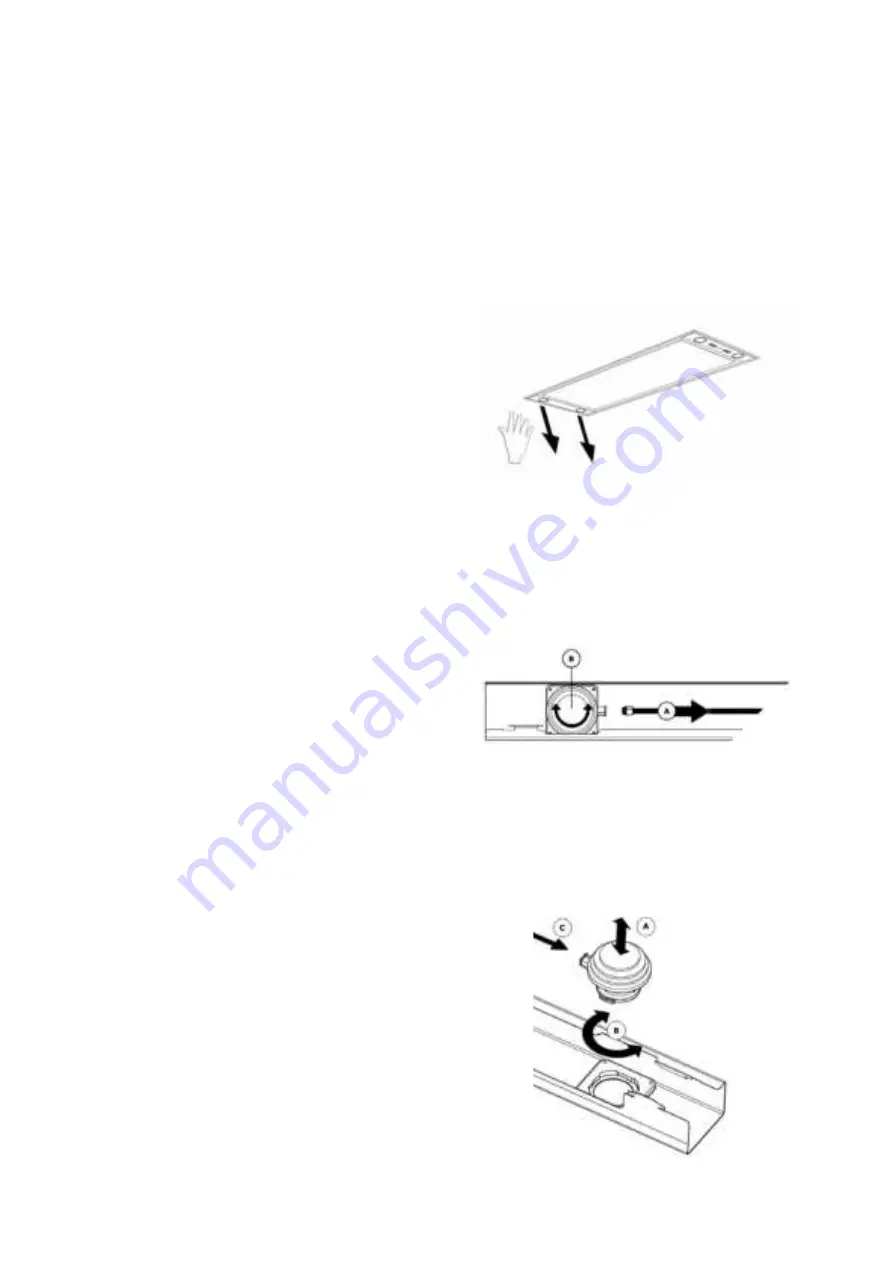
1.   Carefully slide down the spotlight holder and 

then open the spotlight holder with a tilting 
movement.

2.   Removing the LED lamp:
A.  First disconnect the cable to the LED to be 

replaced. Disconnect by means of releasing 
the lock, by applying light pressure while at 
the same time pulling away.

B.  Next, remove the LED to be replaced by 

making a gentle rotating movement to the left.

3.   Mounting the new LED:
A.   Place the new LED light into the locking ring.
B.  Make a rotating movement to the right until 

the LED light is locked.

C.  Connect the power cable.
D.  Put back the cover at its place.

Remove the Monoblock recirculation filter:

•  Open the bottom plate with both hands and 

remove the aluminium grease filter from the 
hood.

•  The Monoblock recirculation filter is found in 

its opening in the cooker hood. Remove it from 
the cooker hood.

Regenerate the Monoblock recirculation filter:

•  The Monoblock can be regenerated up to 12 

times. This is done in the oven.

•  Place the filter in the oven for 1 hour at 120°C. 

Provide sufficient fresh air in the room where 
the oven has been placed, as smells can be 
released. Smells can be released when baking 
certain kinds of fish. The best solution for this is 
to immediately regenerate the filter.

Reset the Monoblock recirculation filter

The cooker hood (motor) must be running!
Simultaneously press + and – for 5 sec. until the 
red indicator lamp flashes 3 times for confirmation.

Place the Monoblock recirculation filter:

•  Open the bottom plate with both hands and 

remove the aluminium grease filter from the 
hood.

•  Place the Monoblock recirculation filter is its 

opening in the cooker hood.

•  Put back the aluminium grease filter and close 

the bottom plate.

Deactivate the programming:

Attention! This is not recommended for a cooker 
hood with recirculation.
Simultaneously press + and – for 5 sec. until the 
third green LED flashes 3 times.   

Maintenance of the bottom side of the cooker 
hood

Please allow the lights to cool down sufficiently 
before cleaning the hood. Use a soft, wet cloth 
and a mild detergent to clean the hood. 
Never use aggressive, abrasive detergents or 
sponges. Bleach will damage stainless steel. 
The stainless steel surfaces can be treated with 
Novy Inoxcleaner (906.060) after cleaning.

Maintenance of the Solid Surface material

The housing is made from Solid Surface. Cleaning 
is done using a cloth or sponge moistened with a 
mild detergent. Then rub dry with a dry, soft cloth 
to avoid stains. Do not use an abrasive or scourer.

Summary of Contents for 7510/15

Page 1: ...nstallatievoorschriften p 2 Nederland FR Belgique Mode d emploi et d installation p 7 France DE Belgien Montage und Bedienungsanleitung p 12 Deutschland Österreich Schweiz EN Operating and installation Instructions p 17 7510 15 7520 15 ...

Page 2: ...raten van ander afval te worden gescheiden De recyclage van de apparaten die door uw fabrikant wordt georganiseerd wordt op deze manier onder de beste omstandigheden uitgevoerd over eenkomstig de Europese richtlijn 2002 96 CE betreffende elektrisch en elektronisch afval Infor meer bij uw gemeente of bij uw verkoper naar de dichtstbijzijnde inzamelplaats voor uw oude apparaten Storing In geval van ...

Page 3: ...tor in en uitschakelen Om de motor in te schakelen drukt u op toets De afzuigkap wordt altijd opgestart op de laatst gebruikte functie verlichting en of motor Uitschakelen met naloopstand Om de naloopstand in te stellen drukt u éénmaal op toets Het eerste indicatie lampje knippert de andere indicatie lampjes branden op de laatst ingestelde stand Na 30 minuten schakelen motor en verlichting automat...

Page 4: ...is bereikt Er zijn in totaal 10 code mogelijkheden fig 1 b Druk gelijktijdig op 0 I lampje van de afzuig kapbediening tot het tweede groene indicatie lampje pinkt figuur 2 c Druk binnen de 10 seconden op het verlich tingstoets van de afstandsbediening om de instellingen te bevestigen De afzuigkap en de afstandsbediening zijn nu op elkaar ingesteld figuur 3 Vervangen van de batterijen Voor de verva...

Page 5: ...m het aluminium vetfilter uit de afzuigkap Plaats het Monoblock recirculatiefilter in de voorziene opening in de afzuigkap Plaats het aluminium vetfilter terug en sluit de onderplaat Programmering deactiveren Let op dit is niet aan te bevelen bij een afzuigkap met recirculatie De en gelijktijdig gedurende 5 sec indrukken tot 3e groene led 3 x knippert Onderhoud van de afzuigkap aan de onder zijde ...

Page 6: ...en tot uit de houder 2 Haal de lamp naar boven 3 De sfeerverlichting bevat 4 lampen We adviseren om bij vervanging de lampen bij Novy te bestellen om kleur verschil te voorkomen Elektrische aansluiting De afzuigkap is voorzien van aansluitsnoer Vervanging van het aansluitsnoer dient steeds te gebeuren door een bekwame vakman Stroomsterkte en verbruik zijn aangegeven op het specificatieplaatje Afme...

Page 7: ...chets dénués de valeur Un retraitement adapté à l environnement peut permettre d en tirer des matières premières de valeur Cet appareil est labélisé conformément à la directive européenne 2002 96 CE sur les appareils électriques et électroniques usagés Pour connaître les circuits actuels d élimination adressez vous s v p à votre revendeur ou à l administration de votre commune En cas de problèmes ...

Page 8: ...re vitesse utilisée Arrêt avec permanence Actionnez la touche une fois un arrêt avec permanence est démarré La première diode clignote et les autres diodes sont allumés selon la vitesse du moteur Après 10 minutes le moteur et la lumière se coupent automatiquement Arrêt sans permanence Actionner 2 fois la touche le moteur et la lumière s arrêtent immédiatement Auto Stop Pour éviter que la hotte fon...

Page 9: ...e le code choisi Répétez cette étape jusqu à l affichage du code voulu il existe au total 10 possibilités de code figure 1 b Appuyez simultanément sur O I et sur la lampe témoin de la commande de la hotte jusqu à ce que la deuxième témoin de vitesse s allume figure 2 c Dans les 10 secondes qui suivent appuyez sur l icône d éclairage de la commande à distance pour confirmer les réglages La hotte et...

Page 10: ... cuisson Réinitialisation du témoin de nettoyage du filtre à recyclage La hotte moteur doit être allumée Appuyez simultanément sur et pendant 5 se condes le témoin rouge clignote 3 x pour confir mer Remise en place filtre à recyclage Monoblock Ouvrez la plaque de fond avec les deux mains et retirez le filtre à graisse en aluminium de la hotte Replacez le filtre à recyclage Monoblock dans l ouvertu...

Page 11: ...lacer une nouvelle lampe à l aide de la même ventouse L éclairage est constitué de lampes halogènes de 12V 20W Ø35 GU4 38 référence 7401 029 Les lampes de l éclairage d ambiance Dévisser les vises sur les dessus de la structure Ouvrir le couvercle à l aide de la ventouse fournie Tourner la lampe 1 La dégager de la douille 2 La sortir de son logement 3 L éclairage d ambiance comporte 4 lampes En ca...

Page 12: ...träglich und wieder verwertbar Bitte helfen Sie mit und entsorgen Sie die Verpackung umweltgerecht AltgerätesindkeinwertloserAbfall DurchumweltgerechteEntsorgungkönnenwertvolleRohstoffe wiedergewonnen werden Dieses Gerät ist entsprechend der europäischen Richtlinie 2002 96 EG über Elektro und Elektronik Altgeräte gekennzeichnet Über aktuelle Entsorgungswege informieren Sie sich bitte bei Ihrem Fac...

Page 13: ...e wie sie ausgeschaltet wurde Ausschalten mit Nachlaufzeit Nach einmaligem Drücken der Taste wird eine Nachlaufzeit von 10 Minuten gestartet die erste Anzeigelampe Geschwindigkeit blinkt und die andere Leuchtdioden leuchten je nachdem wieviele Stufen aktiviert sind Nach Ablauf von 10 Minuten werden Motor und Beleuchtung ausgeschaltet Ausschalten ohne Nachlaufzeit Wird die Taste zweimal gedrückt we...

Page 14: ...lautet Wiederholen Sie diesen Schritt bis Sie den gewünschten Code erreicht haben es gibt insgesamt 10 Code Möglichkeiten siehe Abbildung 1 b Drücken Sie gleichzeitig die 0 I Taste Lichttaste der Dunstabzugshaube bis die zweite grüne Anzeigelampe Geschwindigkeit blinkt siehe Abbildung 2 c Drücken Sie innerhalb von 10 Sekunden die Lichttaste der Fernbedienung um die Einstellung zu bestätigen Dunsta...

Page 15: ... entstehen In die sem Fall besteht die beste Lösung darin den Filter umgehend zu regenerieren Zurücksetzen der Reinigungsanzeige für den Umluftfilter Der Motor der Dunstabzugshaube muss eingeschaltet sein Drücken Sie und gleichzeitig 5 Sekunden lang Zur Bestätigung blinkt die rote Lampe 3 x Einsetzen des Monoblock Umluftfilters Öffnen Sie die Unterseite mit beiden Händen und nehmen Sie den Fettfil...

Page 16: ...em Lampentausch sonst kann es zu Schäden an den Transformatoren kommen Tauschen Sie die Röhren immer als Paar aus also beide 8W oder beide 21 W Röhren sonst kann es zu Schäden an den Transforma toren kommen Zum Wechseln des Leuchtmittels drehen Sie die Schrauben der Abdeckung heraus Klappen Sie mittels des mitgelieferten Saugnapfs die Abdeckung hoch und nehmen Sie sie ab Drehen Sie die Lampe mit e...

Page 17: ...aging in an environmen tally friendly manner Old appliances are not worthless rubbish Valuable raw materials can be reclaimed by recycling old appliances This appliance is identified according to the European Directive 2002 96 EC on waste electrical and electronic equipment Please ask your dealer or inquire at your local au thority about current means of disposal Technical problem In case of techn...

Page 18: ...always resume the level it was previously switched off in Switch off with 10 minute delay Press button once The first green speed indicator lamp blinks the other speed indicator lamp s remain lit up according to the level in use After 10 minutes motor and illumination switch off automatically Switch off without delay Push button twice Auto Stop To avoid that the hood will function during a too lon...

Page 19: ...hold refuse but they are to be handed in as chemical waste NOVY key You can switch on the ambient lighting using the NOVY key figure 5 Technical information Power supply 2xAAA batteries Frequence 433 92Mhz Numbre of codes 10 Worktemperature 0 50 C Dimensions 110 x 50 x 19mm 1 2 3 4 5 Maintenance Maintenance of the grease filter The hood contains one metal filter which should be cleaned twice a mon...

Page 20: ...sufficient fresh air in the room where the oven has been placed as smells can be released Smells can be released when baking certain kinds of fish The best solution for this is to immediately regenerate the filter Reset the Monoblock recirculation filter The cooker hood motor must be running Simultaneously press and for 5 sec until the red indicator lamp flashes 3 times for confirmation Place the ...

Page 21: ...out of the holder 2 Pull the lamp to the top 3 The atmospheric lighting contains four lamps When changing the lamps we advise you to order the new lamps with Novy in order to avoid difference in colour Electrical connection Electrical output electrical cord Changes or replacement of the electrical cord should be performed by a professional only Dimensions p 22 Electrical scheme p 23 ...

Page 22: ...22 Afmetingen Dimensions Abmessungen Dimensions 7510 7520 ...

Page 23: ...23 Elektrisch schema Schéma électrique Elektrischer Schaltplan Electrical scheme 7510 7520 ...

Page 24: ......

Page 25: ......

Page 26: ...éavis la construction et les prix de ses produits Die NOVY AG behält sich das Recht vor zu jeder Zeit und ohne Vorbehalt die Konstruktion und die Preise ihrer Produkte zu ändern NOVY nv Noordlaan 6 B 8520 KUURNE Tel 056 36 51 00 Fax 056 35 32 51 E mail novy novy be http www novy be France Tél 0320 940662 Deutschland und Österreich Tel 49 0 511 54 20 771 Nederland Tel 31 0 88 0119110 ref G7510 A ...

Page 27: ...areil correspond aux exigences techniques locales type de gaz tension fréquence conditions d installation conditions climatiques Les dégâts occasionnés par une utilisation non conforme ou adéquate et les adaptations nécessaires ou souhaités ne sont pas concernés par les conditions de la garantie Demande de réparation En cas de pièce défectueuse il convient de vous adresser à votre revendeur ou ins...

Page 28: ...tie hottes NOVY Garantie Zertifikat NOVY Dunsthauben Warrenty certificate NOVY hoods Naam Nom Name Name Adres Adresse Adresse Adress Faktuurdatum Date de facturation Datum der Rechnung Invoice Date Zie achterkant Voir au dos Sehen Sie die RuckSeite See back ...

Reviews: