background image

EN 20

Change in colour temperature with LED-lighting
First make sure that the power supply of the hood has 
been disconnected. Remove the plug from the hood or
switch off the power group.

The colour of the LED-lighting has been set to 2700K
(warm white) by default. If the colour is to be changed
to 4000K (neutral white), follow the instruction given
below:
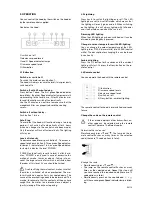
•  Open the bottom plate at the bottom of the hood.
•  Press with two hands against the side of the inox 

lamp holder and carefully pull down simultaneously, 
so you get access to the lighting on the inside.

•  The wiring has been connected to the LED-lamp 

with a connector.

•  Disconnect the connector from the LED-lamp and 

move the wiring to the other free connection on the 
lamp.


•  Repeat this for all four LED-lamps.
•  Then close the inox lamp holder again.

The colour of the LED-lighting has now been changed
from 2700K to 4000K. 

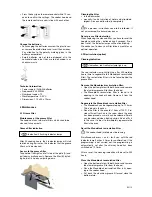
Lamps of the  ambient lighting
Unscrew the screws on top of the structure. Open the 
covers.

Turn the lamp a quarter (1). Push it to the front, until it 
comes out of the holder. (2). Pull the lamp to the top.(3)

4.3 Maintenance of the hood

 Never use aggressive, abrasive detergents or 

sponges.

 Do not use an abrasive or scourer.

Maintenance of the bottom side of the cookerhood
Please allow the lights to cool down sufficiently before 
cleaning the hood. Use a soft, wet cloth and a mild 
detergent to clean the hood.

Maintenance of the Solid Surface material
The housing is made from Solid Surface. Cleaning is 
done using a cloth or sponge moistened with a mild 
detergent. Then rub dry with a dry, soft cloth to avoid 
stains. 

4.4 Replacing the lamps

Replacing the cooking lighting
Please allow the lights to cool down sufficiently
before touching them. Cover and protect delicate
surfaces underneath the hood when changing
lamps. The hood needs to be disconnected from
the current before proceeding.

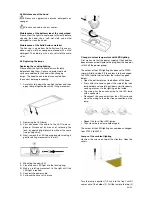
1.   Carefully slide down the spotlight holder and then 

open the spotlight holder with a tilting movement.

2.   Removing the LED lamp:
A.  First disconnect the cable to the LED to be re-

placed. Disconnect by means of releasing the 
lock, by applying light pressure while at the same 
time pulling away.

B.   Next, remove the LED to be replaced by making a 

gentle rotating movement to the left.

3.   Mounting the new LED:
A.   Place the new LED light into the locking ring.
B.  Make a rotating movement to the right until the 

LED light is locked.

C.   Connect the power cable.
D.   Put back the cover at its place.

Summary of Contents for 7510/16

Page 1: ...NL Gebruiksaanwijzing en installatievoorschriften p 2 FR Mode d emploi et d installation p 7 DE Montage und Bedienungsanleitung p 12 EN Operating and installation Instructions p 17 7510 16 7520 16 ...

Page 2: ...n op een aardleiding is aangesloten Gebruik geen verlengkabel voor de aansluiting op het elektrische net 2 2 Gebruik van het apparaat Flamberen onder de afzuigkap is in geen geval toegestaan Alleen onder voortdurend toezicht mag onder de af zuigkap gefrituurd worden In geval van brand schakel altijd uw afzuigkap uit Blus brandende vetten nooit met water maar dek de pan af met een passend deksel of...

Page 3: ... afkoeling zal de motor weer inschakelen Het vaststellen van de oververhitting is noodzakelijk Dit kan bijvoorbeeld zijn door vlam in de pan de waaier van de motor wordt geblokkeerd of er is een voorwerp in de uitblaasopening is gekomen waardoor deze gedeeltelijk of volledig is afgesloten 3 2 Verlichting Om de verlichting in of uit te schakelen drukt u op toets 6 De LED verlichting beschikt over e...

Page 4: ...ter in een oplossing van kokend water waaraan een ontvettend afwasmiddel is toegevoegd Spoel vervolgens de filters onder de kraan met warm water uit en laat ze daarna drogen Indien de bovenvermelde instructies niet worden uitgevoerd ontstaat er door een te sterke vervuiling kans op brandgevaar Reset reinigingsindicatie vetfilters Wanneer u de vetfilter terugplaatst na reiniging volstaat het om 5 s...

Page 5: ...e afkoelen 1 Schuif de spothouder voorzichtig naar beneden om vervolgens met een kantelbeweging de spothouder te openen 2 Uitnemen van de LED lamp A Ontkoppel eerst de kabel die naar de te vervangen LED loopt Het ontkoppelen gebeurt d m v het lossen van de vergrendeling door een lichte druk uit te oefenen en tegelijk los te trekken B Verwijder vervolgens de te vervangen LED door een zachte roteren...

Page 6: ... de Novy Klantendienst België Tel 056 36 51 02 Frankrijk Tel 03 20 94 06 62 Duitsland Tel 0511 54 20 771 Nederland Tel 088 0119110 Voor alle andere landen uw lokale installateur of Novy in België 32 0 56 36 51 02 Voor een goede en vlotte afhandeling is het noodzakelijk dat de Hersteldienst weet welk type apparaat u heeft Het typenummer vindt u op een sticker in de binnenzijde van de afzuigkap Deze...

Page 7: ... électrique n utilisez pas de rallonge 2 2 Utilisation de l appareil Ileststrictementinterditdeflambersouslahotte Ne jamais laisser votre friteuse sans surveillance En cas de feu éteindre la hotte Ne jamais éteindre des graisses ou huiles brûlantes avec de l eau Couvrez la casserole avec un co vercle ou une couverture humide Les enfants de moins de 8 ans les personnes à capacité physique ou mental...

Page 8: ...ent automatique veille à arrêter le moteur en cas de surchauffe Une fois refroidi le moteur se remet en marche Il est toutefois indispensable d identifier la cause de la sur chauffe Parmi les causes possibles on peut citer le dégagement d une flamme dans la casserole le blo cage du ventilateur du moteur ou la présence d un corps étranger dans la bouche de soufflage qui obs true totalement ou parti...

Page 9: ...pour ôter le filtre b tirer vers le bas sur la languette Nettoyage Dans le lave vaisselle Préparez dans l évier de l eau chaude additionnée d un détergent liquide Laissez tremper les filtres à graisses et nettoyez les pour en éliminer toutes les particules Rincer et controler la proprete par mirage a contre jour Egoutter secher et remettre en place Ne pas utiliser de poudre non dissoute Un filtre ...

Page 10: ...efroidir les lampes 1 Faites delicatement coulisser le support despots vers le bas pour pouvoir ensuite l ouvrir avec un mouvement de basculement 2 Pour retirer la lampe LED A Débranchez d abord le câble qui alimente la LED à remplacer Pour ce faire détachez le verrouillage en y exerçant une légère pression tout en tirant B Retirez ensuite la LED à remplacer en effectuant en douceur un mouvement d...

Page 11: ...ute difference de teinte 4 4 Service En cas de problemes techniques n hesitez pas a contacter notre Service de reparation Belgique Tel 056 36 51 02 La France Tel 03 20 94 06 62 L Allemagne Tel 0511 54 20 771 Pour les autres Pays votre installateur local ou Novy en Belgique 32 0 56 36 51 02 Pour une intervention rapide il est necessaire de communiquer le numero de type de l appareil figu rant sur l...

Page 12: ... Gerät darf nicht abgeändert werden Die Sicherheit ist nur gewährleistet wenn das Gerät mit einem Schutzleiter verbunden ist der den gülti gen Vorschriften entspricht Der Anschluss des Gerätes an das Elektronetz darf nicht über ein Verlängerungskabel erfolgen 2 2 Allgemeine Sicherheits Hinweise Bitte flambieren Sie nicht unter der Dunsthaube Fritieren Sie nur unter Aufsicht Bei einem eventuellen F...

Page 13: ...ufe stellt sich nach 6 Min automatisch zurück auf Stufe 3 Ein automatischer Thermokontakt sorgt dafür dass der Motor bei Überhitzung ausgeschaltet wird Wenn der Motor sich ausreichend abgekühlt hat wird er wieder eingeschaltet Allerdings sollte der Grund für die Überhitzung ermittelt werden Dies kann zum Bei spiel eine Flamme im Topf sein eine Blockierung des Motorventilators oder ein Gegenstand d...

Page 14: ...ausziehen Reinigung Fettfilters Sie können die Fettfilter in der Geschirrspülmaschi ne reinigen Oder die Filter in heißem Wasser mit fettlösendem Reinigungsmittel säubern Wenn die oben genannten Anweisungen nicht be folgt werden kann es aufgrund einer zu starken Ver schmutzung zu Brandgefahr und Leistungsverlusten kommen Reset Fettfiltersättigungsanzeige Nach dem Reinigen und Trocknen wird der Fil...

Page 15: ...uhlen lassen Vor Wartungsarbeiten an der Dunstabzugshaube is diese spannungslos zu ma chen 1 Schieben Sie die Halterung des Strahlers vorsichtig nach unten um anschliesend ihn mit einer Kippbe wegung zu offnen 2 Herausnehmen der LED Lampe A Losen Sie zunachst das Kabel das zu der auszu wechselnden LED fuhrt Losen Sie hierfur die Verrie gelung indem Sie einen leichten Druck ausuben und gleichzeitig...

Page 16: ... Lampe heraus 3 Tauschen Sie sie gegen eine neue aus Die Stimmungsbeleuchtung beinhaltet 4 Lampen Wenn die Lampen ausgewechselt werden müssen empfehlen wir Ihnen die neuen Lampen bei Novy zu bestellen um Farbunterschiede zu vermeiden 4 4 Kundendienst Bei technischen Mängeln können Sie den Kunden dienst des für Sie zuständigen Landes kontaktieren Belgien Tel 056 36 51 02 Frankreich Tel 03 20 94 06 ...

Page 17: ...ot use any extension cable to connect it 2 2 Using the appliance Under no circumstances is it allowed to flambé under the hood Deep frying under the hood is only allowed under constant supervision In case of fire always switch off the hood Never extinguish burning fat or oil with water Cover the pot with a well fitting lid or a burnblanket This appliance can be used by children aged from 8 years a...

Page 18: ...wn The cause of the overheating needs to be determined This may be for example that the contents of the pan have caught fire the motor fan is blocked or an object is partly closing off the exhaust opening 3 2 Lightning Press key 6 to switch the lighting on or off The LED lighting has a soft on soft off mode which means that the lighting will evenly go on and off When switching on the lighting this...

Page 19: ...ou don t reset the indicator lamps will continu blinking We advise you to clean your filter twice a month for an optimal operation 4 2 Recirculation option Cleaning indication Indication red Lindicator lamp lights up The red indicator lamp will light up after 200 working hours time to regenerate the Monoblock recirculation filter The recirculation filter is to be found behind the grease filter Rem...

Page 20: ...ive abrasive detergents or sponges Do not use an abrasive or scourer Maintenance of the bottom side of the cookerhood Please allow the lights to cool down sufficiently before cleaning the hood Use a soft wet cloth and a mild detergent to clean the hood Maintenance of the Solid Surface material The housing is made from Solid Surface Cleaning is done using a cloth or sponge moistened with a mild det...

Page 21: ...ms please contact Novy Service Department For Belgium Tel 056 36 51 02 For France Tel 03 20 94 06 62 For Germany Tel 0511 54 20 771 For all other countries your local installor or Novy Bel gium 32 0 56 36 51 02 Please supply us with the model number of your hood The model number can be found on the engra ved plaque behind the filter You can make a note of the number here Dimensions p 22 Electrical...

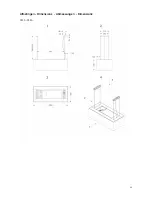
Page 22: ...22 Afmetingen Dimensions Abmessungen Dimensions 7510 7520 ...

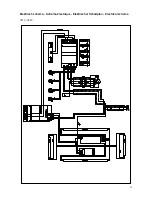
Page 23: ...23 Elektrisch schema Schéma électrique Elektrischer Schaltplan Electrical scheme 7510 7520 ...

Page 24: ......

Page 25: ......

Page 26: ...préavis la construction et les prix de ses produits Die NOVY AG behält sich das Recht vor zu jeder Zeit und ohne Vorbehalt die Konstruktion und die Preise ihrer Produkte zu ändern NOVY nv Noordlaan 6 B 8520 KUURNE Tel 056 36 51 00 Fax 056 35 32 51 E mail novy novy be http www novy be France Tél 0320 940662 Deutschland und Österreich Tel 49 0 511 54 20 771 Nederland Tel 31 0 88 0119110 G7510 C ...

Page 27: ...areil correspond aux exigences techniques locales type de gaz tension fréquence conditions d installation conditions climatiques Les dégâts occasionnés par une utilisation non conforme ou adéquate et les adaptations nécessaires ou souhaités ne sont pas concernés par les conditions de la garantie Demande de réparation En cas de pièce défectueuse il convient de vous adresser à votre revendeur ou ins...

Page 28: ...n België Les conditions de garantie en Belgique Die Garantiebedingungen in Belgien p 2 4 Les conditions de garantie en France p 5 Für Garantiebedingungen in Deutschland For all other countries Naam Nom Name Name Adres Adresse Adresse Adress Faktuurdatum Date de facturation Datum der Rechnung Invoice Date Zie achterkant Voir au dos Sehen Sie die RuckSeite See back ...

Reviews: