background image

CARE OF THE PARACHUTE 


Parachutes are simultaneously very rugged and quite delicate.  They are life saving pieces of 
equipment and should be treated with care.  Parachutes are made of nylon, a very strong and 
durable material, but even nylon has enemies.  Most acids will destroy nylon and ultra-violet 
light from the sun weakens nylon over time.  This is a surface effect so that the thicker 
materials (webbing or pack fabric) are not seriously affected, but canopy cloth is very 
vulnerable.  If your National 360, 425 or 490 parachute is opened, avoid continued exposure 
to direct sunlight.  Grease and oil will not damage the nylon but can stick the canopy fabric 
together, preventing it from functioning properly. Excessive moisture should be avoided; if the 
canopy becomes wet or damp, it should be aired and repacked.  If your National 360, 425 or 
490 parachute is opened or used, it should be taken to a Certified Parachute Rigger, 
Parachute Loft or returned to the Manufacturer, for inspection and repack. 


INSPECTION OF THE PARACHUTE 


Canopy Check:  Inspect fabric for stains, cuts and tears.  Check all stitching and accomplish 
all repairs as per Mil-P-6645 or use best practice.  Contact the Manufacturer if in doubt. 
 
Pilot Chute:  Inspect fabric and mesh for stains, cuts and tears.  Check the spring for 
damage.  Inspect the pilot chute bridle for cuts or burns.  Check stitching.  Repair or replace 
as required. 
 
Harness:  Check harness for cuts, abrasions, and excessive wear.  Inspect all hardware for 
proper function.  Check all stitching. 
 
Container:  Inspect for cuts, holes and stains.  Tears under one inch may be patched.  Use 
best practice.  Damage to stiffeners or webbing shall be cause for assembly replacement. 


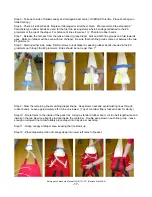
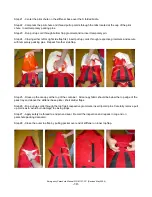
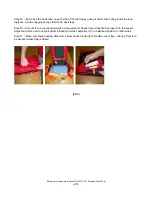
PACKING THE PARACHUTE 


The Federal Aviation Administration (USA) specifies that Emergency Parachutes are to be 
repacked every 120 days* by a Certified Parachute Rigger that is properly rated for the type 
of parachute to be packed.  All necessary tools and equipment must be available in the 
packing facility.  After recording all pertinent data on the parachute, proceed to the following 
packing steps. 
 

*The repack cycle may vary in other countries; see “REPACK SCHEDULE” on previous page. 


Emergency Parachute Manual P/N 81101-2P  (Revised May 2004) 

- 15 - 


Summary of Contents for NATIONAL 360

Page 1: ...t Flemington New Jersey 08822 USA PH 908 782 1646 FAX 908 782 5638 E mail info nationalparachute com Emergency Parachute Manual NATIONAL 360 NATIONAL 425 NATIONAL 490 TSO C23b NATIONAL Your One Last C...

Page 2: ...ither expressed or implied statutory by operation of law or otherwise beyond that expressed herein Parachute equipment is sold with all faults and without any warranty of merchantability or fitness fo...

Page 3: ...ng The Parachute 8 9 Floating Harness Adjustment 10 Operating Instructions 11 Parachute Steering 12 Landing Procedures 13 Hazard Landings 13 14 Care Of Parachute 14 Repack Schedule 14 Care Of The Para...

Page 4: ...LLUSTRATIONS NATIONAL BACK PARACHUTE NATIONAL SEAT PARACHUTE NATIONAL CHAIR PARACHUTE N 360 N 425 N 490 N 360 S N 425 S N 490 S N 360 C N 425 C N 490 C Emergency Parachute Manual P N 81101 2P Revised...

Page 5: ...cket z z lements Included as applicable z e above explanation z z acks Maintenance etc N your new parachute system please check the following pocket under the National monogram on inboard side of righ...

Page 6: ...gravity does normally Features and Options Prevents parachute from lifting or shifting Attached to base bottom of parachute Improves seating comfort Leg strap integrated Custom options available 5 YE...

Page 7: ...arieties In a high air speed The question some pilots now ask is what will happen if I bail out and open the parachute at 200 knots The answer is can not predict the results Although testing requires...

Page 8: ...81101 24 Pilot Chute Bridle 1 Square Weave Nylon Mil T 5038 finished to a length of 54 0 81101 27A Ripcord Housing 21 0 O A length 81101 27B Ripcord Housing 24 0 O A length 81101 28A Locking Loop Con...

Page 9: ...trap and two leg straps There are three choices of hardware 1 Thread Through TT 2 Regular Snaps B 12 3 Quick Ejector Snaps QE To don the harness with 1 TT hardware is the simplest and lightest but req...

Page 10: ...maximum comfort for an actual use insert index finger between back of leg strap webbing and upper end of leg pad to un mate the Velcro Slide pad so the end is positioned near the leg strap hardware an...

Page 11: ...layers of side strap webbing On the back of the MLW beneath your ripcord handle is a strip of Velcro Loop On the inside of the side strap is a strip of Velcro Hook When these two pieces of Velcro are...

Page 12: ...and chair parachutes and an up ward stroke for seat parachute See drawings below BACK CHAIR PARACHUTES SEAT PARACHUTE The parachute will normally open fully within 3 seconds of activation If an emerge...

Page 13: ...hute can be turned to the right by pulling down the right rear riser 6 to 12 the same applies for a left turn A rear riser can most effectively be pulled down by placing fingers between suspension lin...

Page 14: ...end under the parachute this allows for faster parachute egress after landing Turn the parachute to face into the wind as normal in case you are dragged by brisk winds it is better to be face up than...

Page 15: ...d be taped or covered to prevent wear on the parachute container Be sure that the parachute does not come in contact with water oils acids grease or dirt When in doubt consult your nearest parachute r...

Page 16: ...E PARACHUTE Canopy Check Inspect fabric for stains cuts and tears Check all stitching and accomplish all repairs as per Mil P 6645 or use best practice Contact the Manufacturer if in doubt Pilot Chute...

Page 17: ...PICTURES IN SEQUENCE Step 1 Place canopy on packing table and apply tension Verify that canopy is not inverted check suspension line continuity and align the apex band Verify that all inspections are...

Page 18: ...e make first two stows to lock diaper by passing rubber bands inserted in the 0 grommets up through the 2 grommets Bites should be no longer then 1 Step 9 Stow the remaining lines matching diaper shap...

Page 19: ...ld will also be slightly fanned out to reduce bulk and should be placed on top of all the tep 20 S fold the bridle between the grommets on the stiffener base Thread the pull up cords through the use o...

Page 20: ...ripcord pins Carefully remove pull p cords as to avoid burn damage to closing loops Record the inspection and repack in Log and on arachute packing data card p by pulling pocket over end of stiffener...

Page 21: ...l your packing tools and equipment Check ripcord handle for proper fit in the pocket tep 31 Place parachute packing data card in stow pocket under right shoulder cover flap Orange flag is to END S fas...

Reviews: