background image

OPERATING LIMITATIONS 


Recommended minimum deployment height:  500 ft AGL                  


Pilot weight range: 100 lb (45 kg) to 241 lb (109 kg)                 


Stability:   +/- 5 degrees from vertical at gross weight                  


Normal altitude loss during opening:  200 - 300 ft.             


Ripcord pull force:  22 pounds maximum                  


Forward drive:  3 - 10 mph (depending upon weight)                  


Steerability:  360 degrees in 8-10 seconds at gross weight                  


Opening time:  3 seconds is normal (varies with airspeed) 


To maintain performance level, the following relationships are recommended: 


Up to 177 lbs. pilot weight - National 360 with 24' Canopy 


Up to 208 lbs. pilot weight - National 425 with 26' Canopy 


Up to 241 lbs. pilot weight - National 490 with 28' Canopy 


FITTING OF THE PARACHUTE 

 
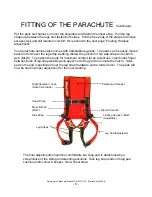
The National Parachute Harness has three primary hardware adjustments, one chest strap 
and two leg straps.  There are three choices of hardware:  
 

1.  Thread-Through (TT)  ……………… 


2. Regular Snaps (B-12)  ……………… 


3. Quick Ejector Snaps (QE)  …………. 

 
To don the harness with:  1) TT hardware is 

the simplest and lightest but 

requires the webbing be threaded / unthreaded from the hardware.  This is mandatory for the 
chest strap, the leg straps may be operated the same way OR the webbing adjustment may 
be extended to the maximum (folded web ends hits TT) allowing to step in / out of leg straps. 
(Cons – It can be cumbersome to operate.)  2) B-12 snaps simply hook to the mating V-ring.  
To release the B-12 the guard is squeezed open to unhook from the V-ring. (Cons - Some 
slack is required to unhook.)  3) QE snaps hook on as the B-12 and have a built in lever to 
eject the V-ring which can be accomplished under moderate tension.  It is easier and quicker 
to get out of the harness with QE snaps. (Cons - QE snaps cost more and may require 
maintenance.) 

Emergency Parachute Manual P/N 81101-2P  (Revised May 2004) 

- 8 - 


Summary of Contents for NATIONAL 360

Page 1: ...t Flemington New Jersey 08822 USA PH 908 782 1646 FAX 908 782 5638 E mail info nationalparachute com Emergency Parachute Manual NATIONAL 360 NATIONAL 425 NATIONAL 490 TSO C23b NATIONAL Your One Last C...

Page 2: ...ither expressed or implied statutory by operation of law or otherwise beyond that expressed herein Parachute equipment is sold with all faults and without any warranty of merchantability or fitness fo...

Page 3: ...ng The Parachute 8 9 Floating Harness Adjustment 10 Operating Instructions 11 Parachute Steering 12 Landing Procedures 13 Hazard Landings 13 14 Care Of Parachute 14 Repack Schedule 14 Care Of The Para...

Page 4: ...LLUSTRATIONS NATIONAL BACK PARACHUTE NATIONAL SEAT PARACHUTE NATIONAL CHAIR PARACHUTE N 360 N 425 N 490 N 360 S N 425 S N 490 S N 360 C N 425 C N 490 C Emergency Parachute Manual P N 81101 2P Revised...

Page 5: ...cket z z lements Included as applicable z e above explanation z z acks Maintenance etc N your new parachute system please check the following pocket under the National monogram on inboard side of righ...

Page 6: ...gravity does normally Features and Options Prevents parachute from lifting or shifting Attached to base bottom of parachute Improves seating comfort Leg strap integrated Custom options available 5 YE...

Page 7: ...arieties In a high air speed The question some pilots now ask is what will happen if I bail out and open the parachute at 200 knots The answer is can not predict the results Although testing requires...

Page 8: ...81101 24 Pilot Chute Bridle 1 Square Weave Nylon Mil T 5038 finished to a length of 54 0 81101 27A Ripcord Housing 21 0 O A length 81101 27B Ripcord Housing 24 0 O A length 81101 28A Locking Loop Con...

Page 9: ...trap and two leg straps There are three choices of hardware 1 Thread Through TT 2 Regular Snaps B 12 3 Quick Ejector Snaps QE To don the harness with 1 TT hardware is the simplest and lightest but req...

Page 10: ...maximum comfort for an actual use insert index finger between back of leg strap webbing and upper end of leg pad to un mate the Velcro Slide pad so the end is positioned near the leg strap hardware an...

Page 11: ...layers of side strap webbing On the back of the MLW beneath your ripcord handle is a strip of Velcro Loop On the inside of the side strap is a strip of Velcro Hook When these two pieces of Velcro are...

Page 12: ...and chair parachutes and an up ward stroke for seat parachute See drawings below BACK CHAIR PARACHUTES SEAT PARACHUTE The parachute will normally open fully within 3 seconds of activation If an emerge...

Page 13: ...hute can be turned to the right by pulling down the right rear riser 6 to 12 the same applies for a left turn A rear riser can most effectively be pulled down by placing fingers between suspension lin...

Page 14: ...end under the parachute this allows for faster parachute egress after landing Turn the parachute to face into the wind as normal in case you are dragged by brisk winds it is better to be face up than...

Page 15: ...d be taped or covered to prevent wear on the parachute container Be sure that the parachute does not come in contact with water oils acids grease or dirt When in doubt consult your nearest parachute r...

Page 16: ...E PARACHUTE Canopy Check Inspect fabric for stains cuts and tears Check all stitching and accomplish all repairs as per Mil P 6645 or use best practice Contact the Manufacturer if in doubt Pilot Chute...

Page 17: ...PICTURES IN SEQUENCE Step 1 Place canopy on packing table and apply tension Verify that canopy is not inverted check suspension line continuity and align the apex band Verify that all inspections are...

Page 18: ...e make first two stows to lock diaper by passing rubber bands inserted in the 0 grommets up through the 2 grommets Bites should be no longer then 1 Step 9 Stow the remaining lines matching diaper shap...

Page 19: ...ld will also be slightly fanned out to reduce bulk and should be placed on top of all the tep 20 S fold the bridle between the grommets on the stiffener base Thread the pull up cords through the use o...

Page 20: ...ripcord pins Carefully remove pull p cords as to avoid burn damage to closing loops Record the inspection and repack in Log and on arachute packing data card p by pulling pocket over end of stiffener...

Page 21: ...l your packing tools and equipment Check ripcord handle for proper fit in the pocket tep 31 Place parachute packing data card in stow pocket under right shoulder cover flap Orange flag is to END S fas...

Reviews: