SymphoniePRO User Manual
Rev. 8
support@nrgsystems.com | Page 166
11 January 2018
APPENDIX G | GROUNDING & LIGHTNING PROTECTION
Meteorological sensors, loggers, and towers accumulate static electrical charge unless they are properly
grounded. High winds, low humidity, and the height of the tower above ground increase the rate of charge
accumulation. Charge continues to accumulate until the developed voltage difference, sometimes thousands of
volts relative to ground, causes dielectric breakdown and an electrostatic discharge (ESD). ESD will damage any
scientific instrument or sensor, including NRG loggers, NRG 40C anemometers, or NRG 200P wind vanes. By
attaching an NRG logger or other instrument to a properly grounded TallTower™, and sensors to the logger, the
logger and sensors will also be electrically grounded.
Note - Properly grounding your system helps protect your sensors, your wind measurement instruments, and
your wind data! It is your responsibility to provide proper earth grounding for the tower, logger, and sensors. All
warranties on NRG instruments and sensors are voided if your system is not properly grounded.
For many sites, the NRG grounding kit provides all the needed parts to earth ground your TallTower™ and
instrumentation. The grounding kit includes a copper-clad lightning spike, copper ground wire, and two copper
clad ground rods. Determine the soil type and classify its resistivity. The lower the resistivity, the better the
earth ground.
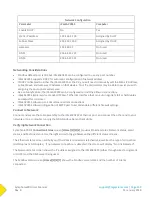
Soil Type
Average Soil Resistivity per cm (Ohms-cm)
1. Ashes, cinders, brine, waste
2370
2. Clay, shale, gumbo, loam
4060
3. Same, with varying proportions of sand and gravel
15800
4. Gravel, sand, stones with little clay or loam
94000
The grounding kit will perform adequately in type 1 and 2 soils. For other soil types, or for sites with a high
incidence of lightning, you will need to augment the earth grounding system. Consult NRG for more information.
Installation
The grounding kit is usually installed before the sensors and sensor cabling in a new installation, but may also be
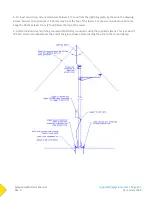
retro-fitted to an existing tower installation. Refer to the drawing on the next page. To install the grounding kit:
1. Drive the two ground rods through the holes provided in the TallTower™ baseplate when laying out the
tower. Leave enough of each rods above the baseplate to attach the ground wires.
2. Raise the TallTower™ slightly off the ground. Attach the top end of the copper ground wire to the lightning
spike using one of the supplied ground clamps. Mount the lightning spike to the tower using the two supplied
stainless steel band clamps.
3. Unwind the ground wire to the base of the tower, wrapping the wire around the tower in a downward spiral,1
turn every 6 meters (20 feet) as shown in the figure. Tape the wire securely to the tower every 1 to 2 meters (3
to 6 feet) to prevent the wire being damaged by wind motion or icing.
Summary of Contents for SymphoniePRO
Page 1: ......
Page 74: ...SymphoniePRO User Manual Rev 8 support nrgsystems com Page 74 11 January 2018 ...
Page 76: ...SymphoniePRO User Manual Rev 8 support nrgsystems com Page 76 11 January 2018 ...
Page 77: ...SymphoniePRO User Manual Rev 8 support nrgsystems com Page 77 11 January 2018 ...
Page 78: ...SymphoniePRO User Manual Rev 8 support nrgsystems com Page 78 11 January 2018 ...
Page 134: ...SymphoniePRO User Manual Rev 8 support nrgsystems com Page 134 11 January 2018 ...
Page 137: ...SymphoniePRO User Manual Rev 8 support nrgsystems com Page 137 11 January 2018 ...
Page 139: ...SymphoniePRO User Manual Rev 8 support nrgsystems com Page 139 11 January 2018 ...
Page 142: ...SymphoniePRO User Manual Rev 8 support nrgsystems com Page 142 11 January 2018 ...

