www.nationalrailwaysupply.com
1-800-357-3572
2
38934B
3. THEORY OF OPERATION
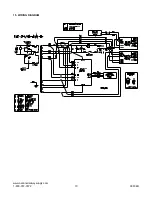
When the charger is connected to the desired AC
voltage source (115 or 230), the transformer creates
auxiliary voltages for the electronic control module.
The electronic control module controls and monitors
the charger so it will perform properly. The
transformer also supplies the power output used for
charging the batteries and provides electrical
isolation between the charger's output and the AC
source.
The charger's output current flows through a shunt
and is sensed by the electronic control module along
with the charger's output voltage. These values are
converted into drive pulses for the SCRs by the
control module. This pulsating charge current (a
pulse occurs each time an SCR is on) is then filtered
by a large capacitor and the batteries to provide a
smooth output.
The charger is an "IE" profile which is: (a) High rate
constant current, and (b) Constant voltage. When
the charger is first started, the SCRs will conduct for
a certain portion of the sinusoidal anode voltage to
provide the required charging current at the low level
of battery voltage. In this start region, a constant 30-
amp current is applied to the battery. The SCR
conduction will then increase as the battery voltage
increases in order to provide a higher output voltage
while maintaining a constant charging current.
When the battery voltage reaches the float voltage
(the voltage set with the switches), the SCRs will
start to decrease their output. This causes the
charger to automatically change from a constant
current charge region to a constant voltage charge
region. As the batteries become fully charged, the
output current decreases. A continuous constant
float voltage will be supplied to the batteries to
maintain their charge.
Another feature of the charger is temperature
compensation, which keeps the batteries from
getting under- or over-charged. TEMPERATURE
COMPENSATION ONLY OCCURS WHEN USING
A TEMPERATURE PROBE. The red LED on the
front of the charger will be off when using a
functional temperature probe. If the LED is on,
either a temperature probe is not being used, or the
temperature probe is working improperly.
Temperature compensation uses a temperature
reference of 77
°
F (25
°
C), a voltage reference of 2.23
volts (the voltage of a standard gel-cell battery at
77
°
F), and a compensation value of 3.0 mV per
°
F,
or 5.4 mV per °C. The equivalent equation for the
compensated voltage is:
Vcomp = V – k (t - 77
°
F)
Where V is the voltage of the battery at 77
°
F, t is
the temperature in
°
F, and k = V (.003 / 2.23).
The
control
module
has
a
temperature
compensation range between 32°F and 95°F (0°C
and 35°C) that does not allow charger voltage to
increase or decrease beyond the calculated values.
Example 1:
If a 26.8 volt battery is charging and the
temperature increases to 95
°
F, then the output
voltage decreases to 26.1 volts.
26.8 - .036 (95
°
F - 77
°
F) = 26.1
Example 2:
If a 29.00 volt battery is charging and the
temperature increases to 95
°
F, then the output
voltage decreases to 28.3 volts.
29.00 - .039 (95
°
F - 77
°
F) = 28.3
Example 3:
If 35.0 volt batteries are charging and the
temperature decreases to 32
°
F, the output voltage
increases to 37.1 volts.
35.0 - .047 (32
°
F - 77
°
F) = 37.1
4. RECEIVING AND INSTALLING THE
CHARGER
Proper installation of the charger is important in
order to achieve good charger performance and to
prevent damage to the charger and batteries. When
a charger is received, a check for possible in-transit
damage should be made. If any damage is found, it
should be reported as a claim to the carrier. To
permit free air flow for convention cooling, allow two
inches (2") minimum between the charger sides and
other equipment and four inches (4") minimum on
top of the charger.
WARNING: NEVER PLACE ANYTHING ON
TOP OF THE CHARGER WHILE OPERATING.
DAMAGE TO THE CHARGER OR BATTERIES
COULD OCCUR.
WARNING: THE CHARGER MUST BE SET
UP FOR THE PROPER USER SPECIFICATIONS
BEFORE STARTING THE INITIAL CHARGE.
The charger can be mounted on a shelf, countertop,
floor, wall, or relay rack. The charger case includes
four (4) cushioned feet that are designed to prevent
marring of mounting surface and to absorb vibration.
The case has built-in rear mounting flanges at the
rear for wall and rack mounting.
Wall mounting
The mounting flanges each have two (2) keyhole
slots. These are designed to conveniently engage a
¼” (6mm) diameter bolt. The dimensions are pattern
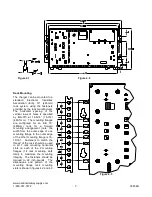
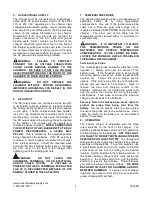
of mounting flange keyhole slots is shown in Figures
4.1 & 4.2


