background image

MODEL#: 

E500T

The E500T is an ON delay timer which allows for a set time interval to elapse before the load connected to the timer is powered ON. An external maintained contact switch (by others) is used to start the 

delay time. Once turned ON, the load will remain on until the external switch is opened.
It has an adjustable rotary dial which contains 32 precisely defined positions, allowing for interval durations from five (5) seconds minimum to 3 hours maximum. Continuous ON and continuous OFF 

settings are included.

POWER 

REQUIREMENTS:

Input: 120 and 240 VAC (+10% -15% at 60 Hz).  

Outputs: SPDT relay with 20 Amp N.O. and 10 Amp N.C. general purpose at 120,240 VAC; N.O. 1 HP at 120 VAC, 2HP at 240 VAC

ENVIRONMENTAL:

Operating Temperature Range: 32°F to 122°F (0°C to 50°C). Operating Humidity Range: Relative humidity up to 100%

Water Resistance: The control will be capable of direct low-pressure water wash down according to NEMA 4X specification.

CONTACT 

RATING:

ENCLOSURE:

NEMA type 4X (indoor use only) enclosure standard (E500T). Watertight cover with gasket - flame retardant UV stabilized & non-metallic. In grey.

MOUNTING:

Control is compatible for mounting to Tork’s NEMA 4X nonmetallic enclosure.

DIALS:

Sealed from external access

MAINTENANCE:

Cleaning: Use only mild detergent and water to clean the enclosure

INSTALLATION & WIRING INSTRUCTIONS

Note: 

Wiring connections are made to a six-position terminal block. 

All terminals accept AWG #18 to AWG #12 wire. 

1. Turn off all power to the timer circuit at the distribution panel before 

beginning the installation. 

2. The E500T box contains knockouts on two sides. Determine the most 

convenient way to mount the box to the conduit and remove the appropri-

ate knockout. To secure the box to a fixed location, use at least two of the 

four box mounting knockouts located on the back of the box. 

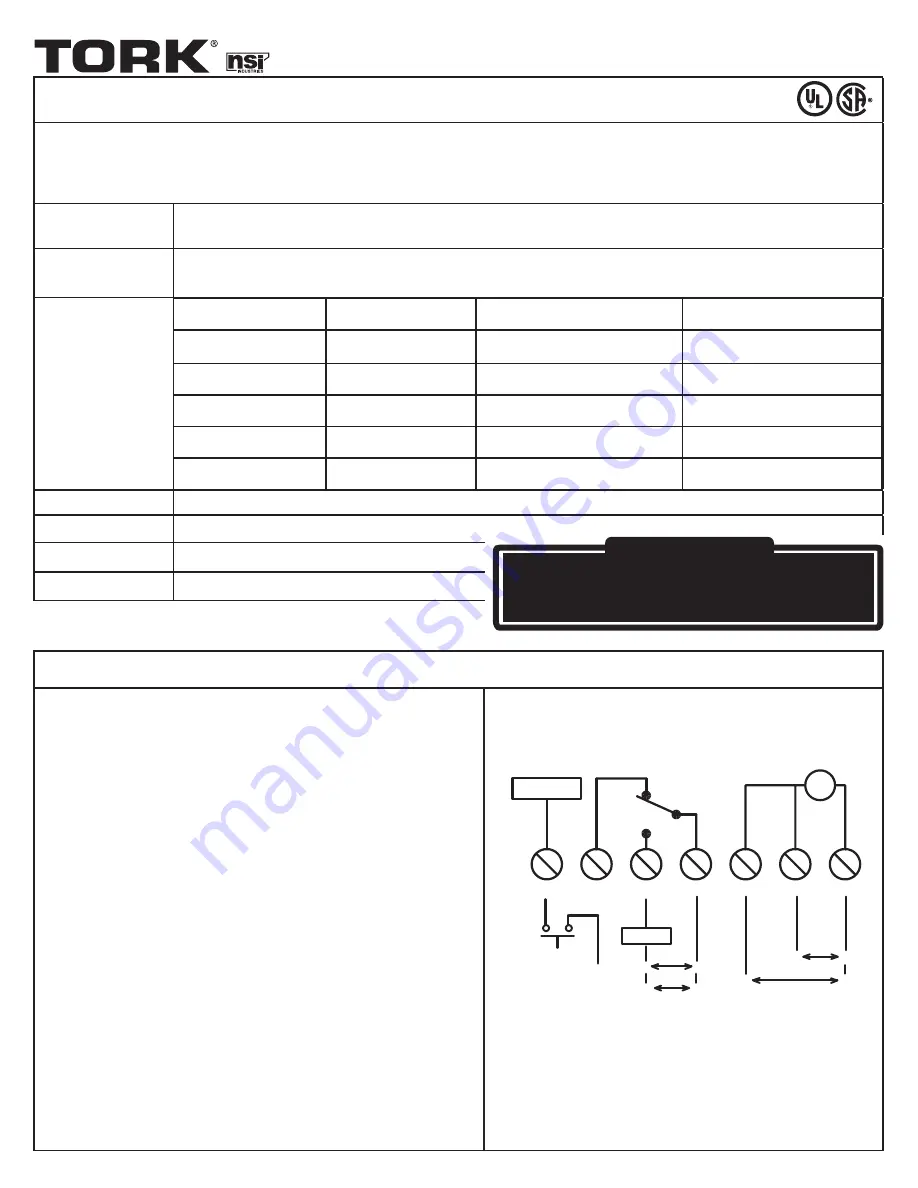
3. Wire timer for either 120 VAC or 240 VAC as shown by the wiring dia-

gram. Wire the load to the timer as shown in the wiring diagram, noting 

the contact load type and ratings shown.

4. Connect external trigger contacts to the timer as shown in the wiring 

diagram.

5. Securely attach the timer to Tork’s NEMA 4X (for indoor use only) non-

metallic enclosure with the included screws

ON DELAY TIMER

VOLTAGE

LOAD TYPE

N.O. CONTACTS

N.C. CONTACTS

120-240 VAC

Resistive 

20 A

10 A

120-240 VAC

General Purpose

20 A

10 A

120 VAC

Motor

1 HP

¼ HP

208-240 VAC

Motor

2 HP

½ HP

120-240 VAC

Pilot Duty

470 VA

275 VA

TRIGGER

T

LOAD

START

NC

NO

COM

240V/L1

120V NEUT/L2

120V

L

N

FOR 240V

L2

L1

EXTERNAL

TRIGGER

(CONTACTS)

SPDT

120V

L

N

L1

L2

FOR 240V

APPLY ONLY ONE VOLTAGE

FOR 120V

(L)

FOR 240V

(L1)

! CAUTION !

RISK OF ELECTRIC SHOCK

Disconnect power at main panel prior to installing 

or servicing this lighting control or the equipment connected to it. 

Summary of Contents for TORK E500T

Page 1: ...FOR TECHNICAL SUPPORT SOUTIEN TECHNIQUE PARA COMUNICARSE CON EL SERVICIO TÉCNICO techsupport nsiindustries com 888 500 4598 ...

Page 2: ...E500T ON DELAY TIMER INSTRUCTIONS ...

Page 3: ...r to clean the enclosure INSTALLATION WIRING INSTRUCTIONS Note Wiring connections are made to a six position terminal block All terminals accept AWG 18 to AWG 12 wire 1 Turn off all power to the timer circuit at the distribution panel before beginning the installation 2 The E500T box contains knockouts on two sides Determine the most convenient way to mount the box to the conduit and remove the ap...

Page 4: ...contact is ON the load connected to the normally closed contact is OFF When the load that is connected to the normally open relay contact is OFF the load that is connected to the normally closed contact is ON PROGRAMMING OPERATING THE TIMER OPERATING PARAMETERS The control relay will be energized continuously if the time interval dial is turned to ON The control relay will be de energized continuo...

Page 5: ...G 12 1 Avant de commencer l installation coupez complètement l alimentation du circuit de la minuterie à partir du panneau de distribution 2 Des pastilles défonçables se trouvent des deux côtés du boîtier de la mi nuterie E500T Déterminez la manière la plus pratique d installer le boîtier sur le conduit puis retirez la pastille défonçable appropriée Pour fixer le boîtier à un emplacement précis ut...

Page 6: ...branchée sur le contact de relais normalement fermé est à OFF arrêt Lorsque la charge raccordée au contact de relais normalement ouvert est à OFF arrêt celle qui est branchée sur le contact de relais normalement fermé est à ON marche PROGRAMMATION ET FONCTIONNEMENT DE LA MINUTERIE PARAMÈTRES OPÉRATIONNELS Le relais de commande sera sous tension de manière continue si le cadran de sélection de l in...

Page 7: ...cte por completo la alimentación al circuito del temporizador en el panel de distribución antes de comenzar con la instalación 2 La caja del E500T contiene orificios en ambos lados Determine la forma más conveniente para montar la caja al conducto y retire el orificio apro piado Para asegurar la caja a una ubicación fija utilice al menos dos de los orificios de montaje ubicados en la parte posteri...

Page 8: ...secundaria en intervalos de tiempo opuestos de la carga principal la carga controlada por el contacto normalmente abierto Cuando se activa la carga conectada al contacto del relé normalmente abierto se desactiva la carga conectada al contacto normalmente cerrado Cuando se desactiva la carga conectada al contacto del relé normalmente abierto se activa la carga conectada al contacto normalmente cerr...

Reviews: