background image


Page 14 


FIGURE 6 –

 Cleaning


Summary of Contents for 0010-1

Page 1: ...thoroughly for assembly instructions safe operation tool handling tool capability information and all other precautions before using the tool Keep this manual in a place where operators can access it...

Page 2: ...d Accessories 4 Tools Needed for Assembly 4 Assembling the Seam Phantom 5 Adjusting the Seam Phantom 7 USE INSTRUCTIONS 8 Before Using the Seam Phantom 8 How to Operate 9 Work Piece Setup 9 Guide Setu...

Page 3: ...on and proper personal safety equipment when using this product Observe Maximum RPM Maximum 4000 RPM for the turbo Abrasives and 10000 RPM for the 2 cup wheel Caution Firmly attach all components befo...

Page 4: ...nal 1 Tool Box for Seam Phantom and Attachments 1 SL3 ADM14 M14 Threaded Snail Lock Adapter 5 8 11 Adapter is available 1 SL3 60 60 Grit Turbo Abrasive Pad 1 SL3 150 150 Grit Turbo Abrasive Pad 1 SL3...

Page 5: ...below Guard will not be needed with the Seam Phantom 2 Using a 3mm Allen or Hex wrench remove quantity 4 4mm diameter Hex screws item 2 from head of Polisher at the locations shown in Figure 2 below D...

Page 6: ...Phantom Insert shim washers item 7 optional between Spacer and Seam Phantom to adjust the angle of the grinding pad as noted below Tighten using a 3mm Allen Hex wrench NOTE See section titled Adjusti...

Page 7: ...ge is acceptable and sometimes desirable It is a matter of personal preference Some fabricators prefer to make perpendicular tight seams from top to bottom Other fabricators prefer a slight gap on the...

Page 8: ...GFCI between the main power supply and the cord of the machine Keep Water Out of the Grinder electric version Do not let water into the motor of the electric grinder Water inside the machine will weak...

Page 9: ...ion for the seam Mark with tape cut to the template or other preferred method 3 Use two gauge blocks to line up the Glide Guide straight edge parallel to the seam See Figure 4 below 4 Your Glide Guide...

Page 10: ...e to ensure an adequate water supply DO NOT OVERHEAT the Cup Wheel by operating it dry Max speed for the 2 Cup Wheel is 10 000 RPM Dressing the Seam Suggested Process 8 Start with either the SL3 60 or...

Page 11: ...ss of the seam with the power and water off the Seam Phantom can be lightly rolled from left to right across the Glide Guide to see if the turbo pad drags or turns on a high spot If the turbo pad does...

Page 12: ...Page 12 FIGURE 5 Dressing the Seam After Use Clean and dry the electric polisher as noted in the Cleaning and Maintenance section...

Page 13: ...ing a dry air supply to remove any dust or moisture This will extend the life of the electric motor 2 Cleaning Guide Rods and Bushings After heavy use the in and out adjustment of the Seam Phantom may...

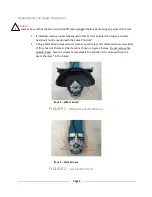
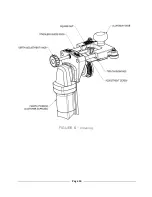
Page 14: ...Page 14 FIGURE 6 Cleaning...

Page 15: ...l free to contact us You can reach us at Web nsisolutions com Email info nsisolutions com Phone 425 297 3162 Snail Mail NSI Solutions LLC 13020 Mukilteo Speedway Suite A Lynnwood WA 98087 Usage Tips F...

Reviews: