25
8.3
PRE-WARNING ALARMS
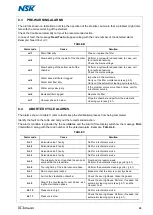
The alarms shown on table B do not stop the operation of the sterilizer, but warn that a problem might inter-
fere with the correct working of the sterilizer.
Check the trouble and promptly carry out the recommended action.
In case of fault, the message
Need Test
will appear along with the code number of the detected alarm.
Example: Need Test cd 1.
TABLE B
Alarm code
Cause
Solution
cd 1
Drain filter dirty
Clean or replace the filter
cd 2
Slow heating of the top wall of the chamber
Perform a cycle with reduced load. In case, call
for a technical service.
Check the mains voltage.
cd 3
Slow heating of the bottom wall of the
chamber
Perform a cycle with reduced load. In case, call
for a technical service.
Check the mains voltage.
cd 4
Water dose distributor clogged
Water inlet filter dirty
Impurities in the main tank .
Carry out the filter maintenance (see § 6.3).
Carry out the automatic cleaning cycle (see 6.1)
cd 5
Water entry valve dirty
If the problem occurs more than 3 times, call for
a technical service
cd 6
Bacterial filter clogged
Replace the filter
cd 7
Vacuum phase too slow
Wipe the chamber and perform the automatic
cleaning cycle (see § 6.1).
8.4
ABORTED CYCLE ALARMS
The alarms shown on table C refer to faults keep the sterilization process from being completed.
Identify the fault on the table and carry out the recommended action.
The alarm condition is signalled by the Led
Alarm
, and the Alarm/Time
display will show the message
FAIL
(intermittent) along with the code number of the detected alarm. Example:
FAIL AL 6
.
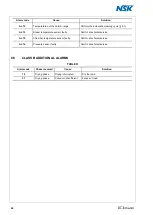
TABLE C
Alarm code
Cause
Solution
AL 1
Solenoid valve 1 faulty
Call for a technical service
AL 2
Solenoid valve 2 faulty
Call for a technical service
AL 3
Solenoid valve 3 faulty
Call for a technical service
AL 4
Solenoid valve 4 faulty
Call for a technical service
AL 5
The pressure has not reached the set-point
value within the preset time
Overload or pressure weak.
Perform the automatic cleaning cycle (§ 6.1)
AL 6
Too long time of the initial vacuum phase
Perform the automatic cleaning cycle ( § 6.1)
AL 7
Door not properly locked
Make sure that the door is correctly closed.
AL 8
Air into the sterilization chamber
Check the door tightness. Clean the gasket.
AL 9
Stop of the countdown for over 60 sec. dur-
ing the sterilization phase
Check the door tightness. Perform, if needed, the
automatic cleaning cycle (see § 6.1), and the
Vacuum Test.
AL 10
Pressure too high
Call for a technical service.
AL 11
Pressure too low
Check the door tightness. Perform, if needed, the
automatic cleaning cycle (see § 6.1).

