


3
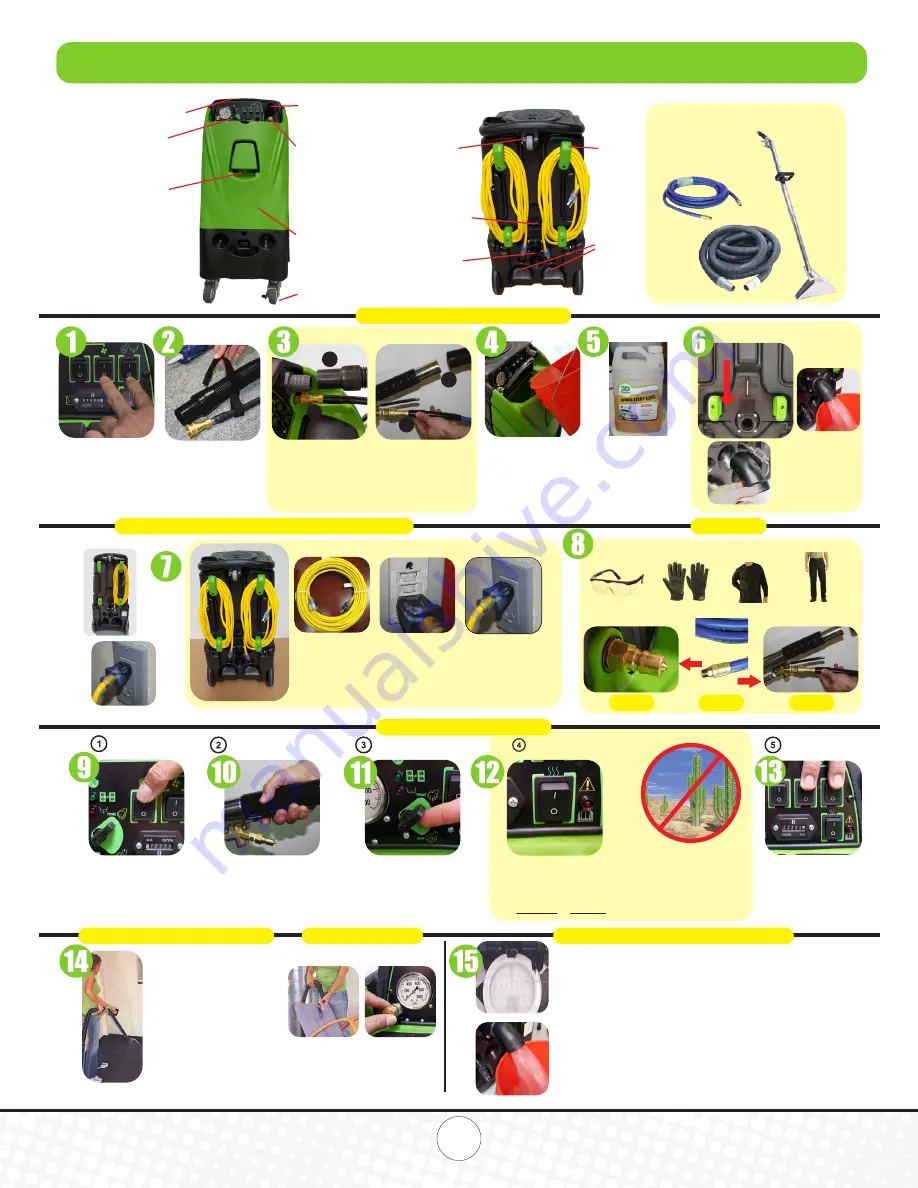
12-gallon QUICK START GUIDE
Plug into grounded outlets,
No GFI outlet.
Assemble your vacuum
& solution hose. Small loop
goes over small hose velcro
over hose. Large 5 straps,
one every five feet.
Make sure all
switches are in
the OFF position.
1. Connect your hose to vacuum
2. Solution hose
3. Push back locking sleeve, insert brass post,
let locking sleeve cover spring back covering
retaining balls
4. Push vacuum hose & cuff over 1.5” hose barb
Quick Start Machine Preparation
Recovery tank access
Vacuum
hose
connection
Hose
solution
connect
Indestructible
molded
body
Control panel
Optional wand holder
Locking caster
Dump valve
Roller
wheel
Motor
Cool-air
Intake
Cord
wrap
Dump
valve
extender
Turn pump on
Pump test, prime machine
Prime 300 & 500 PSI
Vacuum motor
Many surfaces are hot, wear protective
clothing
Switches
Hoses & Straps
Vacuum & Solution hose
Power Single Cord Machine
No Power Dual Cord Machine
Pull trigger until liquid
sprays from spray jets.
Pump and heater are now primed
with water or cleaning solution.
For 500 PSI units a
prime valve is located on
the front panel.
A. turn up to prime.
B. Spray for 30 seconds
C. Turn valve down to run position
Now that the pump is
primed with water or
cleaning solution.
Turn heater on
for 5-minutes to Pre-Heat.
CAUTION
Never run heater
DRY or without
liquid. Throughout
the machine and
hose system.
Failure to do so,
will damage the heater.
Wear eye
protection
Wear gloves
Wear
long sle
e
ves
Wear
long pants
Complete hose & wand kit
(25 ft. vac & solution hoses and wand)
Turn on both
vacuums motors.
Carpet Cleaning and wand use
Upholstery
Disposal of Water & You’re Finished
Start Sequence 1,2,3,4,5
HOT
HOT
HOT
1
3
2
4
Pour liquid into front
cavity. (For best results
use 100° water) Do not
use more chemical than
directed. Over use
of chemical clogs
jets, brass and reducing
heater performance.
Stores into slot
below dump valve.
Cleaning liquids
Dump valve
extender
Dump valve closed
position
Electrical Connection
Heater Pre-Heat
When doing upholstery it’s
important not to overwet, test
on an unseen area and
allow to dry prior to starting.
Use liquid detergents
only. Powder clogs
pumps + filters
DRY
Reduce pressure to 100PSI
Liquids detergent
only
1 Cord Extractor | 2 Cord Extractor
When You’re finished
1. Take the vacuum hose off the wand
and put it into the front tank and
vacuum out the remaining cleaning
chemicals to the recovery tank, dump
the water into a bucket or toilet.
2. Run clean water (warm if possible)
throughout the machine to remove
cleaning chemicals from coating
internal hoses/jets.
3. Unplug the equipment, wipe it down
with clean cloth and soap and return
it to a safe storage area.
Disposing of dirty water
1. Unplug the extractor and back it
over a toilet or bucket
2. Slowly pull the dump-valve up
and dispose of the water to
the sewer system.
3. Remember to close it when done.
4. Never dispose of liquids on to
the soil, outdooor gutter or into
the environment.
HOT!
After start sequence above
1. Start in the far corner and
plan your exit.
2. Do a series of 4’x6’ area
spraying forward and
extracting back. Overlap
by 2” on each stroke.
3. After your 4’x6’ area is done
go over it again vacuuming
only at a slow pace to
remove any missed liquids
to improve drying.
GFI’s 1st plug in one cord.
2nd Cord must be on a seperate circuit. A light and
sound pulse will activate when you plug into a 2nd
circuit. If you do not hear a pulse tone move cord to other
outet until you obtain a 2nd pulse. Pump will not run
unless 2nd circuit light is on, no GFI outlets.


