background image


NOISE AND VIBRATION 

MACHINE INSPECTION 

  Now that the machine is unpacked remember to 

recycle all packing materials. 

  Inspect the machine for damage or missing    

components.  If damage is found, contact the local 
freight company to file a freight claim. 

MACHINE COMPONENTS


Solution Tank 

The solution tank is the lower part of the machine body 
and has a capacity of 

16 gal (60.5 L)

  The amount of water in the tank is measured in the 

plastic tube at the right rear of the tank. The solution 
tank is emptied through the clear plastic tube at the 
right rear of the tank. 

Recovery Tank 

The recovery tank is the upper part of the machine body 
and has a capacity of 

17 gal (64.3 L)

  A round clear view lid assembly closes off the 

recovery tank’s opening. 

  The recovery tank has a foam sensitive float shut-off 

assembly.  As the water level rises, the float ball will 
rise into the tube and shut of the airflow of the 
vacuum.  NOTE:  The float shut-off assembly does 

not

 shut off the vacuum motor. 

Operator Control Panel 

The operator control panel is located at the upper rear 
area of the machine.  This panel has components that 
control various machine functions. 

  The toggle switch on the left controls the brush motor. 

  The toggle switch on the right controls the vacuum 

motor. 

  The red button is the master power switch; it controls 

the power to all components.  Power on, is indicated 
by the Battery Meter. 

Battery Meter 

The battery meter is located on the left side of the 
operator control panel and shows the state of charge of 
batteries during operation. 
The battery meter is equipped with a relay that will 
open, turning off the machine, when the battery voltage 
has dropped to its lowest permissible level. 

  When the batteries are fully charged, all of the LED’s 

are illuminated. 

  As the batteries discharge, the LED’s start to turn off, 

one at a time, from right to left. 

  When the last yellow LED on the left starts blinking, 

there is only a few minutes of runtime left before the 
machine is automatically turned off.  NOW is the time 
to turn off the brushes and vacuum motor, and drive 
to the battery charging area. 

  If the machine is operated until it is automatically shut 

off, turn off the master switch, the brush switch, and 
the vacuum switch.  Then turn on the master switch, 
and the machine can be driven to a charging location 
(wheel drive models only). 

Circuit Breaker 

  The circuit breakers are located to the left of the 

handle grips. 

  The right circuit breaker is for the vacuum motor. 

  The left circuit breaker is for the brush motor. 

Wheel Drive 

  The center circuit breaker is for the drive motor. 

  In the middle of the panel are two (2) rubber twist 

grips.  These grips rotate forward and backward to 
control the direction and speed of the machine.  The 
farther the grips are rotated, the faster the machine 
will move.  These twist grips have a feature that 
returns the machine to the neutral position when the 
handles are released. 

Solution Control (Valve) Lever 

  The solution control lever is located on the left rear 

side of the machine.  This lever controls the solution 
valve and the amounts of liquid put on the floor when 
cleaning.  

Pull up

 on the handle to 

open

 the valve.  

Push down

 on the handle to 

close

 the valve.  The 

control lever can be placed in notches to maintain 
desired flow between the open and closed position. 


Solution Filter Assembly 

  Attached to the solution control valve is a canister 

strainer designed to stop debris from entering the 
solution solenoid valve. 

  If the solution stops flowing to the brush, close the 

solution control valve and unscrew the canister bowl 
(by hand), remove and clean the screen. 

Battery Compartment Drain Hose 

This hose is tucked up under the lower right side of the 
control panel.  The spilled liquids from the battery 
compartment collect in it.  A pinch clamp is used to hold 
it closed. 

  Inspect the hose for liquid level on a weekly basis. 

  Dispose of liquids according to your local and federal 

regulations. 

Brush Gear Motor 

This machine has (2) 24-volt brush motors located at 
the front of the machine.  The motors are attached to a 
gearbox to turn the pad driver or brush. 

  The right lift arm is used to raise or lower the brush 

motors to and from transport, float, or heavy scrub 
positions. 

  These motors have carbon brushes that must be 

serviced on a regular basis.  The carbon brushes 
have an expected life of 2,000 operating hours. Refer 
to the maintenance section later in this book. 

Vacuum Motor 

This machine has a 24-volt vacuum motor. 

  The vacuum motor is mounted to the underside of the 

recovery (top) tank. 
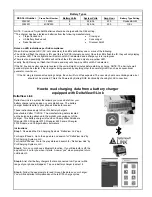
NOISE 
Sound pressure level at Operator 
position (ISO 11201) 


72 dB(A) 


VIBRATION 
Weighted RMS acceleration value 
(ISO 5349) 


.575 m/s

2


Summary of Contents for WRANGLER 2616 DB

Page 1: ...OPERATION MANUAL WRANGLER 2616 DB Original Instructions Instructions D origine...

Page 2: ...etc NEVER pick up anything that is burning or smoking such as cigarettes matches or hot ashes NEVER spray this machine with water or any liquids NEVER allow the vacuum motor or battery charging plug t...

Page 3: ...et when the machine is not in use For flooded lead acid batteries only does not apply to AGM or Gel cell batteries ALWAYS check to ensure the battery water level covers the battery plates before charg...

Page 4: ...d is the ground wire Never connect this wire to other than the grounding pin of the attachment plug Check nameplate on the charger to be sure voltage and cycle stated is the same as the electrical out...

Page 5: ...turn on the master switch and the machine can be driven to a charging location wheel drive models only Circuit Breaker The circuit breakers are located to the left of the handle grips The right circu...

Page 6: ...onsult your local distributor for complete chemical advice Install a pad driver and pad There is a wide range of pads or brushes available for the many cleaning applications of this machine Consult yo...

Page 7: ...at care should be taken when walking on this wet surface Stripping This procedure is used to remove moderate build up of floor finish from the floor The most aggressive pads or brushes are used in thi...

Page 8: ...brush Remove inspect and clean solution filter assembly Flush solution tank and hoses with a mixture of 8oz 250 mL white vinegar to 1 gal 4 L water Repair or replace any worn or damaged components as...

Page 9: ...wet batteries can be easily identified by the removable cell caps Removing the caps allows inspection of the liquid electrolyte sulfuric acid level in each cell AGM Absorbed Glass Mat batteries are s...

Page 10: ...et then plug it back in The charger will run for 2 hours holding the batteries at a constant voltage and equalizing each cell Battery Do s and Don ts a You do not have to fully discharge the batteries...

Page 11: ...rging data from a battery charger equipped with DeltaView Link DeltaView Link DeltaView Link is a system that allows you to read data from your battery charger using an app on your smartphone The batt...

Page 12: ...n damage in the squeegee squeegee hose or standpipe Remove obstruction repair damage Squeegee angle needs adjustment Adjust angle Vacuum motor worn out Repair replace vacuum motor Recovery tank drain...

Page 13: ...e motor has a short circuit to a battery connection Contact your local authorized distributor service station for further evaluation and repair The battery charge level has fallen below the Battery Lo...

Page 14: ...MANUEL D INSTRUCTIONS WRANGLER 2616 DB Translation from Original Instructions Une Traduction Des Instructions Originales...

Page 15: ...chaudes NE JAMAIS pulv riser cette machine avec de l eau ou des liquides NE JAMAIS laisser le moteur d aspiration ou la prise de charge de la batterie se mouiller ou un court peut se produire NE JAMAI...

Page 16: ...r les batteries au plomb acide seulement ne s applique pas la cellule de gel ou batteries sans entretien TOUJOURS v rifier pour assurer le niveau d eau de la batterie couvre la batterie plat avant de...

Page 17: ...de la fiche de branchement V rifiez la plaque signal tique sur la machine pour tre s r tension et le cycle indiqu est le m me que la prise lectrique Ne tentez pas de brancher une machine de 120 volts...

Page 18: ...ce clignoter il est seulement quelques minutes d autonomie gauche avant que la machine s teint automatiquement Est maintenant le temps d teindre les brosses et le vide de moteur et conduire la zone de...

Page 19: ...nexions de batterie desserr es ou incorrectes entra nera la batterie ou d endommager l appareil et provoquer des blessures Chargez les batteries avant utilisation Chargement de la Batterie Pour rechar...

Page 20: ...t lorsqu il avance ou recule Soupape de solution de levage poign e pour d marrer l coulement de liquide au sol R glez quantit de flux en fonction des besoins Fermez la vanne de solution compl tement 1...

Page 21: ...es dommages de la machine et des blessures Nettoyer et liminer imm diatement les d versements Chaque cellule de chaque batterie doit tre contr l et r approvisionn si n cessaire une fois par semaine Vo...

Page 22: ...uivant effectu l intervalle d crit Ne pas effectuer cette proc dure peut entra ner des performances de la machine pauvres des dommages aux composants et l chec Cette proc dure doit tre effectu e par u...

Page 23: ...bles sont oWet AGM Lorsque ce voyant est allum le chargeur est configur pour charger soit inond e humide ou batteries plus AGM oGel Cell Lorsque ce voyant est allum le chargeur est configur pour charg...

Page 24: ...llule Batterie Faire et Ne Pas Faire a Y Vous n avez pas d charger compl tement la batterie avant de la charger Ils n ont pas une m moire b Branchez le chargeur quand la machine n est pas en cours d u...

Page 25: ...tape 1 T l chargez l application DeltaView Link Pro Charging Systems Pour Apple iPhones acc dez la boutique d applications et recherchez DeltaView Link par Pro Charging Systems LLC Pour les t l phones...

Page 26: ...ode d identification et n affichent qu une LED jaune Enfin les voyants peuvent ne pas clignoter leur code d identification et ne peuvent pas afficher de voyants tant que le courant alternatif n est pa...

Page 27: ...e squeegee squeegee hose or standpipe Retirer les dommages obstruction r paration Squeegee angle needs adjustment Ajuster l angle Vacuum motor worn out R parer remplacer moteur aspirateur Recovery tan...

Page 28: ...ontactez votre station distributeur r parateur agr pour une valuation ult rieure et la r paration Le niveau de charge de la batterie est tomb e en dessous du niveau de la batterie de verrouillage et l...

Page 29: ......

Page 30: ...WRANGLER 2616 DB Rev Orig 04 19 Rev B 03 20 9092603 NSS Enterprises Inc 3115 Frenchmens Road Toledo Ohio 43607 PHONE 419 531 2121 FAX 419 531 3761 mailus nss com www nss com...

Reviews: