

Normal Cleaning:
Sweep and dust mop the floor to remove dirt and
debris before scrubbing. Accumulations of dirt or
debris on the floor will reduce cleaning performance.
You may also need to pre-clean some types of spills
or stains before scrubbing.
Plan your work so that you make long, straight paths
with the fewest amount of turns possible, overlapping
each cleaning path about 2 in. (5 cm.) to prevent
streaking and dirty areas.
Move machine to area to be cleaned.
Place “Wet Floor” warning signs in area.
Turn on master switch.
Turn on vacuum motor switch.
Lower the brush motor and squeegee assembly into
the operating position on the floor.
The brush motor will automatically turn on when
moving either forward or backwards.
Lift solution valve handle to start liquid flow to floor.
Adjust amount of flow as needed. Close the solution
valve completely 10 ft (3 m) before you turn at the
end of your cleaning path. This will reduce the
amount of liquid on the floor when you make your
turn.
Reopen the solution valve when starting the next
pass. Repeat this procedure for each pass.
NOTE: Solution will not flow until brush turns on.
Watch the level of liquid in the recovery tank and
listen for the float shut-off to change the sound of the
vacuum motor. When the vacuum airflow stops, you
must turn off the vacuum motor and empty the
recovery tank.
Take the machine to an approved disposal drain and
turn off all switches.
Pull the flexible rubber drain hose out from behind the
brush motor. Raise the end of the hose above the
level of the recovery tank, loosen and remove the
hose drain plug. Carefully direct the drain hose into
the drain.
When the recovery tank is empty, replace and tighten
the drain plug. Place the drain hose back behind the
brush motors.
Do not
obstruct the lift mechanism or
brush motors.
Special Cleaning
This machine may be used to perform special cleaning
jobs other than “normal” scrubbing.
Double scrubbing
This procedure provides deeper cleaning on heavily
soiled floors. One or more cleaning passes are made
before picking up the chemicals with the squeegee.
This allows dwell time. Best results are achieved by
placing the brush motor in the heavy scrub position.
Caution:
The floor surface becomes extremely slippery
in this operation. This machine should be operated only
in slow to medium speed and great care should be
taken when walking on this wet surface.
Stripping:
This procedure is used to remove moderate build-up
of floor finish from the floor. The most aggressive
pads or brushes are used in this procedure.
The stripper solution is applied to the floor with a mop
and then double scrubbed as described above.
Stripping solution should not be put into the solution
tank. Clean water from the solution tank is applied to
the floor to keep the chemicals and finish in a “liquid”
condition. The floor surface becomes extremely
slippery in this operation. This machine should be
operated only in slow to medium speed and great
care should be taken when walking on this wet
surface.
MACHINE MAINTENANCE
Routine maintenance is critical to ensure proper
machine operation and cleaning performance. Perform
all maintenance procedures as follows.
Always turn OFF all machine switches before
performing any maintenance.
Adjusting the squeegee assembly:
Turn the vacuum motor ON and open the water valve
slightly.
Squeegee blades should lie over slightly (like a
window squeegee) when the machine is moving.
If adjustment is required adjust the blade angle by
turning the wing nut on the squeegee mount.
Daily Maintenance
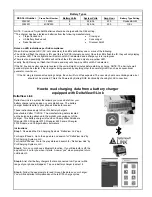
Battery Charging
The master power switch and all other switches
must be turned OFF.
You must recharge the batteries when indicated by
the battery meter, and after every use. Read the
battery meter while the machine is in use.
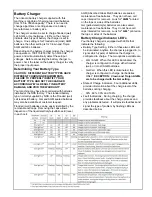
*235 AH batteries require 8-12 hours to fully charge.
See the Operating Instructions for Battery Charger.
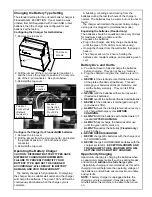
Battery Electrolyte (liquid) Level (Flooded only)
Inspect the electrolyte level of at least one cell in each
battery before daily charging. The liquid must be visible
above the internal plates. Do not charge the batteries if
the liquid is below the plates.
NEVER
let the electrolyte level fall below the tops of
the plates. This will damage the batteries
immediately, and void the warranty.
Add only distilled water to the cell of a battery to adjust
the liquid level.
Do not
use well or tap water.
Before
charging, add only enough water to cover the top of
the internal plates. After charging, add only enough
water to bring the level to the bottom of the fill tube.
Do not
overfill the battery liquid, this will cause
electrolyte (acid) spill. Spilled electrolyte (acid) can
cause machine damage and personal injury. Clean
and dispose of spills immediately.
Every cell
of every battery must be checked and
replenished (if needed) once per week
See the battery-warning sheet (page 3) for more
details.


