Issue 06/2016
MegaLoop
Rigid Loop Version
Assembly instructions
(please, read carefully
before
installation)
Safety note
Attention: risk of injury
For shipping purposes, the receiving element of the 80cm
loop has been compressed and banded together putting it
under mechanical tension.
The red band that holds the loop compressed should be
removed last after the other bands have been removed.
Press the loop together while removing the red band to
avoid it springing apart too quickly which could be
dangerous.
Please note:
The receiving element and the supporting rod are made of
extruded aluminum profile (aluminum alloy AlMgSi0,5). Due
to manufacturing and shipping, there will always be slight
scratches and spots which do not constitute a reason for
complaint and have no influence on reception.
All fixing elements are made of stainless steel.
Although the extruded aluminum profile is specified as salt-
water resistant and non-corroding, we do not recommend to
expose it to a salt-water environment or otherwise polluted
areas.
When used as an outside antenna, over time, there will be a
grey coating on the loop which, however, does not impede
the function of the antenna.
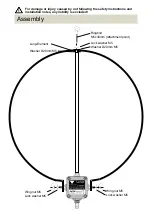
Assembling the antenna (cf. diagram overleaf)
1. For bend protection, all fixings elements are fastened to
the upper eyebolt.
2. Unscrew all fixing elements and check completeness:
1x ringbolt M5x30mm stainless steel Zahnscheibe
2x washers D20mm M5 stainless steel
3x lock washers M5 stainless steel
2x wing nuts M5 stainless steel
1.
Screw the Middle fitting at the top M5 grub screw of
the active antenna part.
2.
First place a lock washer over the M5 grub screws to
the
right and left of the antenna and then fasten the
loop to the
M5 grub screw with the wing nuts.
3.
Attach the supporting rod in the following order:
4.
eyebolt, lock washer, washer, loop, washer and
supporting rod with M5 internal thred.
The standard version of the antenna is made for suspended
installation with the eyebolt as suspension point.
Mast mounting
For mast mounting, it is vital to attach the active element to
the mast with its upper and bottom side because otherwise
there will not be sufficient stability in case of heavy winds.
For this purpose, an optional two-point mast mounting set is
available, which is not included.
Additional upper mast-mounting set (optional)
Additional lower mast mounting set (optional)
Grounding
When erecting the antenna outdoors, it should always be
grounded for lightning protection. Via the supporting rod, the
loop is connected galvanically to the BNC connector.
Reception will not be impeded and immunity to E-field
components is enhanced.
In addition, disconnect the antenna from connected devices
when it is not in use, or the operator is not present, when
using transmitting antennas in the near vicinity or when there
is danger of imminent thunderstorms.
Manufacturer: Rudolf Ille Nachrichtentechnik www.nti-online.de
Distribution: Bonito - Dennis Walter Gerichtsweg 3 D-29320 Hermannsburg www.bonito.net
®
NTi


