369
Ov
erseas Use
Setting the Carrier Search
Method
<Network search mode>
Yo u c a n s e t w h e t h e r t o s e a r c h t h e n e t w o r k
automatically and connect to another carrier when the
network currently used falls outside of the service area.
Example: Changing a carrier for manual connection
1
From the Menu, select [Settings]
→
[Management]
→
[NW Services]
→
[Int’l roaming]
→
[Network
search mode] and press
.
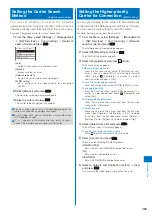
Network search mode
Auto
Manual
Network re−search
PLMN setting
[Auto]:
Automatically connect to another carrier.
[Manual]:
Manually select a carrier.
[Network re-search]:
Search the carrier to be connected again.
[PLMN setting]:
Set a carrier with the higher-priority for connection
(P.369).
2
Select [Manual] and press
.
The menu for selecting a network appears.
3
Select a carrier and press
.
The carrier to be connected is changed.
●
You may not be able to set this function depending on the
radio wave condition or network restrictions.
●
As of October 2007, you cannot select a carrier other than
NTT DoCoMo in Japan.
●
If “
” appears in the display after you return to Japan,
check if the Network search mode is set to [Auto].
Setting the Higher-priority
Carrier for Connection
<PLMN setting>
You can set a priority for the carriers to be automatically
connected when the Network search mode is set to [Auto].
You can save a priority setting for up to 20 carriers.
Example: Saving a carrier from the carrier list
1
From the Menu, select [Settings]
→
[Management]
→
[NW Services]
→
[Int’l roaming]
→
[Network
search mode] and press
.
The Network search mode display appears.
2
Select [PLMN setting] and press
.
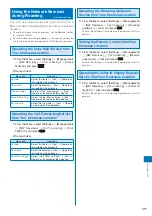
The PLMN setting display appears.
3
Select [Unregistered] and press
(Func).
The Function menu appears.
Entering a carrier manually
From the Function menu, select [PLMN manual sel.],
enter a country code (MCC) and network number
(MNC), press
(Complete), and select a network
communication method
→
[Yes].
To save the carrier being connected
From the Function menu, select [VPLMN to PLMN]
→
[Yes].
To change the priority
From the Function menu, select [Change priority]
→
a
carrier
→
a desired position, press
(Complete), and
select [Yes].
To display detailed information
Move the cursor to the carrier and from the Function
menu, select [Detail info].
To delete a carrier
Move the cursor to the carrier and from the Function
menu, select [Delete]
→
[Delete one]
→
[Yes]. To delete
all carriers, from the Function menu, select [Delete]
→
[Delete all], enter the Security code, and select [Yes].
4
Select [Select from List] and press
.
The PLMN slct from List display appears.
To search for a carrier by country name
Press
(Search) and select a country name.
5
Select a carrier and press
.
The screen for selecting 3G/GSM appears.
[3G/GSM/GPRS]:
Set as the 3G and GSM/GPRS compatible carrier.
[3G]:
Set as the 3G compatible carrier.
[GSM/GPRS]:
Set as the GSM/GPRS compatible carrier.
6
Select a network communication method
→
[Yes]
and press
.
A carrier with the higher-priority for connection is set.


