background image

2

27. 11. 17. Leaflet Number 671721

Installation and Maintenance

The WH1 Wall Mounted Range of Units

2.2 Wall Mounting cont. Option 1: 

The unit fixed to a solid wall construction using the
mounting bracket provided.

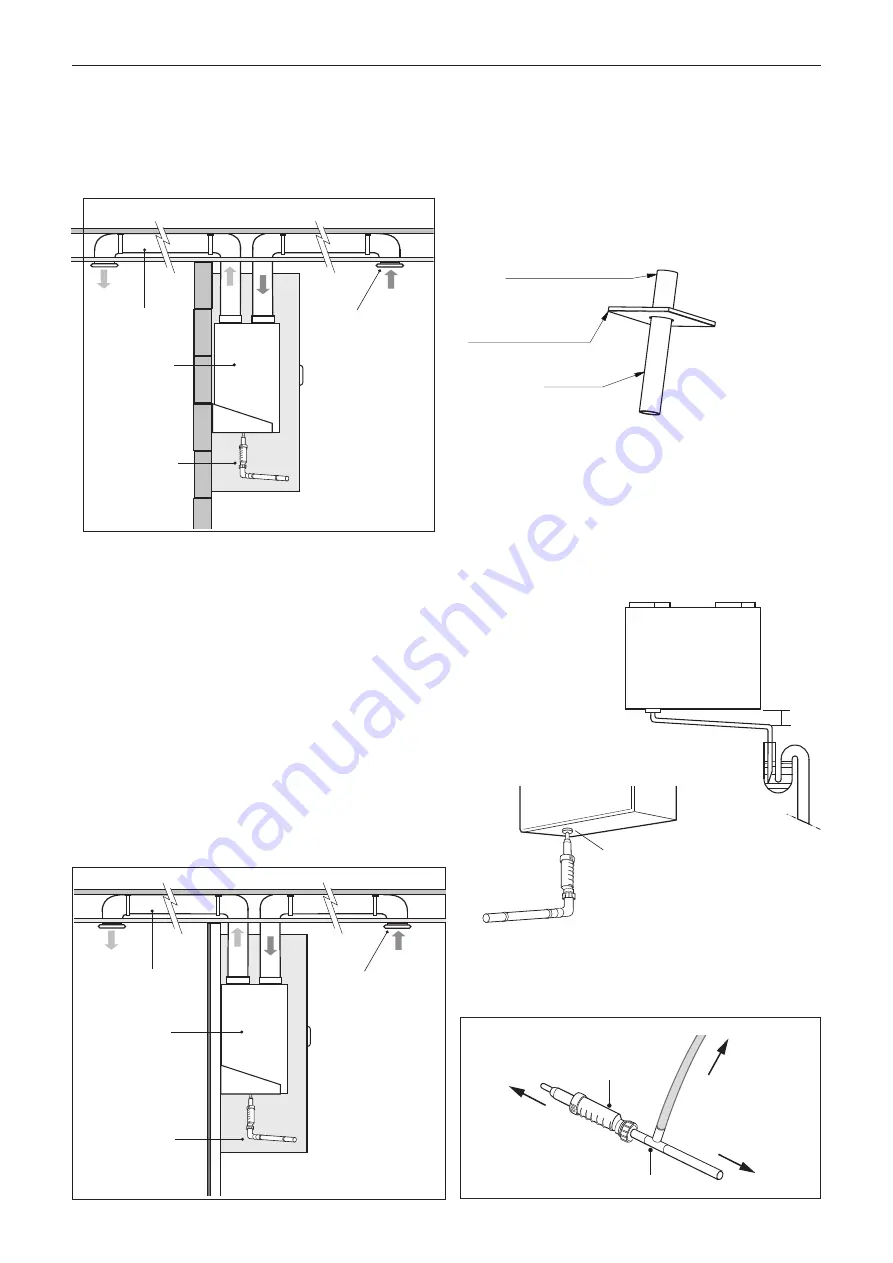
Figure 5. Typical example of a cupboard mounted unit (Standard unit)
fixed to a block work wall.

Wall Mounting Option 2: 

If it is not practical to use a solid wall, the unit should
be fixed to a stud partition with a 25mm minimum
thickness MDF panel solidly fixed behind the plaster-
board.

If fixing to a stud wall the MDF panel should extend, width wise, over
a minimum of 3 vertical studs with centres of no more than 400mm.
A vertical stud should be located to correspond with the position
each mounting bracket is to be fixed to provide additional support.

Add additional vertical supports if necessary. Height wise, the MDF
panel should extend from floor to ceiling.

Fix the mounting bracket to the wall (as fig 4) and use the wall
mounted bracket to mount the unit on (as shown in fig 5).

Figure 6. Typical example of a cupboard mounted unit (Standard unit)
fixed to a stud partition with the MDF panel fixed behind the plaster-
board.

2.3 Condensate Drain

The MVHR unit inside the enclosure is fitted with a straight coupling
to allow 21.5mm overflow pipe (not supplied) to be attached using
solvent cement, the pipe should be passed through the flexible 
adhesive backed cover plate before the solvent cement is applied.
The pipe can then be inserted into the coupling of the MVHR unit
and the cover plate slid along the length to bond against the base
panel of the enclosure preventing noise breakout. (fig. 7).

Figure 7. 

1. The condensate must be discharged under a water level in a U-trap 

drainpipe or an alternative drain method which acts as an airlock. 

2. If using a U-trap please ensure the U-trap has been filled to a

suitable level of water to avoid any air locks.

3. If the condensation pipe is fitted in an unheated space the pipe 

should be in insulated to prevent freezing. 

Nuaire recommend MVHR-DRAIN be used as the primary 
condensate take-off. (see figure 8b and 8C.

Ducting in the 
ceiling void.

Side view of unit 
mounted on the
block wall in a 
cupboard using 
the wall brackets.

MVHR-DRAIN
Condensate drain,
uninsulated drain 
pipe with min 5

o

 fall 

running to SVP.

Valve in ceiling.

Ducting in the 
ceiling void.

Side view of unit 
mounted in a 
cupboard fixed to 
a stud partition
with the 25mm 
MDF fixed behind 
the plasterboard
using the wall 
brackets. 

MVHR-DRAIN
Condensate drain,
uninsulated drain 
pipe with min 5

o

 fall 

running to SVP.

Valve in ceiling.

Solvent cement to be applied

Flexible adhesive backed 
cover plate

Overflow pipe

Figure 8a. Wet option.
Condensate pipe 
connection to unit and 
a typical example of 
a “U” trap drainpipe.

(Standard configuration
only).

Figure 8b. MVHR-DRAIN option. 
Condensate drain, uninsulated drain 
pipe with min 5

o

fall running to SVP.

min 5

o Drop

Collar

To SVP 

“T” piece 

MVHR Drain 

To unit 

To CONTRAP 

Figure 8c. 

IMPORTANT: When using a “T” Piece to connect the CONTRAP

drainage and the MVHR drain pipework the MVHR drain must always be
fitted before the “T” Piece to prevent condensate from feeding back into
the MVHR system. 

Unit weight 

= 76kG

Unit weight 

= 76kG

Summary of Contents for Ecosmart MRXBOX95-WH1-1Z

Page 1: ...opriate authority and conforming to all statutory governing regulations All mains wiring must be in accordance with the current I E E Regulations or the appropriate standards Ensure that the mains supply Voltage Frequency and Phase complies with the rating label Please allow a minimum of 430mm in front of the enclosure for MRXBOX95 WH1 models and 360mm for MRXBOX95AB WH1 units The fan must be inst...

Page 2: ...nd the cover plate slid along the length to bond against the base panel of the enclosure preventing noise breakout fig 7 Figure 7 1 The condensate must be discharged under a water level in a U trap drainpipe or an alternative drain method which acts as an airlock 2 If using a U trap please ensure the U trap has been filled to a suitable level of water to avoid any air locks 3 If the condensation p...

Page 3: ...et duct and the air outlet duct from the unit these ducts should be insulated Ducting must be installed in such a way that resistance to airflow is minimised Bends should be kept to a minimum A minimum distance of 300mm between the appliance and any bends in ductwork is recommended Ideally 150mm diameter or 220 x 90mm rectangular ducting should be used Refer to dwelling design drawing figure 10a a...

Page 4: ...sanitary accommodation should be omitted from the step 2 calculation Step 3 The required airflow rates are as follows n the maximum whole dwelling extract ventilation rate e g boost should be at least the greater of step 1 and step 2 Note that the maximum individual room extract rate should be at least those given in table 1 for minimum high rate n the minimum air supply rate should be at least th...

Page 5: ...pply duct Air supply to lounge via Air Valve in ceilings Extract air from kitchen bathroom via Air Valve in ceilings Air supply to bedrooms via Air Valve in ceilings Top of ceiling void Top of ceiling void Air supply to bedrooms via Air Valve in ceilings Insulated extract duct Insulated extract duct Minimum distance as specified in building regulations MVHR DRAIN Condensate drain uninsulated drain...

Page 6: ...ion to Remote Fail Indicator Ref MRXBOX95 RFI Optional 3 2 Figure 11a Note Wiring is for reference purposes only as the connections in fig 11a are factory fitted The unit is pre wired with a 2 metre fly lead Disconnection from the supply mains must be incorporated within the fixed wiring in accordance with the wiring regulations and shall have a minimum contact separation of 3mm Disconnection from...

Page 7: ...l covering the control has an adhesive panel which should be removed post commissioning to prevent tampering 8 Speed 1 is limited to never exceed the speed 2 when commissioning the speed 2 should always be set first 6 1 Speed 3 The unit has to ability to override both speed 1 and speed 2 to operate the fan to maximum airflow See wiring diagram for details of operating this facility 6 2 Humidity ad...

Page 8: ...arranty The 5 year warranty starts from the day of delivery and includes parts and labour for the first year and parts only for the remaining 4 years This warranty is void if the equipment is modified without authorisation is incorrectly applied misused disassembled or not installed commissioned and maintained in accordance with the details contained in this manual and general good practice The pr...

Reviews: