background image

5

Leaflet Number 671366 July 2007

Installation and Maintenance

mrXbox90S Mechanical Ventilation with Heat Recovery

5.2 Connecting the ducts cont. 

Arrange the exterior air supply from the shadowed (North) side of the

dwelling, for instance from the wall or overhang. 

• install the discharge duct between the mrXbox90S and the 

roof sleeve in such a manner that surface condensation is 

prevented

• always use an insulated ventilation roof sleeve

• the maximum permissible resistance in the duct system is 

150 pa at the maximum ventilation capacity. if the resistance of

the duct system is higher, the maximum ventilation capacity will

be lower

• the location of the mechanical ventilation outlet and the sewer 

stack vent relative to the inlet must be chosen to prevent 

nuisance

• choose the location of the inlet valves to prevent fouling and 

draught

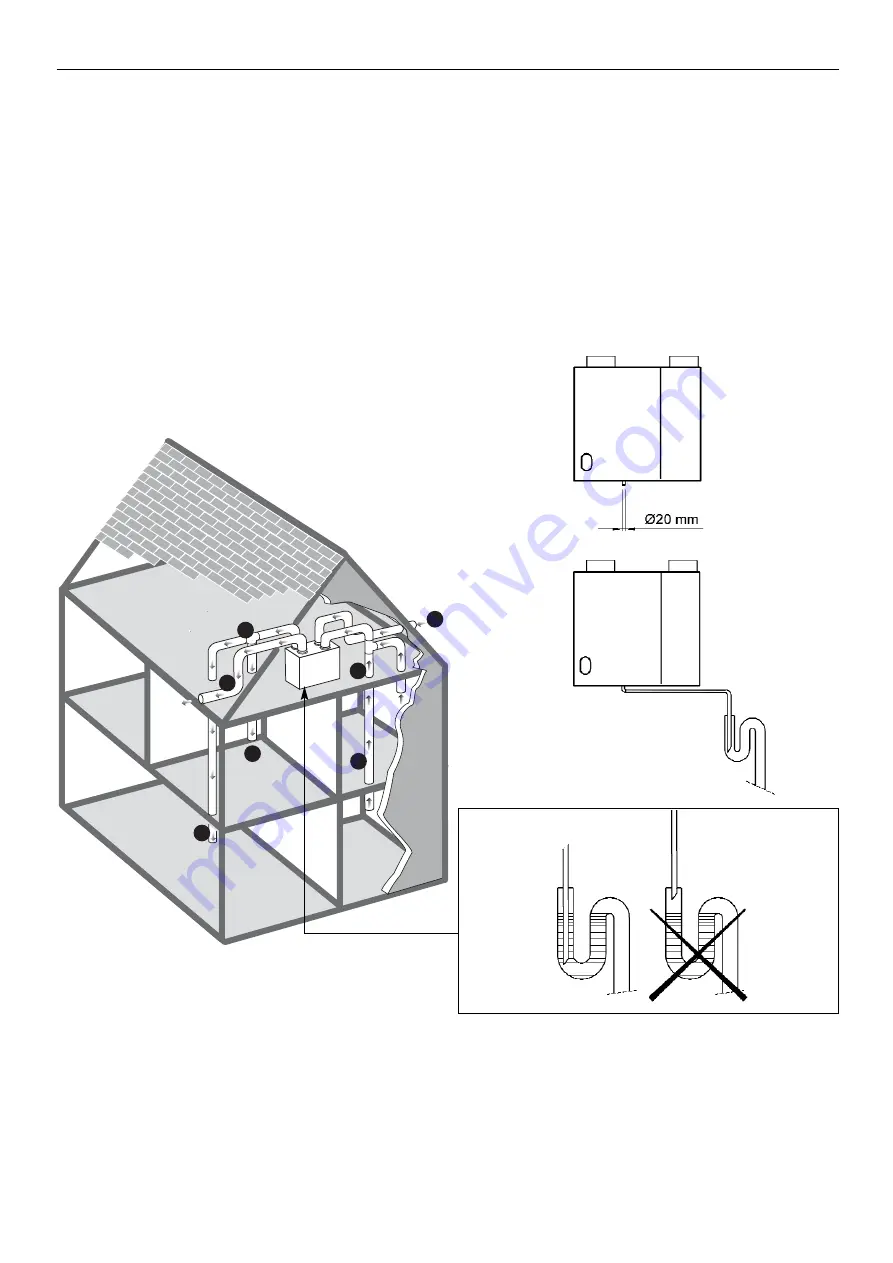
Ducting references:

1

=  to dwelling. Supply (warmed fresh air)

2 =  to outside. Exhaust (cool stale air)

3 =  from dwelling. Extract (warm stale air)

4 =  from outside. Intake (cool fresh air)

5.3 Connecting the condensate discharge 

The condensate discharge line for the mrXbox90S is fed through the

lower panel. the condensate must be discharged through a 

drainpipe. The drain must discharge under the water level in the 

U-trap. The condensate discharge comes separately with the unit 

and the installer must screw it into the underside of the unit.

This condensate discharge connection has an external connecting

diameter of 20mm. The condensate discharge line can be glued to 

it, if necessary using a square bend. The installer can glue the 

condensate discharge in the desired position in the lower part of the

unit.

See Figure 8 below for an example of a connection to a drainpipe.

Pour water into the drip tray to create an air trap.

4

2

1

1

3

3

1

Figure 7. Typical installation with unit mounted on wall

Figure 8.

Summary of Contents for mrXbox90S

Page 1: ...tem 150 pa at 180 m3 h Filters supplied to be replaced post commissioning Coding mrXbox90S 1 2 Function components 1 Interior temperature sensor measures the temperature of the air from the dwelling 2...

Page 2: ...fact ory def ault settings Speed 1 Speed 2 Speed 3 X Watt age per fan Resist ance Duct Pressure P a 26 Flow R ate m3 h 42 86 Dimensional references 1 spigot to dwelling Supply warmed fresh air 2 spig...

Page 3: ...he right it shows the readout value for instance the preset volume Example The display now shows that the unit is running at ventilation setting 3 at a flow rate of 150 m3 h The four keys have the fol...

Page 4: ...allations current IEE regulations the regulations for connection to interior sewers in dwellings and residential buildings any additional regulations of the local utilities the installation instructio...

Page 5: ...ent fouling and draught Ducting references 1 to dwelling Supply warmed fresh air 2 to outside Exhaust cool stale air 3 from dwelling Extract warm stale air 4 from outside Intake cool fresh air 5 3 Con...

Page 6: ...Combination of a mechanical switch and a radio controlled RC transmitter It s possible to combine 2 RC transmitters with each other It s also possible to combine a mechanical switch with RC transmitt...

Page 7: ...ted with a pressure controlled filter indication and frost control For optimum performance of these features we recommend you initialise the unit This will ensure that the system pressure as function...

Page 8: ...ing 2 U3 setting 3 Settings U4 and U5 do not apply to this unit 3 Press key OK for 1 second to display the selected parameter value 4 The selected parameter value can be changed using keys or 5 The mo...

Page 9: ...cause some settings have an influence on the correct operation of the unit these have been placed in a separate installer parameters set Consequently these parameters can only be modified by the insta...

Page 10: ...s key F 1 second If no key is operated for 5 minutes Press key OK 1 second If no key is operated for 1 minute Press keys F and OK 3 seconds Press key or Press F or key 1 second Press F or key 1 second...

Page 11: ...r data and pressing key takes you back to step no 1 After 5 minutes this menu automatically disappears and the display will show the operational situation again In the event of an error the error code...

Page 12: ...red to modify the settings from operational mode By way of example parameter 8 bypass mode is changed from 1 to 2 1 Press key F for 3 seconds to activate the settings menu 2 Press keys F and OK for 3...

Page 13: ...display the LED on the switch will light up When the filters have been cleaned or replaced press the key OK to reset the filter indication The text FIL will blink for a moment and then the display wil...

Page 14: ...measures the temperature of to the basic pcb the input air is defective The Check the sensor connection to unit operates as normal the wiring Replace the sensor F10 The temperature sensor that Contact...

Page 15: ...th a new filter the filter indication must be reset by pressing key OK The display will blink for a moment to confirm that the filter has been reset The unit will return to operational mode 10 0 Repla...

Page 16: ...ithin the unit is considered Lifting gear such as slings or ropes must be arranged so as not to bear on the casing 3 3 Equipment stored on site prior to installation should be protected from the weath...

Reviews: