background image

nucamprv.com  •  Truck Campers

21

20

Truck Campers  •  nucamprv.com

  •  Use caution when loading and unloading the camper on a windy  day. The amount of wind that    


is dangerous depends on your exposure and the weight of the camper. It is best to avoid loading  


on a windy day. 

  •  Always keep the front higher than the rear. Before loading the camper onto the truck, be sure to   


attach the tie-downs to the truck. 

Step by step instructions for loading your camper: 

  1.   Extend each jack no more than four inches at once. Starting with the front jacks, keeping the  


camper level always. Repeat this process until the camper clears the truck body bed by    


approximately four inches. 

  2.   Slowly back truck under camper making sure to clear wheel wells and any structure or plumbing    


located below the living area. This will come easier with some practice. 

  3.  Continue backing until the truck is within a foot of loaded position. Stop and connect the 7-way    


power cord to the 7-way receptacle in the truck bed. 

  4.  Continue backing under the camper until the rubber bumpers mounted on the front wall in the    


truck bed lightly touch the front of the camper. 

  5.  Slowly retract both rear jacks, then front jacks until the camper is  resting fully on the truck bed. 
  6.  Retract the jacks completely and secure in place per the manufacturer’s instructions. 
  7.  Lift and swing front jacks inward (if equipped with swing-out brackets). 
  8.  Secure the camper to the truck with turnbuckles. The front turnbuckles must be spring-   


loaded, while the rear should use solid turnbuckles. Install both the front and rear turnbuckles    


per manufacturer’s instructions. Turnbuckles should never be overtightened. They should be  


snug enough to keep them securely in place but not so tight that it puts stress on the camper’s    


outer floor. The turnbuckle is designed to keep your camper from moving backward as opposed   


to holding your camper down. 

Step by step instructions for unloading your camper: 

  1.  Position the truck/camper combination on firm, level, ground. If needed use 12" square ¾"  


plywood support pads under each jack to prevent sinking if the ground is soft.

  2.  Disconnect and remove the following items:
   

  a.  Front and rear turnbuckles/tiedowns


  b.  7-way camper power cord

  3.  Using your remote control, operate all jacks together until the camper clears the truck bed by  


four inches.

  4.  If necessary, operate the jacks individually starting with the front  jacks. Extend the jacks no  


more than 4" at a time. Keep the camper as level as possible. Repeat the process until the  


camper has cleared the truck bed by approximately 4".

  5.  Slowly drive the truck from under the camper until it clears the camper and the front overhang.

  6.  Lower the camper with the rear jacks first, then lower the front jacks no more than four inches at    


a time. 

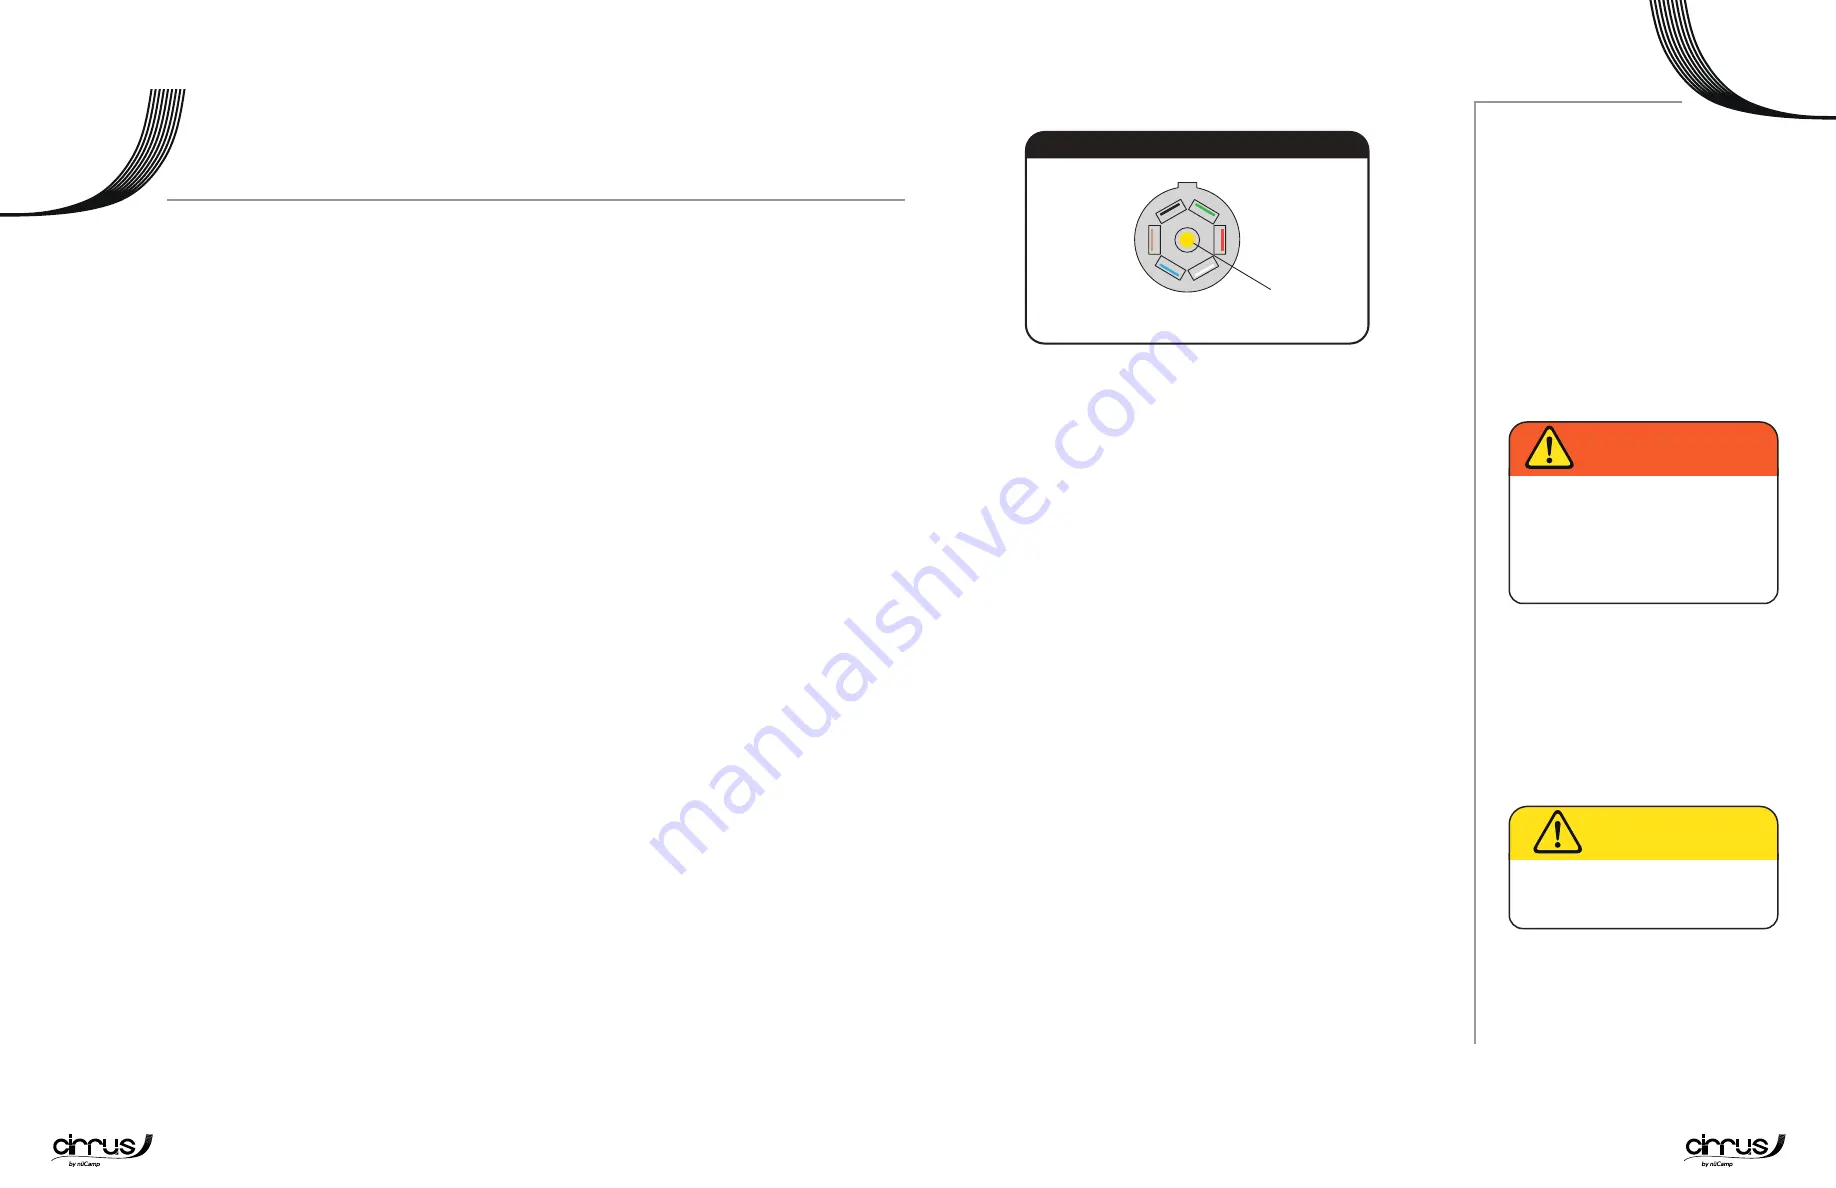
CONNECTOR PLUG

Before each trip:

  1.  Plug the 7-way connector plug into the hauling vehicle socket and  


verify that the driving lights on the side and rear of trailer light up.

  2.  Have someone stand behind the camper and confirm lights are    


working when you perform next steps.


  a.  Step on the tow vehicle brakes. Brake lights should light up. 


  b.  Turn on right/left turn signals and verify that the appropriate  


    lights come on. 


  c.  With your foot on the brake, put your vehicle in reverse and  


    verify that the backup lights come on.

  3.  If any of the lights do not function as expected, the system may    


need serviced. 

The 7-way connector plug and the wire harness from the underbelly, 

supplies power from the hauling vehicle to brake, turn signal, driving and 

backup lights in your camper. It may build up corrosion over time. Clean 

the connector plug frequently to ensure good electrical contact.

STABILIZING & SETUP


Important points to observe:


  •  After unloading the camper, always lower camper down close to   


ground level. 

  •  Do not enter or occupy the camper before lowering it the ground  


where it is ready for use. Your camper is designed to be used  


while standing on the jacks in a lowered position. 

  •  When lowering the camper, do not allow the bumper to touch the  


ground. Allow a minimum of two inches of clearance to the ground  


from the lowest point of the camper.

  •  Always level the camper front to back and side to side. This will    


allow your equipment and water drainage to function properly.

  •  Make sure that all four jacks are touching the ground. If one jack is  


off the ground it may cause the camper to rock and feel unsteady  


when walking inside. 

Right Turn/Stop

(BROWN)

Left Turn/Stop

(RED)

Charge

(BLACK)

Tail/Running Lights

(GREEN)

Brakes/Open

(BLUE)

Ground

(WHITE)

Backup Lights

(Yellow)

RV Industry Standard 7-Way Plug

Malfunctioning or disconnected lights 

on your camper while driving is not only 

illegal but may result in traffic accidents 

due to limited visibility of your trailer by 

other vehicles. Loss of control, serious 

injury or death can result.

WARNING

Always level your camper when in use. 

Failure to level can cause water leaks, 

refrigerator failure or other damage.

CAUTION

Summary of Contents for Cirrus 820 2021

Page 1: ...2021 OWNER S MANUAL Cirrus 820 nucamprv com...

Page 2: ...e such changes nuCamp further reserves the right to make changes to the equipment form technical system or layout of each camper as it sees fit to be innovative and beneficial Therefore no legal claim...

Page 3: ...frequently asked questions regarding the operation function and care of the many systems that make modern camping a pleasure For more complete instructions regarding safety maintenance and operation...

Page 4: ...Structure Warranty and the Warranty Claim Procedure 8 You received a copy of One Year Limited Warranty before your purchase was completed You read and agreed by written signature to the terms and con...

Page 5: ...local radio or TV station that broadcasts weather In case of power loss keep an emergency grade battery operated radio with extra batteries available Invest in a weather radio A weather radio will gi...

Page 6: ...u extra information or a tip on the subject presented SAFETY LABEL DESCRIPTIONS Cultivate these safety habits in recreation to minimize fire safety hazards Teach all occupants Fire Safety Practices Co...

Page 7: ...It is very important to have exhaust fans running and an air inlet such as a window open when operating fuel burning appliances CO LP GAS ALARM Your camper is equipped with a CO Propane Leak alarm nea...

Page 8: ...our truck The zone is normally measured from the rear of the cargo area c In a properly matched combination of truck and camper point B camper center of gravity will fall within points C and D truck s...

Page 9: ...rsing mountainous territory ELECTRIC JACK SYSTEM When hauling a camper you will encounter Electric jacks need 12 volt automotive battery power to operate If the battery is too low to operate the jacks...

Page 10: ...e total mass or weight of a vehicle with all needed fuels such as oils lubricants coolants and a full tank of fuel CCC Cargo Carrying Capacity also known as Payload Capacity The maximum weight that pe...

Page 11: ...starting with the front jacks Extend the jacks no more than 4 at a time Keep the camper as level as possible Repeat the process until the camper has cleared the truck bed by approximately 4 5 Slowly...

Page 12: ...before showering WARNING 3 Check your Alde expansion tank The glycol fluid level must be at least one inch above the minimum line This may need to be topped off after first use 4 Make sure you have a...

Page 13: ...a low profile mach 8 mach 8 ac FAN VENTILATION The fan vent s installed in the roof creates fresh air circulation and removes stale air from the camper It is powered by 12V or shore power and may be e...

Page 14: ...st faucet is turned off the pump should turn off as well 5 The system is now pressurized and ready for normal operation and use 6 During normal operation the pump will cycle on whenever a water outlet...

Page 15: ...per grease ethylene glycol based or other automotive antifreeze sanitary napkins or household toilet cleaners in the holding tanks Do not put anything solid in either tank that could scratch or punctu...

Page 16: ...nformation for filling LP tanks Propane appliances will not light when there is an improper mixture of gas and air Brand new LP tanks often have air and moisture trapped inside before first time use H...

Page 17: ...Refrigerator 120V AC shore power is powerful enough to kill you Always use a grounded shore power connection and never remove the third ground prong from your shore power cord Both reverse polarity or...

Page 18: ...ng system When 120V AC shore power is connected and the switch is turned ON the power center is activated and the battery ies will be re charged When 120V AC shore power is connected and the switch is...

Page 19: ...r s packet NUCAMP CONTROL PANEL S The nuCamp control panel is located near the main entrance door On it you will find the Alde control panel a tank fill level and battery charge level indicator along...

Page 20: ...cooking appliances for comfort heating May lead to carbon monoxide poisoning which can lead to death or serious injury DANGER Do not turn the burner control knobs ON allowing gas to escape before ligh...

Page 21: ...e leg in place 5 Adjust as needed Pinch point hazard Keep limbs clear of the arm extension when retracting the awning Serious injury or death can occur from not keeping clear of pinching points WARNIN...

Page 22: ...ion in the air Humidity is the amount of water in the air expressed as a percent Condensation begins when the air has reached 100 humidity Generally condensation in a camper is from improper air flow...

Page 23: ...ausea headache allergies coughing or wheezing Elderly folks children and those with previous lung problems are more susceptible to outgassing effects To reduce the effects of outgassing ventilate and...

Page 24: ...r will help protect from damage Salt Water Salt water is highly corrosive When towing in snowy areas in winter especially where salt is used on roads spray off the camper after every trip to remove co...

Page 25: ...and all 12V DC 120V propane gas appliances 3 Shut off the propane gas cylinder LP tank main valve 4 Disconnect the 120V AC power 5 Charge batteries to full capacity Check the battery once a month If...

Page 26: ...fill level Inspect and secure if necessary Check for leaks Professional inspection Bleed after filling Verify operation of all safety detectors Test Inspect for debris Proper operation and leak free V...

Page 27: ...seal b If this did not resolve the issue please contact your nearest nuCamp Dealer to have the unit looked at on site 2 Water pump stopped working a Check the filter located on the inlet side of your...

Page 28: ...ll be to repair the defect As a limited backup remedy in the event the RV cannot be repaired to determine in the sole and absolute discretion of nuCamp after a reasonable opportunity to repair nuCamp...

Page 29: ...associated with transporting the trailer for any warranty service shall be the sole responsibility of the owner WHAT IS NOT COVERED BY THIS LIMITED WARRANTY This Limited Warranty does not provide cove...

Page 30: ...ch as warranty service repairs and for cases where your dealer is unable to provide the information you need E mail customerservice nucamprv com Mailing Address P O Box 395 warranty nucamprv com Sugar...

Page 31: ...the width of interior living space regardless of protruding components MODEL The brand name of the trailer camper OVERALL HEIGHT Measured from the level ground to the top of the trailer accounting fo...

Page 32: ...as possible at time of creation nuCamp reserves the right to make refinements during the model year without notice All weights capacities dimensions are approximate It is the owner s responsibility to...

Reviews: