Splice/Tee Kit
Model #: RPST
EQUIPMENT REQUIRED:
• Utility knife
• Wire cutter
• Pliers (optional)
• Measuring tape/Ruler
• Scissors
• Crimp Tool -
Tyco AD1522
• Heat gun - 1000˚F
KIT CONTAINS:
Splice/Tee Kit
3
– Black heat shrink tubes
•
3½ " long
•
8 " long
2
– Blue heat shrink crimps
1
– Metal crimp sleeve
1
– Mastic strip
End Seal Kit
Two (2) kits with each containing:
1
– Heat shrink cap (½” x 1½” long)
1
– Heat shrink tube (¾” x 2” long)
1
– Aluminum tape strip
1
– Caution label
HOW TO CREATE A SPLICE
(COMBINING TWO CABLES)
Preparing the heating cables:
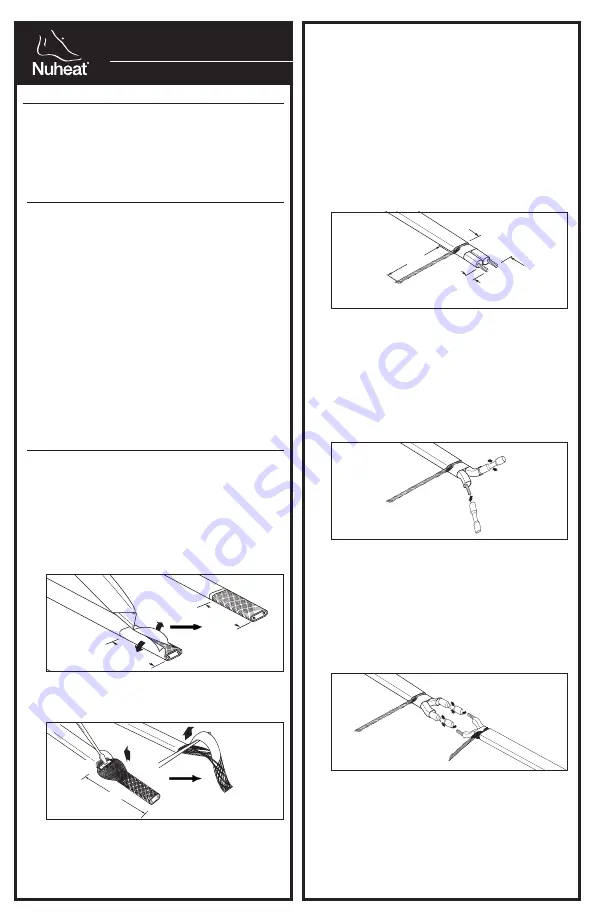
1. Allow 6” of extra length on each heating cable. Trim
cables evenly.
2. Slide the three black heat shrinks (3½" long, 8" long,
8½" long) down one of the cable lengths for use later.
3. From the end of the cable, strip away 3" of outer
jacket using utility knife. Do not cut into inner jacket.
4. Push back braid to loosen. Spread apart braid, bend the
heating cable and work it through the opening in the braid.
5. Twist the braid into a pigtail.
6. Using wire cutter, cut off approximately 1" of the exposed
cable so that only 2" of the exposed cable remain.
7. Using utility knife, strip away 1¼" of the inner jacket.
8. Using scissors, cut down the middle of the conductive
core lengthwise to separate into two parts. Do not cut
into the inner jacket that remains.
9. Completely remove ½" of the conductive core from
the tips to expose both of the bus wires.
TIP:
Lightly score the conductive core at the ½" mark.
Be sure not to contact the bus wires while scoring.
Using pliers, lightly hold the scored conductive core
section and twist continuously until conductive core
breaks at the score mark.
10. Repeat steps 1-9 on the other cable.
Splicing the heating cables:
11. Insert a blue heat shrink crimp over each bus wire
on the cables. Ensure the exposed bus wires are
completely covered by the blue heat shrinks. If the
blue heat shrinks do not cover the exposed wires,
remove more of the conductive core.
12. Bend one bus wire up and the other down to create
more room for crimp tool. Using crimp tool, crimp
the blue heat shrinks down so that they hold the bus
wires in place.
13. Insert the bus wires of the second cable into the
crimps. Ensure the exposed bus wires are completely
covered by the blue heat shrinks.
14. Ensure the exposed bus wires are inside the metal
crimp portion of the blue heat shrinks.
15. Using crimp tool, crimp the blue heat shrinks down so
that they hold the bus wires in place. Use heat gun to
shrink down crimps.
2
– Aluminum tape strips
3
– Cable ties
1
– Caution label
•
8½" long
3"
2"
1 ¼"
1½"
1"
3"
2"
½"
6.5"
½"
¼"
¼"
1½"
1½"
1½"
¼"
¼"
1½"
1½ "
1½"
1½"
7"
sp 6
sp 15
sp 3
sp 7
sp 16
sp 8
sp 10
sp 10
sp 17
3"
3"
sp 13
sp 18
sp 18
tee 11
tee 20
sp 20
T21
T21
T22
T23
T24
sp 22
6.5"
7"
3"
2"
1 ¼"
2"
1"
3"
2"
½"
½"
¼"
¼"
2"
2"
1½"
½"
¼"
¼"
1"
1"
1"
¼"
1¼"
1¼"
1½"
1½"
sp 6
sp 15
sp 3
sp 7
sp 16
sp 16
sp 8
sp 10
sp 17
3"
3"
sp 13
sp 18
tee 11
tee 20
sp 20
T21
T22
T22
T23
T24
sp 22
3"
2"
1 ¼"
1½"
1"
3"
2"
½"
6.5"
½"
¼"
¼"
1½"
1½"
1½"
¼"
¼"
1½"
1½ "
1½"
1½"
7"
sp 6
sp 15
sp 3
sp 7
sp 16
sp 8
sp 10
sp 10
sp 17
3"
3"
sp 13
sp 18
sp 18
tee 11
tee 20
sp 20
T21
T21
T22
T23
T24
sp 22
6.5"
7"
3
/
4"
3
/
4"
3"
3"
3
/
4"
3
/
4"
3
/
8"
3½"
3½"
6 3/4"
1
/
2"
1/4"
7"
8"
3"
3½"
6 1
/
2 "