background image


VirtualDJ 8 

– Numark NDX500


10 


temporary  and  the  track  will  resume  to  the  position  it  would  have  been  if  those 
functions never used. 
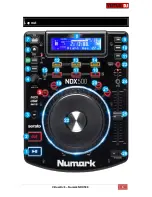
 

21. SEARCH

.  Hold  this  button  to  set  the  Jogwheel  to  temporary  set  the  Jogwheel  to 

Search/Seek mode. While  the  button  is  held,  use  the Jogwheel  to  fast  search/seek 
through the track. Once released, the Jogwheel will return to its previous mode. 
 

22. JOG

. Touch sensitive jogwheel. Use the jogwheel to scratch and pitch bend (if Vinyl 

mode is selected), or pitch bend (in CD mode) If the SEARCH button is pressed, use 
the Jogwheel to fast search/seek through the track. 
The  Jogwheel  also  offers  Loop  In  and  Loop  Out  adjustment  (see  LOOP  IN  and 
LOOP Out buttons) 
 

23. MASTER TEMPO.

 Press this button to "

lock

" the track's pitch to its original 

key.

 The 

track's tempo will remain at the speed designated by the Pitch Fader.  
 

24. PITCH  RANGE

.  Press  this  button  to  select  the  next  available 

range

  for  the 

Pitch


Fader (available values ±4%, ±8%, ±16% and ±100%). 
The 

Leds

 above this button will indicate the selected pitch range.  

A different Pitch range can be selected from the Deck Options in VirtualDJ GUI. 


25. PITCH.

 Adjust the track's playback speed (tempo).  

The  actual  pitch  fader  will  not  alter  the  pitch  of  the  track  if  the  actual  pitch  and  the 
software pitch value do not match (software soft-takeover, ghost fader visible on the 
GUI).  In  most  cases  this  may  happen  if  SYNC  is  prior  pressed  or  switching  decks 
and the other deck is having a different pitch software value. 


26. PITCH  BEND.

  Press  and  hold  down  these  buttons  to 

temporary  speed  up/slow 

down

  the  song  while  pressed. When  released,  the  track  playback  will  return  to  the 

speed designated by the Pitch Fader. 


Summary of Contents for NDX500

Page 1: ...VirtualDJ 8 Numark NDX500 1 ...

Page 2: ...VirtualDJ 8 Numark NDX500 2 Table of Contents Installation 3 Connections 3 Firmware Drivers 3 VirtualDJ 8 Setup 4 Advanced Setup 5 Layout 6 Operation 7 Useful Links 11 ...

Page 3: ... Output of a mixer Power on the NDX500 your mixer and your amplifier Set the NDX500 to MIDI mode using the SOURCE buttons Firmware Drivers No drivers are required to be installed for the NDX500 The NDX500 is a USB class compliant and your Operation system Windows or Mac will auto install the necessary drivers and will auto detect the NDX500 as a Midi device with built in Audio interface Check Numa...

Page 4: ...S Controller or a Subscription License is required to use the Numark NDX500 with VirtualDJ 8 Without any of the above Licenses the controller will operate for 10 minutes each time you restart VirtualDJ 8 http www virtualdj com buy index html Launch VirtualDJ 8 A detection window will appear verifying the proper connection Click on the Use Soundcard button to allow VirtualDJ to automatically create...

Page 5: ...cted will be additionally displayed in this window and any modifications in the mapping file will affect all units Find more details at http www virtualdj com wiki VDJscript html AUDIO Setup The unit has a pre defined Audio setup and a special button in the AUDIO tab of Config to provide that Please read the manual of the unit for further connections capabilities and setups http www numark com ima...

Page 6: ...VirtualDJ 8 Numark NDX500 6 Layout ...

Page 7: ...s and hold the Cue Button then press and hold the Play Button and then release both buttons 3 TAP If the track is paused use this button to set the 1st beat of the 4 bar Beatgrid to the current position If track is playing tap at least 4 times based on the tempo of the track to manually calculate the tempo and the beat phase of the track if VirtualDJ has not calculated it correctly Hold SHIFT down...

Page 8: ...screen The number of the available VirtualDJ decks along with the possible assigned deck on each unit depends on the total number of the deck son the used GUI or the total number that the connected units can control Manually assign of a VirtualDJ deck can be made from the Controllers tab of the VirtualDJ Settings window By default if 2 NDX500 are connected and a 4 decks skin is used the left unit ...

Page 9: ...HotCue 2 Hold SHIFT down and then use this button to trigger an Auto Loop of 2 beats in size 18 HOTCUE 3 Use this button to assign Hot Cue 3 Point or returns the track to this Hot Cue Point When button is unlit you can assign Hot Cue 3 by pressing it at the desired point in your track Once it is assigned the Hot Cue Button will light To return to Hot Cue 3 simply press it Hold the REC button down ...

Page 10: ...ck s pitch to its original key The track s tempo will remain at the speed designated by the Pitch Fader 24 PITCH RANGE Press this button to select the next available range for the Pitch Fader available values 4 8 16 and 100 The Leds above this button will indicate the selected pitch range A different Pitch range can be selected from the Deck Options in VirtualDJ GUI 25 PITCH Adjust the track s pla...

Page 11: ...s html Numark web page http www numark com Numark Support Center http www numark com support Numark NDX500 product page http www numark com product ndx500 Numark NDX500 User Guide http www numark com images product_downloads NDX500 UserGuide v1 1 pdf Hardware Integration Department 2015 ATOMIX PRODUCTIONS Reproduction of this manual in full or in part without written permission from Atomix Product...

Reviews: