


21
T (+ 44) 01460 68600
Information for scrubber dryer
As with all electrical equipment care and attention must be exercised at all times during its use, in addition to ensuring that routine and
preventative maintenance is carried out periodically in order to ensure its safe operation.
Failure to carry out maintenance as necessary, including the replacement of parts to the correct standard could render this equipment
unsafe and the manufacturer can accept no responsibility or liability in this respect.
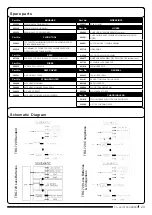
When ordering spare parts always quote the Model Number / Serial Number specified on the Rating Plate.
This appliance is not intended for use by persons (including children) with reduced physical, sensory or mental capabilities, or lack of experience and
knowledge, unless they have been given supervision or instruction concerning use of the appliance by a person responsible for their safety.
Children should be supervised to ensure that they do not play with the appliance.
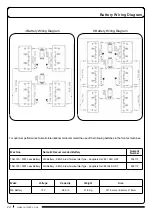
If this product does not have a factory installed Numatic battery charger and batteries then it is the responsibility of the owner and user of the product to
ensure that the charging system and battery combination are compatible, fit for purpose and safe to use.
Only use brushes provided with the appliance or those specified in the instruction manual.
The use of other brushes may impair safety.
A full range of brushes and accessories are available for this product.
Only use brushes or pads which are suitable for the correct operation of the machine for the specific task being performed.
It is essential that this equipment is correctly assembled and operated in accordance with current safety regulations.
When using the equipment always ensure that all necessary precautions are taken to guarantee the safety of the operator and any other persons who
may be affected.
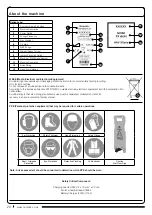
Wear non-slip footwear when scrubbing. Use a respiratory mask in dusty environments.
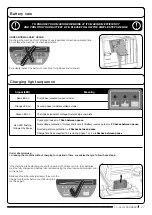
The machine, while charging, must be positioned so that the mains plug is easily accessible.
Remove the key from the ignition when cleaning and carrying out routine maintenance.
In order to prevent unauthorised use of the machine, the power source shall be switched off or locked, for example by removing the key of the main
switch or the ignition key.
When replacing major components the ignition key and battery fuses MUST be removed.
If this product does not have a factory installed Numatic battery charger and batteries then it is the responsibility of the owner and user of the
product to ensure that the charging system and battery combination are compatible, fit for purpose and safe to use.
Machines left unattended shall be secured against unintentional movement.
When detergents or other liquids are used, read the manufacturer’s instructions.
Operators shall be adequately instructed as to the correct use of the machine.
This machine is not suitable for picking-up hazardous dust.
Do not use on surfaces having a gradient exceeding that marked on the appliance.
The machine is not to be stored outdoors in wet conditions.
This machine is for indoor use only.
Read the instruction manual before using the appliance.
This product meets the requirements of IEC 60335-2-72.
NOTE: This machine is intended for commercial use, for example in hotels, schools, hospitals, factories, shops, offices and rental business.
• Ensure only competent persons unpack/assemble the machine.
• Keep your machine clean.
• Keep your brushes in good condition.
• Replace any worn or damaged parts immediately.
• Regularly examine the power cord for damage, such as cracking or ageing. If damage is found, replace the cord before further use.
• Only replace the power cord with the correct Numatic approved replacement parts.
• Ensure that the work area is clear of obstructions and / or people.
• Ensure that the working area is well illuminated.
• Pre-sweep the area to be cleaned.
• Remove the key when the appliance is not in use
• Use steam cleaners or pressure washers to clean the machine or use in the rain.
• Attempt machine maintenance or cleaning unless the power plug has been removed from the supply outlet,
if the machine is in charge mode or remove the key if in normal use.
• Allow any inexperienced repairs. Contact your nearest service centre.
• Strain charger lead or try to unplug by pulling on charger lead.
• Leave the brush deck in the lowered position when not in use.
• Expect the machine to provide trouble-free, reliable operation unless maintained correctly.
• Run the machine over any power cables during operation.
WARNING
CAUTION
DO
DON’T
ORIGINAL INSTRUCTIONS
READ MANUAL BEFORE USE


