background image


23/33 

Quick starter guide 


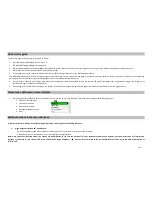
To start your night vision monocular, proceed as follow: 


Press the power button 

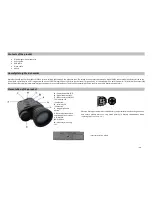
(A)

 to turn on the unit. 


The NUM’AXES logo will appear on the display.  


While looking through the eyepiece 

(M) 

at the LCD display screen, rotate the eyepiece until the display icons or edges of the display screen appear sharp to your eye.  


Remove the lens cover from the front of the objective lens 

(L).


If the image is not sharp, rotate the objective lens barrel 

(L)

 to change the focus until the subject appears sharp. 

The NUM’AXES monocular, VIS1012, uses digital night vision technology. The unit cannot be damaged by exposure to normal indoor or outdoor light levels. However you should avoid 
pointing it directly at the sun or other very bright light sources to avoid overloading the sensor. 


Turn on IR light if needed. If the image is too dark to easily view, press the IR button 

(C)

 to turn on the infrared LED light. If the image is too bright after turning on the IR light, press 

the IR button again to reduce the IR light level. 


If the image is still too dark after turning on the IR light, try pressing the image brightness button 

(E)

 once or twice to lower frame rate of the digital sensor. 


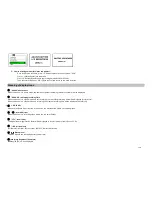
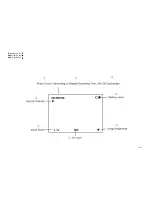
Presentation of the setup menu interface   


Press brightness switch 

(E)

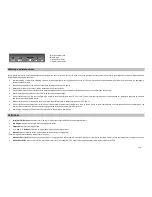
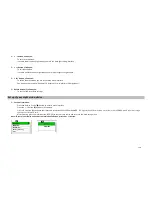
 and held for 2 seconds to enter into the setup menu interface. The setup menu includes the following options :  


Choice of the resolution 


Choice of movie size 


Date and time set up 


Backlight brightness set up 


USB 


Buttons functions in the setup interface 


In the setup interface, the buttons of your digital night vision unit are given the following functions:  


 Image brightness button        , enables you:  

-


Enter/Exit the main setup menu interface : Press an hold on for 3 seconds to enter/Exit setup interface. 

-


Used too as a confirm button when  you are in back light setting interface. 

Note:  Once  you  enter  the  setup  menu,  you  cannot  use  power  button  (A)  to  turn  the  device  off.  Si  vous  souhaitez  éteindre  votre  appareil,  vous  devrez  ressortir  de  l’interface  de 
réglages.  If  you  want  to  turn  the  unit  off,  press  and  hold  the  image  brightness 

button  for 3s to return to the review interface first. Then, press and hold power button 3s 

to turn it off. 

Summary of Contents for VIS1012

Page 1: ...Monoculaire de vision nocturne num rique Digital Night Vision Guide d utilisation User s guide Mod le Model VIS1012 Indice A...

Page 2: ...vision VIS1012 est conforme aux normes europ ennes suivantes complies with european standards below EN55022 2010 AC 2011 EN61000 3 2 2014 EN61000 3 3 2013 EN55024 2010 NUM AXES 745 rue de la Bergeress...

Page 3: ...t le monoculaire VIS1012 est un syst me de visualisation nocturne num rique portatif qui utilise un capteur infrarouge CMOS offrant une r solution et une qualit d image exceptionnelles Ses optiques tr...

Page 4: ...if L image est ensuite achemin e travers un capteur num rique CMOS vers un cran cristaux liquides Les images visionn es sont agrandies jusqu 30 fois zoom optique et zoom num rique Il est quip d une la...

Page 5: ...produits d entretien pour objectif d appareil photo Nettoyez le corps de l appareil avec un chiffon doux et propre Ne pas enlever l oculaire ceci pourrait endommager l cran LCD Ne pas laisser l appare...

Page 6: ...t num rique maximum Un appui bref sur le bouton permet d augmenter progressivement le zoom avant sur le sujet observ par incr ment de x 0 1 Un appui long sur le bouton permet d augmenter rapidement le...

Page 7: ...format AVI avec une r solution de 640 x 480 pixels par image VGA Pour arr ter votre enregistrement il vous suffit d appuyer nouveau sur le bouton d enregistrement F Gr ce aux r glages vous pouvez acc...

Page 8: ...ogie de vision num rique L appareil ne peut donc pas tre endommag en cas d exposition des niveaux normaux de luminosit Cependant vous devrez viter de l orienter directement vers le soleil ou d autres...

Page 9: ...l cran dans le menu r glage de la luminosit de l cran Le bouton vous permet soit De sortir des sous menus Peut galement tre utilis pour augmenter le niveau de luminosit de l cran dans le menu r glage...

Page 10: ...er plus de vid os Apr s avoir choisi appuyez sur le bouton REC pour confirmer votre choix et retourner au menu principal NB pour annuler votre manipulation et sortir des sous menus du menu taille des...

Page 11: ...aitez stocker les vid os et photos sur la MicroSD ou directement sur un PC Appuyez ensuite sur le bouton REC F pour enregistrer confirmer et retourner au menu principal Signification des ic nes de l c...

Page 12: ...s Cet ic ne indique le niveau de charge des piles de votre appareil Luminosit de l image OFF jour 30 images par seconde pas d ic ne l cran LOW nuit 25 images par seconde MED nuit 15 images par seconde...

Page 13: ...a d sactivation automatique Pour afficher toutes les ic nes en permanence appuyez en continu sur le bouton IR pendant environ 3 secondes R p tez l op ration pour revenir la superposition automatique d...

Page 14: ...e pas 1 Replacez les piles en s assurant du bon sens de la polarit bornes 2 Changez toutes les piles 3 Nettoyer le compartiment piles en insistant sur les points de contact L image observ e est trop l...

Page 15: ...ement 3 heures Dimensions 62 x 105 x 208 mm Poids 765 g Etanch it IPX4 Accessoires Tr pied ou monopod NUM AXES Temp rature d utilisation Entre 30 et 55 C En cas de dysfonctionnement Avant d attribuer...

Page 16: ...renouvellement du c ble USB et du c ble TV les risques de transport directs ou indirects li s au retour du produit chez NUM AXES l endommagement du produit r sultant de la n gligence ou faute de l ut...

Page 17: ...recyclage des d chets lectroniques ou rapport chez votre distributeur En adoptant cette d marche vous faites un geste pour l environnement vous contribuez la pr servation des ressources naturelles et...

Page 18: ...a portable digital night vision viewing system that utilizes an infrared sensitive CMOS sensor providing edge to edge resolution and outstanding image quality Fully multi coated optics increase light...

Page 19: ...tive lens The image is then processed through a digital CMOS sensor module and transferred to the micro liquid crystal display LCD Images viewed on the LCD are magnified until 30 times optical zoom di...

Page 20: ...posure to moisture and cannot be submerged in water Always store the unit in its carrying case in a dry well ventilated space in temperature above 15 C 60 F Do not store near heating devices After the...

Page 21: ...no digital zoom applied view represents the original 6x optical magnification IR Button C The IR button turns on off the Infrared LED illumination D for low light operation and is also used to reduce...

Page 22: ...oad Batteries Turn the battery compartment cover K in counter clockwise direction to remove it and insert 4 AA LR06 batteries as indicated inside the battery compartment Lithium AA batteries are recom...

Page 23: ...n again to reduce the IR light level If the image is still too dark after turning on the IR light try pressing the image brightness button E once or twice to lower frame rate of the digital sensor Pre...

Page 24: ...righthness Record button F allows you To confirm and record the settings Set up of your night vision device Set up of resolution Press and hold on 3 s the button to enter in menu interface Press the b...

Page 25: ...enu Movie Size Check the default time and date If need to adjust press the button B enter into the adjust interface Press IR button IR C to select Year Month Day Hour Minute Then press button B enter...

Page 26: ...ideo mode and not recording the reminding recording time will be displayed hrs min sec When the device is in video mode and recording the elapsed recording time will be displayed hrs min sec NO CARD W...

Page 27: ...27 33 LOW night 25 fps MED night 15 fps HIGH night 8 fps...

Page 28: ...ns constantly press and hold the IR button for 3 seconds Repeat to switch back to auto icon overlay only visible for 10 seconds max following the use of a button Selecting PAL or NSTC video output The...

Page 29: ...polarity terminals orientation 2 Replace all batteries 3 Clean the battery compartment especially the contact points Observed image is too bright The ambient light level is too high and or the IR ligh...

Page 30: ...5 x 208 mm Weight 765 g Waterproof grade IPX4 Spare parts Tripod or monopod NUM AXES Operation temperature between 30 et 55 C Troubleshooting Should your product stop working or develop a fault first...

Page 31: ...unauthorized persons loss or theft 3 If the product if found to be defective NUM AXES will either decide to repair or to replace it 4 No claim may be advanced against NUM AXES particularly in relatio...

Page 32: ...f Class B of electromagnetic compatibility This device complies with part 15 of the FCC rules operation is subject to the following two conditions 1 This device may not cause harmful interference and...

Page 33: ...33 33 NUM AXES Z A C des Aulnaies 745 rue de la Bergeresse CS 30157 45161 OLIVET CEDEX FRANCE www numaxes com info numaxes com export numaxes com...

Reviews: