background image

8

7

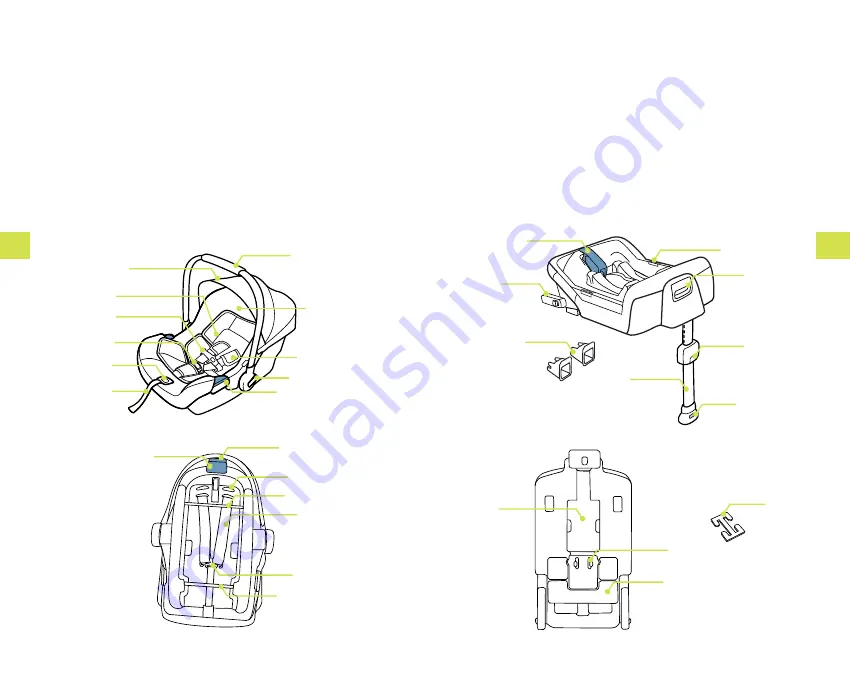
19  lock off (Blue)
20  Rigid lATCH (lower  


 attachments)
21  Rigid lATCH Guides
22  Stability leg
23  Stability leg Indicator
24  Stability leg Adjust  


      Button

25  Carrier Release Button
26  Bubble
27  Instruction Manual
 Storage
28  Stability leg Storage
29  Recline Adjustment
30  locking Clip

12

13

14

15

16

17

18

19

20

21

22

26

25

24

23

27

28

29

4

3

5

8

2

11

1

9

10

7

6

1 Canopy
2  Infant Insert
3  Chest Clip
4  Buckle and Crotch Belt
5  Adjuster Button
6  Adjuster Strap
7  lap Belt Guides (Blue)
8  Handle Button
9  Shoulder Pads 
10  Seat Cover

11 Handle
12  Shoulder belt Guide (Blue)
13  Stroller  Release Handle
*only used with infant car seat   
 adapters
14  Harness Slots
15  Base Attachment Bar
16  Harness Straps
17  Splitter Plate
18  Base Attachment Bar

30

Summary of Contents for Pipa

Page 1: ...instruction manual manual de instrucciones car seat...

Page 2: ...ging harness position 12 Securing child in carrier 14 Installation instructions 16 Cleaning and maintenance 27 Warranty and service 28 Where to find Nuna products 29 31 Thanks for choosing Nuna Nuna d...

Page 3: ...ay have concerning parts use or maintenance When you contact us please have your product s model and serial numbers ready so that we may help you efficiently These numbers can be found on a sticker on...

Page 4: ...no damage to the child restraint Never modify any part of the child restraint Only disassemble child restraint if instructed to by instruction manual Do not use any products or accessories in conjunc...

Page 5: ...vehicles However there are some vehicle belts and vehicle seats that are not safe for use with this restraint Some vehicle belt issues 1 Motorized Automatic shoulder belts These should not be used unl...

Page 6: ...Locking Clip 12 13 14 15 16 17 18 19 20 21 22 26 25 24 23 27 28 29 4 3 5 8 2 11 1 9 10 7 6 1 Canopy 2 Infant Insert 3 Chest Clip 4 Buckle and Crotch Belt 5 Adjuster Button 6 Adjuster Strap 7 Lap Belt...

Page 7: ...ow out Seat pad removal 1 Pull the fastening pieces underneath the edge of the seat out 2 Remove the harness from the splitter plate 3 Remove the seat pad from the adjustment button as shown 4 Remove...

Page 8: ...1 below top of carrier Infant insert The infant insert can be used as necessary to provide a snug fit for smaller babies The low birth weight pillow can be used in the infant insert for even smaller...

Page 9: ...h front slot as shown 2 Medium sized babies use this position Crotch belt is threaded into rear slot as shown 3 Larger babies use this position Crotch belt is threaded through front slot as shown Secu...

Page 10: ...heck that child is secure a Buckle is fastened b Harness straps are not twisted c Harness is snug A snug harness cannot be pinched and should not allow any slack d Chest clip is level with armpits If...

Page 11: ...7 Hook Rigid LATCH lower attachments onto vehicle LATCH lower anchor bars Confirm proper installation by pulling on the base AND also seeing that green is indicated on the connectors The Rigid LATCH l...

Page 12: ...e 22 6 Route the vehicle belt through the opening in the base labeled Belt Path and buckle the vehicle belt Both the shoulder AND lap belt must be under the blue lock off of a crash or sudden stop if...

Page 13: ...If vehicle only has a lap belt then put lap belt under blue lockoff 7 Tighten belt while pressing base into vehicle seat 8 While the shoulder belt is tight hook the bottom of blue lock off and press...

Page 14: ...ur vehicle only has a lap belt shoulder belt will not be used 5 Adjust the angle of the carrier A rolled up towel or foam pool noodle may be used to help adjust the amount of recline Angle is correct...

Page 15: ...r so that child is facing the aircraft seat 2 Route the aircraft lap belt under both lap belt guides and buckle 3 Adjust the angle of the carrier A rolled up towel or foam pool noodle may be used to h...

Page 16: ...t in use for a long period of time Put the infant car seat in a cool dry place and somewhere your child can not access it To clean the buckle rinse using warm water DO NOT use any soaps solvents or lu...

Page 17: ...eu USA Contact We always look forward to improving our products and developing new ideas so please feel free to contact us with any comments or questions regarding the Nuna products nuna eu USA Nuna...

Page 18: ...s La seguridad del ni o en el cargador Instrucciones para la instalaci n Limpieza y mantenimiento Garant a y servicio D nde se pueden encontrar los productos Nuna 33 34 40 42 44 45 48 50 62 63 64 Gra...

Page 19: ...contacto con nuestro Departamento de Servicio al Cliente con respeto a cualquier pregunta que tenga acerca de las piezas el uso o el mantenimiento Al contactarnos por favor tenga a mano sus n meros d...

Page 20: ...to delantero previsto con airbag EL FALLECIMIENTO o HERIDAS GRAVES pueden ocurrir Consulte el manual del usuario del veh culo o las advertencias y las informaciones sobre el airbag lateral No use el s...

Reviews: