9
TRES lx instructions
TRES lx instructions
EN
EN
10
1
- While pressing the harness adjustment button, pull completely the two shoulder harnesses of the enhanced
child restraint.
(17)
2
- Press the button to disengage the buckle.
(18)
3
- Place the buckle tongues against the magnetic area on the outer side of the child restraint so that the
tongues are held in place.
(19)
4
- Engage the buckle.
The green indicator shows that it has been buckled in place.
(20)
5
- Pull the adjustment webbing toward you to adjust it to the proper length and make sure your child is snugly
secured.
(21)
After the child is seated, recheck whether the shoulder harnesses are at the proper height.
Always keep child secured in harness and properly tightened by removing any slack.
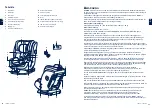
Forward Facing Mode
(Child height 100cm-145cm)
Installation for Forward Facing Mode
When using in the forward facing mode, please remove the infant insert, and place the shoulder harness
straps, buckle and buckle tongues in the harness hideaway storage compartments.
Please adjust the shoulder harnesses to proper length before storing the shoulder straps and buckle in their
storage compartments.
Please adjust the enhanced child restraint to the desired recline position. (4 positions for forward facing
mode). Align the top reclining indicator with one of the bottom white numbers.
While using and adjusting the vehicle seat belt, check that there are no twists in the vehicle seat belt that
could cause your child fastened incorrectly.
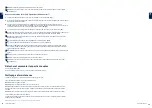
Securing your Child in the Enhanced child restraint Use infant insert
1
- Press the button to disengage the buckle as
(18)
.
2
- Remove Crotch Strap as shown in
(37)
and then the infant insert.
When installing the enhanced child restraint in the forward facing mode, do not use the infant insert.
3
- Detach the snaps.
(22)-1
4
- Lift the upper flap upward and pull the lower flap forward, and then store the shoulder straps in their storage
compartments.
(22)-2
5
- Pull the buckle to the back of the seat pad, and then store the buckle and buckle tongues in respective
storage compartments.
(22)-3 (22)-4
6
- Reattach the snaps to recover the seat pad. The recovered seat pad is shown as
(23)
.
Installing ISO Connector™ attachments
1
- Insert ISO Connector™ attachment guides to assist with installation. The ISO Connector™ attachment
guides can protect the surface of the vehicle seat from being torn.
(24)
2
- Extend the ISO Connector™ attachments by pressing the adjustment button
(25)
and pulling out the
attachments.
(26)
Make sure that both ISO Connector™ attachments are securely attached to their ISOFIX anchor points. The
colors of the indicators on both ISO Connector™ attachments should be completely green.
(27)
The ISO Connector™ attachments must be attached and locked onto the ISOFIX anchor points.
Check to make sure the enhanced child restraint is securely installed by pulling on the both ISO Connector™
attachments.
3
- Press the ISO Connector™ adjustment button and push the enhanced child restraint back against the vehicle
seat until tight.
(28)
Removing and storing ISO Connector™ attachments
1
-
To remove from the vehicle, press the ISO Connector™ adjustment button
(29)-1
and pull the base away
from the seat.
(29)-2
2
- To release the ISO connectors from the vehicle's ISOFIX anchor points, press and hold the front button
(30-1)
, while you press the back one
(30-2)
.
3
- To retract the ISO Connector™ attachments into the base press the ISO Connector™ adjustment button.
(31)
Securing the child in the child restraint system
1
- Please check whether the vehicle shoulder belt guides are at proper height when the child is in the
enhanced child restraint.
2
- Position the shoulder belt through the shoulder belt guide and pass the lap belt through the vehicle lap belt
slots. Engage the vehicle buckle and pull the vehicle belt to make sure it is tightened.
(32)(33)
Shoulder belt must pass through shoulder belt guide.
Lap belt must pass through lap belt slots.
NEVER
use a 2-point vehicle belt (lap-belt only) to secure your child.
DO NOT
use shoulder belt loose or positioned under arm.
DO NOT
use shoulder belt behind child’s back.
DO NOT
allow child to slide down in the enhanced child restraint in case of strangulation.
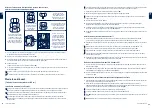
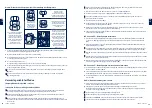
1
2
Detach the snaps
on the head
support to remove
the head portion of
the infant insert.
Remove the head support
portion of the infant insert
when the child’s
head no longer fits
comfortably.
Remove the body
portion of the infant insert
when the infant’s
shoulders no longer fit
comfortably.
Remove the infant insert
cushion by detaching the
snaps to allow more space
when the infant does not
fit comfortably. The
cushion can be used
separately without being
attached to the infant insert
to bolster the infant's back
for more comfort.
We recommend using
the full infant insert while
the baby is under 60cm
and can be used until
they outgrow the infant insert.
The infant insert increases
side impact protection.
Summary of Contents for tres lx
Page 1: ...IM 000216B...
Page 2: ...IMPORTANT KEEP THESE INSTRUCTIONS FOR FUTURE REFERENCE READ CAREFULLY...
Page 4: ...10 15 11 16 12 17 14 13 18 2 1 1 2 1 2 2 3 4 3 click...
Page 5: ...19 23 25 21 26 28 20 24 22 27 1 2 3 4 1 click click...
Page 6: ...29 30 34 36 32 33 38 37 2 2 2 1 2 31 35 1 2 1 3 2 1 1...
Page 7: ...39 41 40 42 43...


