background image

OPERATING INSTRUCTIONS 


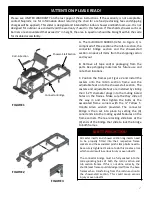
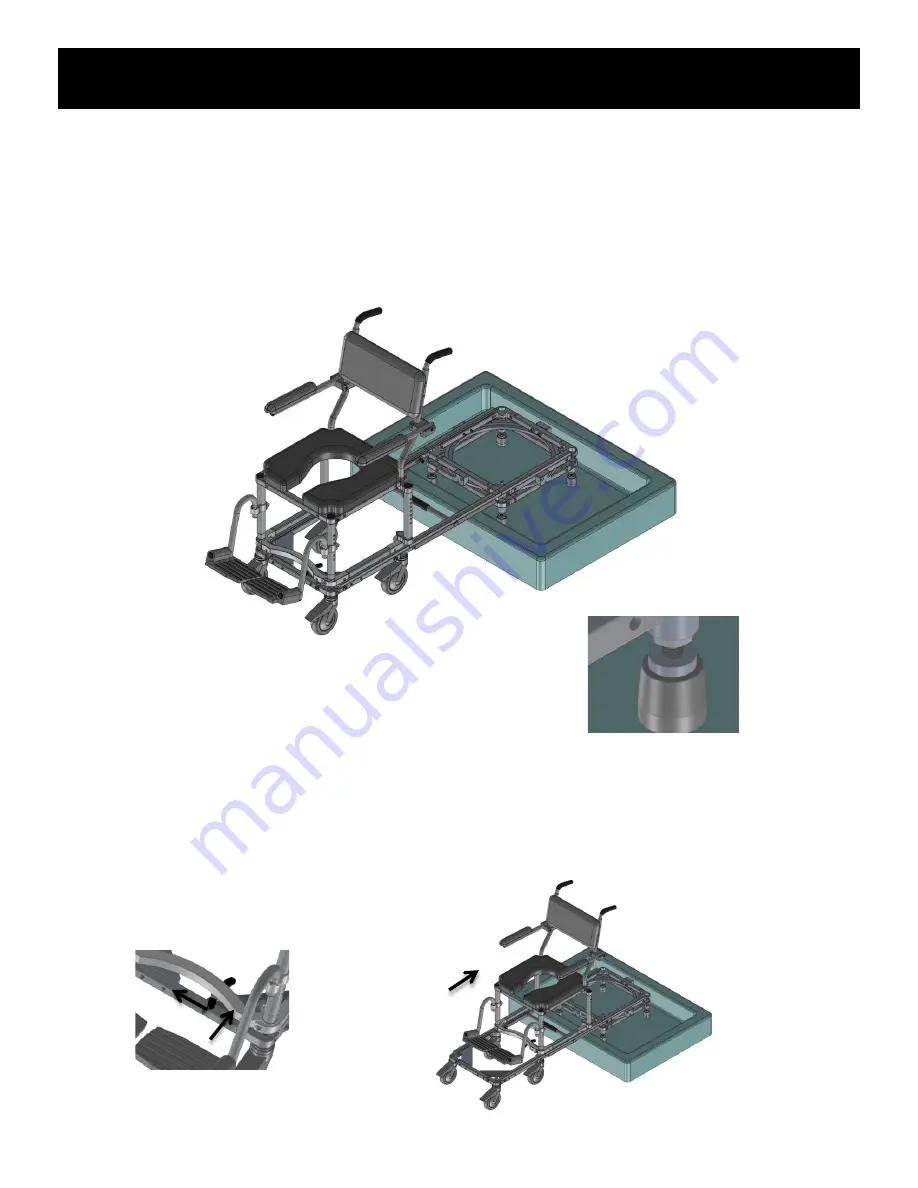
I. Now that the unit is assembled, remove the connector bridge and place the shower-stall section in the 

shower stall to be used, see Figure 11. Connect the two frames with the connector bridge and “lock” the 

bridge in place with its (4) slide bars. Then you need to set the tracks of both frames at approximately the 

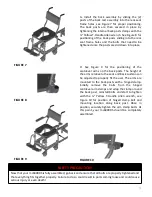
same height and be level. This is accomplished by screwing the (4) adjustable feet on the shower-stall 

section, see Figure 12. Once the shower-stall section height is correct, “lock” the leg heights by screwing 

the jam nuts up against the insert plugs. A 7/8” open ended wrench or a small crescent wrench can be 

used to do this. 


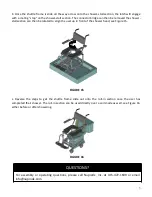
J.)  The  shuttle  section  is  now  ready  to  slide  back  onto  the  shower-stall  section  across  the  connector 

bridge. This is done by pulling back on the slider latch at the front base of the shuttle and simultaneously 

pushing the shuttle frame towards the shower-stall section, see Figures 13 and 14. 

FIGURE 11 

FIGURE 12 

FIGURE 13 

FIGURE 14 

Summary of Contents for MULTICHAIR 6000RS

Page 1: ... ATTENTION READ BEFORE ASSEMBLING OPERATING ASSEMBLY INSTRUCTIONS FOR THE NUPRODX MULTICHAIR 6000RS November 2016 1 ...

Page 2: ... feet onto the shower stall section The casters and adjustable feet are installed by sliding their 1 25 diameter plugs into the mating bored holes on the frames Make sure the they slide all the way in and then tighten the bolts at the associated frame corners with the Yellow T Handle Allen wrench provided The connector bridge is then set into place by setting the 4 coned ends into the mating eyele...

Page 3: ...ing up the leg holes at the bottom of the 4 corners of the seat frame with the legs per Figure 5 Slide the seat frame down onto the legs until they bottom out Once the legs have bottomed out and are securely fitted into the holes Tighten the associated pinch clamp corners with the Yellow T Handle Allen wrench F Place the footrests in footrest clamps per Figure 6 The footrests are height adjustable...

Page 4: ...o the seat and back cushion can be adjusted to properly fit the user The arms are mounted to the back posts with a hinged clamp Initially remove the bolts from the hinged cantilever arm clamps and wrap the clamp around the back post reinstall bolts and start to tighten with the Yellow T Handle Allen wrench see Figure 10 for position of hinged clamp bolt and mounting location along back post Once i...

Page 5: ... the 4 adjustable feet on the shower stall section see Figure 12 Once the shower stall section height is correct lock the leg heights by screwing the jam nuts up against the insert plugs A 7 8 open ended wrench or a small crescent wrench can be used to do this J The shuttle section is now ready to slide back onto the shower stall section across the connector bridge This is done by pulling back on ...

Page 6: ...tated to align the user up in front of the shower head see Figure 15 L Reverse the steps to get the shuttle frame slide out onto the roll in section once the user has completed their shower The roll in section can be used directly over a commode as well see Figure 16 either before or after showering 6 FIGURE 15 FIGURE 16 QUESTIONS For assembly or operating questions please call Nuprodx Inc at 415 ...

Page 7: ...d you have proof of purchase and of purchase date D DISCLAIMER Except for the above warranty and the acknowledgementby Nuprodx Inc that the chair as manufactured by it is fit for the general purpose for which most persons acquire a chair of its kind Nuprodx Inc provides that you accept the chair as is without warranties either express or implied Nuprodx Inc makes no warranty of fitnessfor your par...

Reviews: