11
C1358 SUPERVALVE™ WALL INLET & ROUGH-IN KIT
SAFETY INSTRUCTIONS
FOR HOUSEHOLD USE ONLY. INSTALL ONLY ON A NOMINAL 120 V, 60 Hz, 7 A SUPPLY
PROTECTED BY A MAXIMUM 15 A OVERCURRENT PROTECTIVE DEVICE.
THE PIN CONNECTOR ON THIS TYPE A WALL VALVE IS INTENDED FOR USE ON
A NOMINAL 120 V, 60 Hz, 7 A SUPPLY ONLY. IT IS REQUIRED TO BE WIRED BY A
QUALIFIED ELECTRICIAN AND IS REQUIRED TO CONFIRM
TO LOCAL ELECTRICAL CODES.
N
EW
C
ONSTRUCTION
B
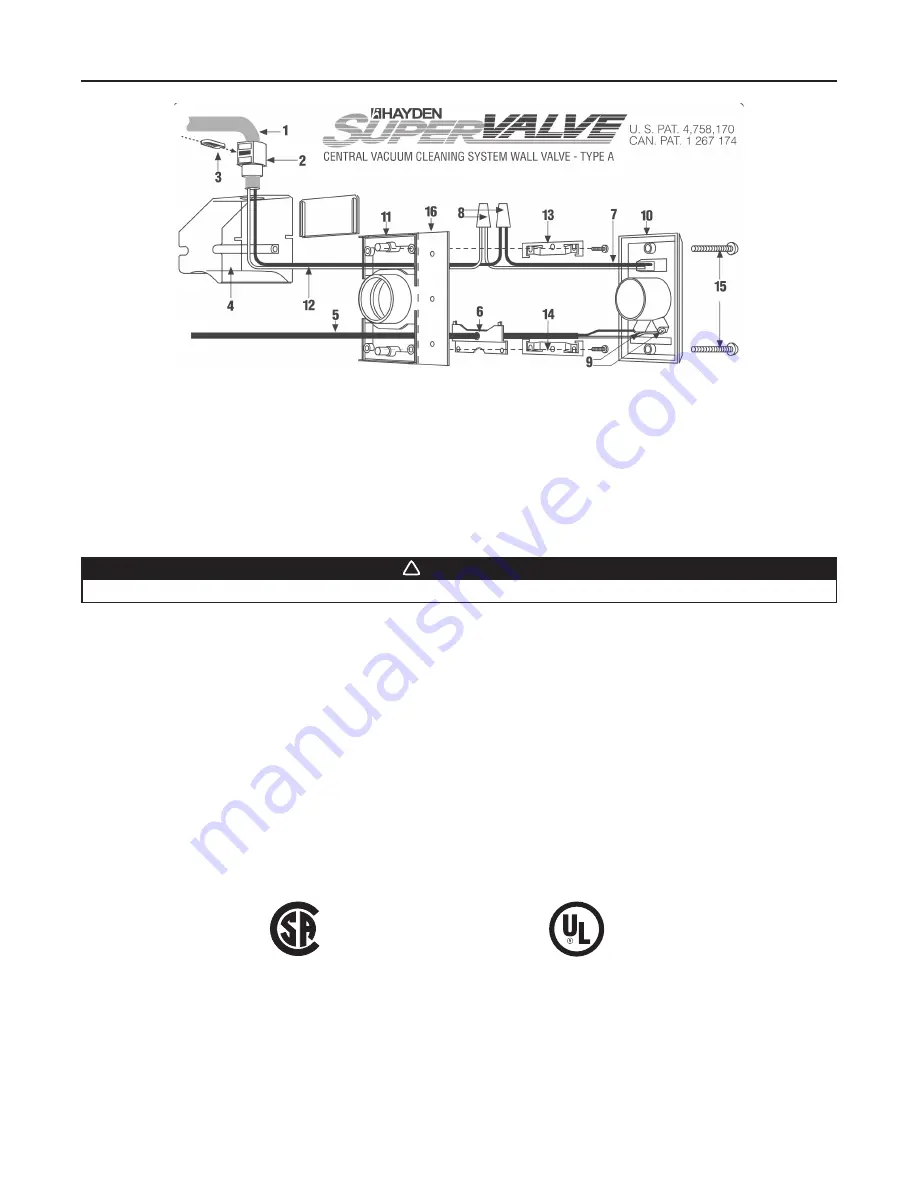
Install BUILDING WIRE CONDUCTORS (
1
) through the approved type electrical CONNECTOR (
2
) (supplied) until they
protrude approximately six inches from connector. Seat connector firmly into the opening atop the WIRING COMPARTMENT (
4
).
Insert and secure LOCKING TAB (
3
).
C
Splice wires from INLET VALVE RECEPTACLE (
7
) to the protruding building wire conductors with no. 31 TWIST-ON WIRE
CONNECTORS
(
8
) (not supplied).
NOTE
: WHITE wire to WHITE wire and BLACK wire to BLACK wire.
D
Feed LOW VOLTAGE RELAY WIRES (
5
) through opening in the LVT COVER PLATE (
6
) and connect to the two contact screws
of INLET VALVE FACE PLATE (
9
).
E
Push Inlet Valve face plate (
10
) into MOUNTING PLATE (
11
). At the same time, push ELECTRICAL CONDUCTORS (
12
) and
connectors
(
8
) into WIRING COMPARTMENT (
4
). Back out the two screws that hold the wiring compartment in place. Slip
upper FINISHED WALL CLIP (
13
) under the screw\heads and tightly fasten both wiring compartment and upper finished wall
clip
(
13
) with MOUNTING SCREWS (supplied).
F
Install the lower FINISHED WALL CLIP (
14
) with screws (supplied).
G
Secure Inlet Valve face plate (
10
) to mounting plate (
11
) using the two supplied color matched SCREWS (
15
).
No. LR 61865
No. 27Z2
F
INISHED
C
ONSTRUCTION
After pipe, low voltage relay control wire, electrical building wires and opening in wall has been cut:
B
Remove mounting plate NAILING FLANGE (
16
). Use a hack saw or score with razor knife along dotted line and snap off.
C
Repeat step
B
(from NEW CONSTRUCTION).
D
Install modified mounting plate with short 90° ELL glued in position into wall opening.
E
Repeat steps
C
-
G
(from NEW CONSTRUCTION).
AL0008A
WARNING
!
Do not operate on wet surfaces!
®


