background image


OPERATION MANUAL 

FLEXESERVE HUB®


FLEXESERVE® | Operation Manual Flexeserve Hub® | R4 MAR 2021 | 40002982 

Page | 18 of 24 

Operation 


WARNING 

Only if the operator has been trained and is skilled in the operation of the equipment 
covered in this guide should this information be followed. 
 
Do NOT attempt to cook products in the equipment. 
 
Do NOT place anything heavier than 25kg (55.1Ibs) on to the display surface.


The equipment will only maintain the temperature of products that have initially been cooked, prior to 
display.  Ensure  that  food  is  transferred  to  the  display  area  immediately  after  cooking  in  appropriate 
containers or packaging. 
 
Ensure  that  temperatures  of  the  displayed  products  are  checked  and  recorded  on  a  regular  basis,  in 
accordance with local regulations. 
 
The temperature of the unit is displayed by the controller and is for indication of operating temperature 
only. Do NOT use this as a reference to core temperature of foods on display; regular temperature probing 
of the product is to be performed. 


The minimum and maximum set-point values have been pre-set in the factory to prevent the equipment 
holding temperatures from being adjusted beyond legal and safety limits. These can only be adjusted by 
a Flexeserve® appointed engineer. 
 
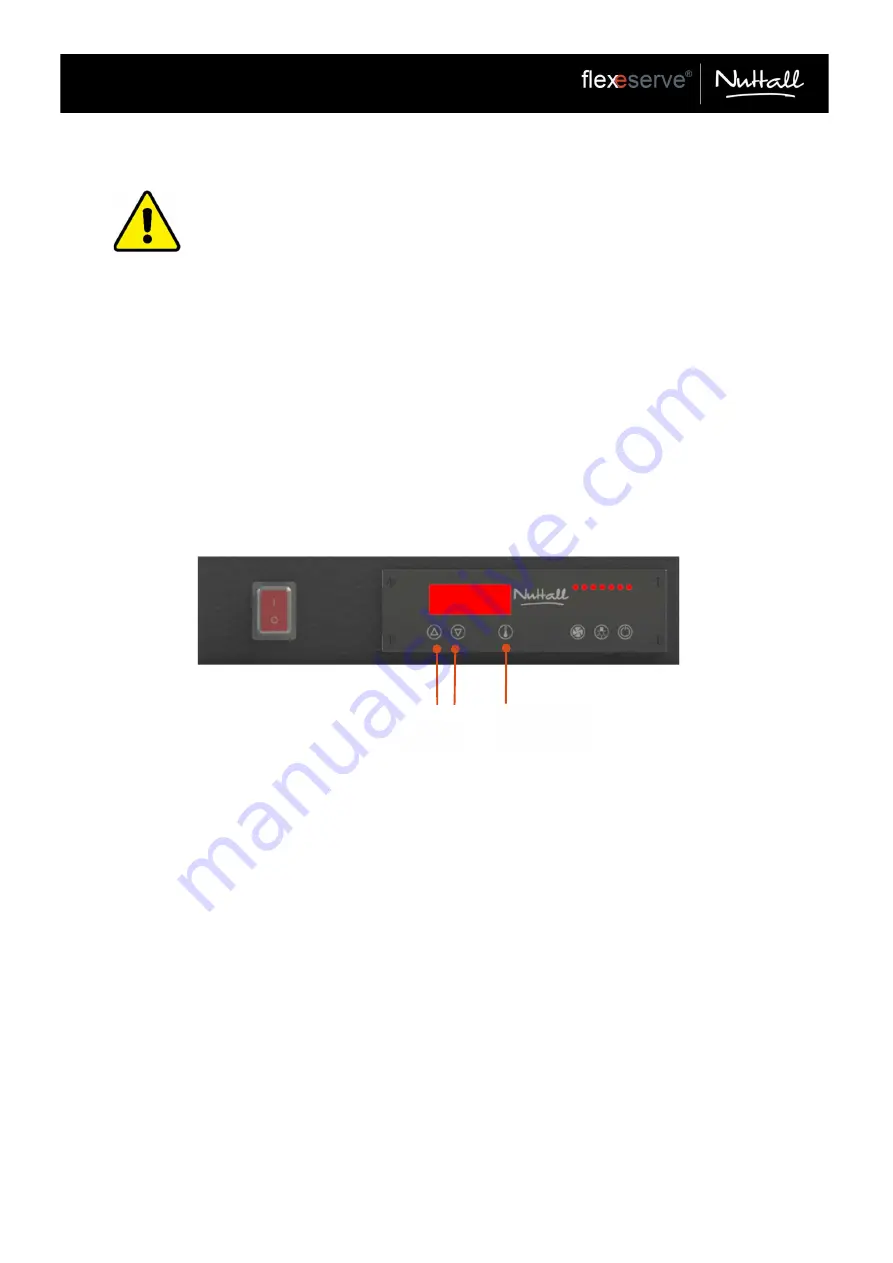
To view the set temperature of the unit, press the ‘temperature’ button for half a second, and then release. 
 
To  change the  temperature of the  unit,  press  and hold  the ‘temperature’  button  and  press  the arrow 
buttons to increase (

) or decrease (

) the temperature. When the ‘temperature’ button is released, the 

new value is stored. After the temperature has been set, the display will revert back to the operating 
temperature, which will rise or fall as it reaches the set temperature. 
 
Flexeserve Hub® is manufactured to comply with health and safety regulations. You must operate the 
equipment properly using only calibrated temperature probes to ensure food is thoroughly cooked to the 
safe standards according to local regulations. 
 

Temperature 

adjust 

Temperature 

button 

Summary of Contents for FH-60R-GB

Page 1: ......

Page 2: ......

Page 3: ...ctions 6 Specifications 7 Overall Dimensions 8 9 Installation 10 Positioning 11 Moving 11 Electrical Connection 12 13 Equipment Configuration 14 Power ON OFF 15 Switching On 16 Switching Off 17 Operat...

Page 4: ...the result of a constant commitment to development and improvement it may be the case that your equipment deviates in detail from what is described in this manual The following instructions are only i...

Page 5: ...rovisions of lifting and moving HOT SURFACE To indicate that the marked item can be hot and should not be touched without taking care INFORMATION Information provided for trained and skilled operators...

Page 6: ...en should not be allowed to play with or be near the equipment Before using the equipment Inspect the power cable for damage If damaged disconnect and isolate Flexeserve Hub Ensure that there are no f...

Page 7: ...elves Flexeserve Hub maintains the food products to a fixed temperature of between 65 C 149 F and 90 C 194 F by means of an air circulation heater NOTE Each Flexeserve Hub will be factory set to maint...

Page 8: ...MANUAL FLEXESERVE HUB FLEXESERVE Operation Manual Flexeserve Hub R4 MAR 2021 40002982 Page 8 of 24 Overall Dimensions Model 600 A Width B Depth C Height Weight 559mm 22 864mm 34 1871mm 73 6 190kg 418...

Page 9: ...ANUAL FLEXESERVE HUB FLEXESERVE Operation Manual Flexeserve Hub R4 MAR 2021 40002982 Page 9 of 24 Overall Dimensions Model 1000 A Width B Depth C Height Weight 984mm 38 7 864mm 34 1871mm 73 6 288kg 63...

Page 10: ...ry may incur charges Ensure that safe manual handling practices are employed at all times Flexeserve Hub should be placed into position using the correct procedures in line with local and regional saf...

Page 11: ...quipment must be kept in the vertical orientation at all times A gap of at least 50mm 2 inches should be left between the back of the equipment and any wall solid surface Once the unit is placed in th...

Page 12: ...ralia 16 AMP 1 PH UK Sweden The equipment must be connected to a branch circuit protected grounded supply in accordance with local electrical codes Each unit must have its own dedicated power supply N...

Page 13: ...on Under no circumstances should any electrical cables or power points be installed directly in contact with any part of the unit or pose a risk to safety If the mains power lead becomes damaged isola...

Page 14: ...on CAUTION Each wire shelf must be fitted correctly to ensure safe and correct operation Slide signage into the ticket strip Close the door when not in use The door must be open in order to open the f...

Page 15: ...xeserve Hub The door must be open in order to open the cover The controls are designed to slide out of the unit for access and use Set the mains power switch to the I position to apply power to the eq...

Page 16: ...equipment is empty and clean prior to switching on Check that the equipment is connected to a power socket Before switching the equipment on it is the operator s responsibility to visually inspect the...

Page 17: ...d may take up to two hours to cool down WARNING Cleaning and maintenance should only be carried out when the unit has sufficiently cooled and with the mains supply isolated To switch off the unit set...

Page 18: ...ference to core temperature of foods on display regular temperature probing of the product is to be performed The minimum and maximum set point values have been pre set in the factory to prevent the e...

Page 19: ...ensure the core temperature of the product is above the legal holding temperature of the local authority Refer to in house operations manual for product probing instructions It is beneficial to enter...

Page 20: ...se excessive amounts of water Do NOT clean the equipment with high pressure cleaners jets of hot water or high pressure steam All traces of food debris should be removed completely Do NOT use abrasive...

Page 21: ...th Wipe the back panel using mild detergent and a soft cloth Reassemble the base tray and crumb catcher once the above cleaning process is complete Door Seals The inner door seals will need to be remo...

Page 22: ...n Manual Flexeserve Hub R4 MAR 2021 40002982 Page 22 of 24 Once the seal is fully pressed into the door s ensure that it is seated flat in its location WARNING Do NOT use aggressive detergents Ensure...

Page 23: ...the temperature to drop Relocate the equipment to a more suitable location If this is not possible raise the temperature settings call your service provider as an Engineer is required to do this Set t...

Page 24: ...osal of this Equipment WASTE OF ELECTRICAL AND ELECTRONIC EQUIPMENT Penalties may be applicable for incorrect disposal of waste in accordance with national legislation This product should not be mixed...

Page 25: ...k regarding any concerns relating to this equipment is always welcome Customer Support t 44 0 1455 638300 Enquiries Customer Support e customer support flexeserve com Enquiries e info flexeserve com C...

Page 26: ......

Reviews: