background image

Maintaining and Servicing the NVIDIA DGX Station

DGX Station

DU-08255-001 _v4.6   |   43


CAUTION:

 To prevent damage from electrostatic discharge, avoid touching any of the

components inside the DGX Station other than any components that you are replacing

or servicing.

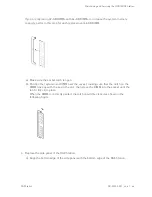
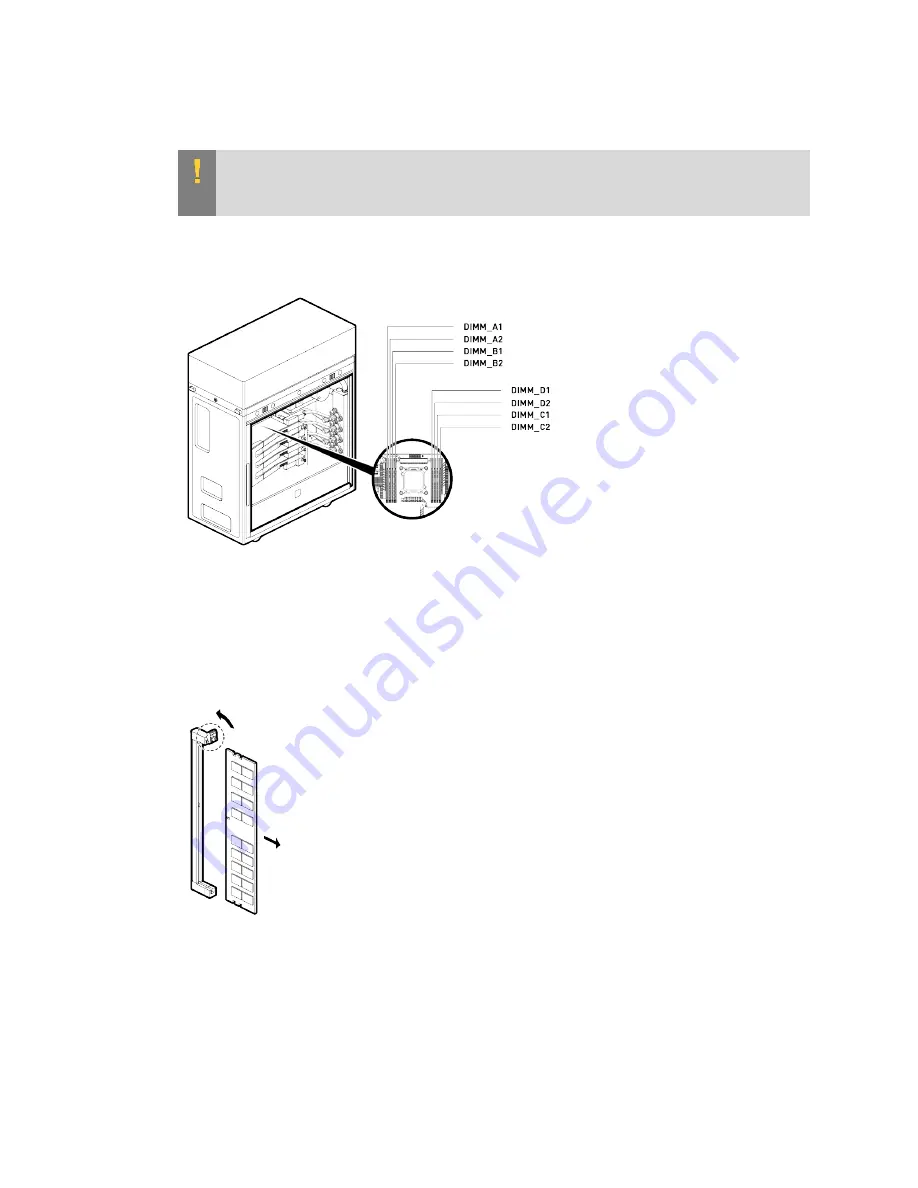
 3. If you are replacing a faulty DIMM, use the following figure as a guide to locate the faulty

DIMM.


 4. Remove the DIMM.

If you are replacing 32-GB DIMMs with 64-GB DIMMs to increase the system memory

capacity, remove all eight 32-GB DIMMs before fitting the replacement 64-GB DIMMs.


 a). Press upwards on the latch at the upper end of the DIMM socket to open the latch and

unseat the DIMM from the socket.

 b). Pull the DIMM towards you to remove it from the socket.

 5. Carefully insert the replacement DIMM.

Summary of Contents for DGX Station

Page 1: ...DU 08255 001 _v4 6 July 2020 DGX Station User Guide ...

Page 2: ... Preventing IP Address Conflicts Between Docker and the DGX Station 17 2 10 Managing CPU Mitigations 18 2 10 1 Determining the CPU Mitigation State of the DGX System 18 2 10 2 Disabling CPU Mitigations 18 2 10 3 Re enabling CPU Mitigations 19 Chapter 3 Upgrading DGX OS Desktop Software on DGX Station 20 3 1 Upgrading Within the Same DGX OS Desktop Major Release 20 3 1 1 Upgrading Within the Same D...

Page 3: ...hecking the Status of the DGX Station RAID Array 50 4 7 3 Checking the Status of the DGX Station SSDs 51 4 7 4 Adding or Replacing an SSD 52 4 7 5 Rebuilding the DGX Station RAID Array 56 4 7 6 Configuring the SSDs for Data Storage as an NFS Cache 57 4 7 7 Sanitizing the DGX Station Persistent Storage 59 4 7 7 1 Running an Ubuntu Desktop LiveCD Session on the DGX Station 60 4 7 7 2 Sanitizing All ...

Page 4: ...ndicators 84 B 4 Audio I O Connections 85 Appendix C Compliance 87 C 1 DGX Station Model Number 87 C 2 Argentina 87 C 3 Australia New Zealand 87 C 4 Brazil 88 C 5 Canada 88 C 6 China 89 C 7 European Union 90 C 8 India 91 C 9 Israel 91 C 10 Japan 92 C 11 Russia 92 C 12 South Africa 92 C 13 South Korea 93 C 14 Taiwan 93 C 15 United States 94 C 16 United States Canada 95 C 17 Vietnam 95 Appendix D DG...

Page 5: ...u use the DGX Station see the following table Task Additional Information Use the Ubuntu Desktop Linux OS Ubuntu 18 04 Desktop Guide https help ubuntu com 18 04 ubuntu help index html Ubuntu 16 04 Desktop Guide https help ubuntu com 16 04 ubuntu help index html Find out about the DGX OS Desktop software for the DGX Station DGX OS Desktop Release Notes Use the DGX Station to download and run contai...

Page 6: ...About this Guide DGX Station DU 08255 001 _v4 6 vi ...

Page 7: ...st multi GPU workstation for deep learning and AI analytics You can use the DGX Station to run neural networks and deploy deep learning models Because the DGX Station is software compatible with the NVIDIA DGX 1 server you can also use the DGX Station to optimize applications to run on a production DGX 1 cluster ...

Page 8: ... Desktop Software Summary The DGX OS Desktop software that is supplied with the DGX Station includes the software that you need for downloading and running containers for deep learning frameworks The software is already installed on the DGX Station except where licensing requirements mandate that the software be supplied separately Any software that must be supplied separately is installed automat...

Page 9: ...mory and Storage Component Qty Unit Capacity Total Capacity Description System memory 8 32 GB 256 GB ECC Registered RDIMM DDR4 SDRAM Note You can replace all eight factory installed 32 GB DIMMs with 64 GB DIMMs to give a total capacity of 512 GB Data storage 3 1 92 TB 5 76 TB 2 5 6 Gb s SATA III SSD in RAID 0 configuration Note Since DGX OS Desktop 4 4 0 or DGX software for Red Hat Enterprise Linu...

Page 10: ...nspect the NVLINK bridge which connects the GPUs and the drive trays in the drive cage to see if they have shifted out of position If any of these components has shifted reseat the component before operating the DGX Station Site the DGX Station in a location that is clean dust free well ventilated and near an appropriately rated grounded AC power outlet Leave approximately 5 12 5 cm of clearance b...

Page 11: ...GX Station If you are returning the DGX Station to NVIDIA under a return merchandise authorization RMA replace this packing piece before repacking the DGX Station Before you begin ensure that The DGX Station is shut down and powered off The power cable all communications cables and any peripheral devices such as displays and keyboards are disconnected from the DGX Station 1 Push the button on the ...

Page 12: ...ing piece gently grasp it and pull it towards you If you are unpacking an advance shipped replacement for a unit that you are returning to NVIDIA under an RMA retain this foam packing piece with all other DGX Station packaging You will need the packaging to repack your original DGX Station for shipment to NVIDIA To replace the foam packing piece gently push it into position around the GPU cards in...

Page 13: ...tation To complete this task you need the following items which are not supplied with the DGX Station Display with power cable and connector cable terminated in a DisplayPort connector or HDMI connector If your display connector cable is terminated in an HDMI connector you can use one of the supplied adapters to connect the cable to the DGX Station USB keyboard USB mouse ...

Page 14: ...to use multiple displays For details see Configuring the DGX Station To Use Multiple Displays 2 Use any of the two Ethernet ports to connect the DGX Station to your LAN with Internet connectivity Note Connect only one Ethernet port on the DGX Station to the Internet unless you plan to configure the ports manually and disable DHCP on at least one of the ports By default both Ethernet ports on the D...

Page 15: ...nd applications to malfunction 3 Make sure that the power supply rocker switch is in the OFF position Current units Earlier units 4 Connect the supplied power cable from the power socket at the back of the unit to an appropriately rated grounded AC outlet For details of the power consumption input voltage and current rating of the DGX Station see Power Specifications ...

Page 16: ...oducts or for any other purpose Not all power cables have the same current ratings Do not use household extension cables with your product Household extension cables do not have overload protection and are not intended for use with computer systems 5 Connect the display to a suitable AC outlet and power on the display 6 Move the DGX Station power supply rocker switch to the ON position ...

Page 17: ...Setting Up the NVIDIA DGX Station DGX Station DU 08255 001 _v4 6 11 Current units Earlier units 7 Push the Power button on the front of the unit to power on the DGX Station ...

Page 18: ...have been made available after your DGX Station was manufactured To ensure that you have the latest DGX Station software including security updates check for updates and install any available updates before using your DGX Station For more information see Upgrading Within the Same DGX OS Desktop Major Release 2 5 Adding Support for Additional Languages to the DGX Station During the initial Ubuntu O...

Page 19: ...the purchase Registration allows you to access the NVIDIA Enterprise Support Portal obtain technical support get software updates and set up an NGC for DGX systems account If you did not receive the information open a case with the NVIDIA Enterprise Support Team at https www nvidia com en us support enterprise 2 7 Configuring the DGX Station To Use Multiple Displays One of the NVIDIA Tesla V100 GP...

Page 20: ...oose Devices Displays DGX OS Desktop 3 releases From the Ubuntu system menu at the right of the desktop menu bar choose System Settings and in the System Settings window that opens click Displays b In the Displays window that opens make the changes to the display settings that you want and click Apply High resolution displays consume a large quantity of GPU memory If you have connected three 4K di...

Page 21: ...GX OS Desktop 3 releases To shut down the LightDM display manager type the following command sudo service lightdm stop To start the display manager log in to the DGX Station remotely and type the command for your DGX OS Desktop release DGX OS Desktop 4 releases sudo telinit 5 DGX OS Desktop 3 releases sudo service lightdm start 2 8 Enabling Multiple Users to Access the DGX Station Remotely To enab...

Page 22: ...o privileges to run containers Meeting this requirement involves enabling users who will run Docker containers to run commands with sudo privileges Therefore you should ensure that only users whom you trust and who are aware of the potential risks to the DGX Station of running commands with sudo privileges are able to run Docker containers Before allowing multiple users to run commands with sudo p...

Page 23: ... ip address range fixed cidr container ip address range bridge ip address range The bridge IP address range to be used by Docker containers for example 192 168 127 1 24 container ip address range The container IP address range to be used by Docker containers for example 192 168 127 128 25 This example shows a complete etc systemd system docker service d docker override conf file that has been edit...

Page 24: ... enabled if the output consists of multiple lines prefixed with Mitigation Example KVM Mitigation Split huge pages Mitigation PTE Inversion VMX conditional cache flushes SMT vulnerable Mitigation Clear CPU buffers SMT vulnerable Mitigation PTI Mitigation Speculative Store Bypass disabled via prctl and seccomp Mitigation usercopy swapgs barriers and __user pointer sanitization Mitigation Full gener...

Page 25: ...t should include several Vulnerable lines See Determining the CPU Mitigation State of the DGX System for example output 2 10 3 Re enabling CPU Mitigations 1 Remove the nv mitigations off package sudo apt purge nv mitigations off 2 Reboot the system 3 Verify CPU mitigations are enabled cat sys devices system cpu vulnerabilities The output should include several Mitigations lines See Determining the...

Page 26: ...s for example from DGX OS Desktop 3 1 7 to 4 0 4 Upgrading to a new major DGX OS Desktop release upgrades all the packages to the latest version in the repositories for the new DGX OS Desktop release For details about the available updates see Available DGX Station Software Updates These updates may contain important security updates To protect your DGX Station keep your system up to date with the...

Page 27: ...from the Software Updater Application Use the Software Updater applicaton to upgrade DGX Station in the same major release Ensure that you are logged in to your Ubuntu desktop on the DGX Station as an administrator user 1 Press the Super key 2 In the search bar type Software Updater 3 Open the Software Updater review the available updates and click Install Now If no updates are available the Softw...

Page 28: ...an administrator user 1 Download information from all configured sources about the latest versions of the packages sudo apt update 2 Review the available updates by simulating an upgrade of the packages sudo apt s full upgrade 3 Install all available updates for your current DGX OS Desktop release sudo apt y full upgrade 4 When the upgrade is complete restart your DGX Station Any upgrade to the NV...

Page 29: ...e process sudo dgx release upgrade If you are logged in to the DGX Station remotely through secure shell SSH you are asked if you want to continue running under SSH Continue running under SSH This session appears to be running under ssh It is not recommended to perform a upgrade over ssh currently because in case of failure it is harder to recover If you continue an additional ssh daemon will be s...

Page 30: ...disabled Lock screen disabled Your lock screen has been disabled and will remain disabled until you reboot To continue please press ENTER Inhibiting until Ctrl C is pressed 7 Press Enter to continue Do not press Ctrl C in response to this warning Pressing Ctrl C terminates the upgrade process 8 When prompted to resolve conflicts in configuration files evaluate the changes before accepting the main...

Page 31: ...lease that you are upgrading to consult the release notes for that release 12 Confirm the NVIDIA Graphics Drivers for Linux version nvidia smi For example for an upgrade to DGX OS Desktop 4 0 4 the NVIDIA Graphics Drivers for Linux version is 410 79 Tue Dec 11 18 03 56 2018 NVIDIA SMI 410 79 Driver Version 410 79 CUDA Version 10 0 For the NVIDIA Graphics Drivers for Linux version of the release th...

Page 32: ...able updates by simulating an upgrade of the packages sudo apt s full upgrade 5 Install all available updates for your current DGX OS Desktop release sudo apt y full upgrade 6 When the upgrade is complete restart your DGX Station Any upgrade to the NVIDIA Graphics Drivers for Linux requires a restart If you upgrade the NVIDIA Graphics Drivers for Linux without restarting the DGX Station running th...

Page 33: ...ks that are available from the NVIDIA GPU Cloud NGC Registry for DGX Do not obtain updates to Docker from Docker s repositories NVIDIA Container Runtime for Docker has strict dependencies on the Docker CE version and updates from Docker s repository may cause NVIDIA Container Runtime for Docker to be removed The repository maintained by NVIDIA is enabled by default in Ubuntu Software Updates Other...

Page 34: ...f you are running a DGX OS Desktop 4 release which is based on Ubuntu 18 04 release is bionic 3 4 2 Updates to the Ubuntu Software on the DGX Station Updates to the Ubuntu software on the DGX Station are available from the Canonical repositories The repositories that are enabled by default in Ubuntu Software Updates Ubuntu Software on the DGX Station are shown in the following screen capture Note ...

Page 35: ...updates from the Ubuntu software repositories use Software Updates You can configure your DGX Station to notify you of important security updates more frequently than other updates In the following example the DGX Station is configured to check for updates daily to display important security updates immediately and to display other updates every two weeks 3 6 Getting Release Information for DGX St...

Page 36: ...Nov 15 15 35 25 PST 2017 DGX_OTA_VERSION 3 1 4 DGX_OTA_DATE Fri Jan 19 13 49 06 PST 2018 DGX_OTA_VERSION 3 1 7 DGX_OTA_DATE Tue Jun 19 14 23 18 PDT 2018 DGX_OTA_VERSION 4 0 4 DGX_OTA_DATE Tue Dec 11 17 45 30 PST 2018 3 7 Updating Software on an Air Gapped DGX Station System For security purposes some installations require that the DGX Station be an air gapped system An air gapped system is not con...

Page 37: ...btained from your private repository 3 7 2 Loading a Container Image onto an Air Gapped DGX Station System Loading a container image from the NGC Container Registry requires an Internet connection On an air gapped system which is isolated from the Internet you must use a removable medium to copy the container image from a system with an Internet connection to the air gapped system 1 On a system wi...

Page 38: ...DGX Station DU 08255 001 _v4 6 32 4 On the air gapped system load the container image from the local copy of the archive file that contains the image docker load i framework tar 5 Confirm that the image is loaded on the air gapped system docker images ...

Page 39: ...ll also impair the performance of the system may overload the system s electrical circuits and may cause it to overheat 4 1 Problem Resolution and Customer Care Log on to the NVIDIA Enterprise Support https nvid nvidia com dashboard site for assistance with troubleshooting diagnostics or to report problems with your DGX Station Refer to Customer Support for the NVIDIA DGX Station for additional co...

Page 40: ...the NVIDIA DGX Station DGX Station DU 08255 001 _v4 6 34 3 Use compressed air to blow the dust from the mesh filter 4 Line up the mesh filter with the runners under the DGX Station and slide it back into position under the unit ...

Page 41: ...ion about how to perform these tasks for earlier releases see the following topics DGX OS Desktop 4 3 0 and Earlier Checking the Health of the DGX Station DGX OS Desktop 4 3 0 and Earlier Collecting Information for Troubleshooting the DGX Station 4 4 DGX OS Desktop 4 3 0 and Earlier Collecting Information for Troubleshooting the DGX Station Note Starting with release 4 4 0 the tool to collect trou...

Page 42: ...gh 3 1 3 tmp nvidia sys info timestamp random number out Use any method that is convenient for you to send the file to NVIDIA Support Enterprise Services For example send the file as an e mail attachment 4 5 DGX OS Desktop 4 3 0 and Earlier Checking the Health of the DGX Station Note Starting with release 4 4 0 the NVIDIA System Health Checker nvhealth tool is replaced by NVIDIA System Management ...

Page 43: ...0 sdc 1 sdd 2 181764096 blocks super 1 2 level 5 512k chunk algorithm 2 4 3 UUU_ recovery 17 2 10426232 60588032 finish 45 8min speed 18238K sec 4 6 Replacing the System and Components Be sure to familiarize yourself with the NVIDIA Terms Conditions documents before attempting to perform any modification or repair to the DGX Station These Terms Conditions for the DGX Station can be found through t...

Page 44: ... the original SSDs install the new SSDs into the defective system when shipping it back AC Power Cable Do not return the AC power cable when returning the DGX Station Accessories Include all supplied accessories except the AC power cable when returning the DGX Station 4 6 2 Repacking the DGX Station for Shipment If you are returning the DGX Station to NVIDIA under an RMA repack it in the packaging...

Page 45: ...hat you have a second person to help you roll the DGX Station into position 3 Insert the front packing piece into the tray ensuring that the lip of the packing piece is under the DGX Station 4 Insert the side packing pieces into the tray ensuring that the lip of each piece is under the DGX Station 5 Pack all supplied accessories in the accessory boxes except the AC power cable ...

Page 46: ...of each accessory box are facing away from the DGX Station The accessory boxes are required to help hold the DGX Station in place in its packaging during shipment Be sure to place both accessory boxes in the slots in the tray even if one or both boxes are empty 7 Pull up the flap at the front of the bottom tray of the DGX Station shipping carton 8 Lower the top cover of the shipping carton into po...

Page 47: ...essive force when inserting them into the cutouts 4 6 3 Replacing a DIMM You can replace a dual inline memory module DIMM if a DIMM fails or if you want replace all eight factory installed 32 GB DIMMs with 64 GB DIMMs to give a total capacity of 512 GB Before attempting to replace a faulty DIMM contact NVIDIA Enterprise Customer support for help in determining the location ID of the faulty DIMM th...

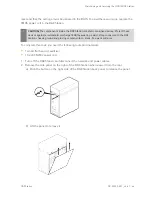
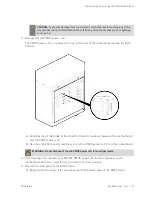
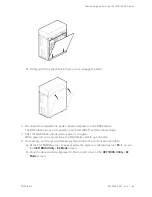
Page 48: ... wearing a wrist strap connected to the DGX Station chassis ground and placing components on static free work surfaces The DIMMs are located on the motherboard inside the DGX Station 1 Turn off the DGX Station and disconnect the network and power cables 2 Remove the side panel on the right of the DGX Station when viewed from the rear a Push the button on the right side of the DGX Station back pane...

Page 49: ...lacing a faulty DIMM use the following figure as a guide to locate the faulty DIMM 4 Remove the DIMM If you are replacing 32 GB DIMMs with 64 GB DIMMs to increase the system memory capacity remove all eight 32 GB DIMMs before fitting the replacement 64 GB DIMMs a Press upwards on the latch at the upper end of the DIMM socket to open the latch and unseat the DIMM from the socket b Pull the DIMM tow...

Page 50: ...the socket latch is open b Position the replacement DIMM over the socket making sure that the notch on the DIMM lines up with the key in the slot then press the DIMM into the socket until the latch clicks into place When the DIMM is correctly seated the latch should be closed as shown in the following figure 6 Replace the side panel of the DGX Station a Align the bottom edge of the side panel with...

Page 51: ...tion shuts down power it on again When powered on a second time the DGX Station starts up normally 4 6 4 Replacing the CMOS Power Cell in the DGX Station The CMOS power cell in the DGX Station provides power to the Real Time Clock RTC to maintain BIOS settings such as the system time and date while DGX Station is disconnected from the AC power supply If the DGX Station is restarted after being dis...

Page 52: ...ic discharge ESD by wearing a wrist strap connected to the DGX Station chassis ground and placing components on static free work surfaces To complete this task you need the following tools and materials 1 small flat head screwdriver 1 fresh CR2032 power cell 1 Turn off the DGX Station and disconnect the network and power cables 2 Remove the side panel on the right of the DGX Station when viewed fr...

Page 53: ...rd inside the DGX Station a Carefully insert the blade of the small flat head screwdriver between the motherboard and the CMOS power cell b Use the small flat head screwdriver to pry the CMOS power cell from the motherboard WARNING Do not dispose of the old CMOS power cell in municipal waste 4 Carefully align the replacement CR2032 CMOS power cell in the receptacle on the motherboard with the sign...

Page 54: ...self test POST and then shuts down 7 After the DGX Station shuts down power it on again When powered on a second time the DGX Station starts up normally 8 If necessary set the system date and system time to the current time and date a At the first NVIDIA screen to appear while the system is rebooting press F2 to access the UEFI BIOS Utility EZ Mode screen b Click the date and time displayed in the...

Page 55: ...Ds for data storage and the operating system As supplied from the factory these SSDs are configured as described in System Memory and Storage 4 7 1 Changing the RAID Level of the RAID Array As supplied from the factory the RAID level of the DGX Station RAID array is RAID 0 RAID 0 provides the maximum storage capacity but does not provide any redundancy If a single SSD in the array fails all data s...

Page 56: ... the RAID array is being rebuilt For more information see DGX OS Desktop 4 3 0 and Earlier Checking the Health of the DGX Station The time required to rebuild the RAID array depends on the workload on the system On an idle system the rebuild might be complete within 30 minutes To change the RAID level to RAID 0 run the following command sudo configure_raid_array py m raid0 To confirm that the RAID...

Page 57: ...The failed or missing SSD is identified by the empty RaidDevice State column sudo mdadm D dev md0 Number Major Minor RaidDevice State 0 8 16 0 active sync dev sdb 1 8 32 1 active sync 2 8 48 2 active sync dev sdd 4 7 3 Checking the Status of the DGX Station SSDs LEDs on the DGX Station SSDs indicate the status of the SSDs The SSDs are mounted inside the DGX Station and are visible only when the si...

Page 58: ...n SSD in the DGX Station fails replace the SSD to return the system to operation CAUTION The default RAID level of the array in the DGX Station is RAID 0 which does not provide any redundancy If a single SSD in the array fails all data stored on the array is lost To prevent the failure of an SSD from causing a loss of data ensure that any data on the array that you want to preserve is backed up If...

Page 59: ...nel b Lift the panel to remove it CAUTION To prevent damage from electrostatic discharge avoid touching any of the components inside the DGX Station other than any components that you are replacing or servicing 2 On the drive tray in which you want to install the new SSD or that contains the SSD that you want to replace press the drive tray eject button to loosen the drive tray latch 3 Pull the dr...

Page 60: ...f you are replacing an SSD remove the failed SSD from the drive tray a Using a Phillips screwdriver remove the four screws attaching the SSD to the drive tray Save the screws for the replacement SSD b Slide the SSD out of the drive tray 6 Slide the new or replacement SSD into the drive tray Make sure that the connector is on the open edge side of the tray ...

Page 61: ... using the four screws that were supplied with the new SSD or secured the failed SSD 8 With the drive tray eject button at the right insert the drive tray into the appropriate drive bay then slide the drive tray all the way into the drive bay 9 Press the drive try latch downwards until you hear a click to completely seat the drive tray ...

Page 62: ...RAID array as explained in Rebuilding the DGX Station RAID Array If you replaced the OS SSD restore the software image as explained in Restoring the DGX Station Software Image 4 7 5 Rebuilding the DGX Station RAID Array After adding SSDs to the DGX Station you must rebuild the RAID array to add the new SSDs to the array After replacing a failed SSD in the RAID array you must rebuild the array to a...

Page 63: ...s preserved after array is rebuilt If you have rebuilt a RAID 0 array and have a backup of data on the array that you want to preserve restore the data from the backup 4 7 6 Configuring the SSDs for Data Storage as an NFS Cache As supplied from the factory the SSDs in the DGX Station for data storage are configured for local persistent storage If your application data is stored in remote NFS mount...

Page 64: ...or training from large datasets brun 25 bcull 15 bstop 5 frun 10 fcull 7 fstop 3 d Save your changes and quit the editor For information about all the options that you can set in this file see the etc cachefilesd conf http manpages ubuntu com manpages bionic man5 cachefilesd conf 5 html man page This example shows a complete etc cachefilesd conf file for configuring the cache daemon for the DGX St...

Page 65: ...he SSDs for data storage as an NFS cache ensure that the mount option fsc is set for all NFS mounted file systems that you want to use the cache This example shows an entry in etc fstab for mounting a file system for which the fsc option is set myfileserver example com mnt shares dldata var local dldata nfs rw noatime rsize 32768 wsize 32768 nolock tcp intr fsc nofail 0 0 4 7 7 Sanitizing the DGX ...

Page 66: ...X Station If you are using a USB flash drive plug it into one of the USB ports of the DGX Station If you are using a DVD ROM connect an external optical drive to the DGX Station and load the DVD ROM into the drive 3 Power on the DGX Station 4 At the first NVIDIA screen to appear press F8 to select the boot device 5 In the menu for selecting the boot device use the arrow keys to select UEFI usb key...

Page 67: ...he device ID of a USB flash drive lsblk grep disk sda 8 0 0 1 8T 0 disk sdb 8 16 0 1 8T 0 disk sdc 8 32 0 1 8T 0 disk sdd 8 48 0 1 8T 0 disk sde 8 64 1 1 9G 0 disk cdrom 2 Confirm that all the SSDs support the ATA SANITIZE command For each SSD run the hdparm command with the I option sudo hdparm I dev device id grep SANIT device id The device ID of the SSD for example sdc This example confirms tha...

Page 68: ...nd press Enter After sanitizing all the DGX Station SSDs return the DGX Station to service by installing the DGX Station software and re initializing the RAID array For instructions see Installing the DGX Station Software Image from a USB Flash Drive or DVD ROM When you are prompted for the option for installing the DGX Station software select Install DGX OS Desktop release and re initialize RAID0...

Page 69: ...hat you restore the latest available version of the DGX Station software image obtain the current ISO image file from NVIDIA Enterprise Support A checksum file is provided for the image to enable you to verify the bootable installation medium that you create from the image file 1 Log on to the NVIDIA Enterprise Support https nvid nvidia com dashboard site 2 Click the Announcements tab to locate th...

Page 70: ...ing a Bootable USB Flash Drive by Using Startup Disk Creator On an Ubuntu Desktop system you can use Startup Disk Creator to create a bootable USB flash drive that contains the DGX Station software image Ensure that the following prerequisites are met The correct DGX Station software image is saved to your local disk For more information see Obtaining the DGX Station Software ISO Image and Checksu...

Page 71: ...s system you can use the Akeo Reliable USB Formatting Utility Rufus https rufus akeo ie to create a bootable USB flash drive that contains the DGX Station software image Ensure that the following prerequisites are met The correct DGX Station software image is saved to your local disk For more information see Obtaining the DGX Station Software ISO Image and Checksum File The USB flash drive has a c...

Page 72: ...elect the Create a bootable disk using option and from the dropdown menu select ISO image 5 Click the optical drive icon and open the DGX Station software ISO image 6 Click Start Because the image is a hybrid ISO file you are prompted to select whether to write the image in ISO Image file copy mode or DD Image disk image mode 7 Select Write in ISO Image mode and click OK ...

Page 73: ...ttp manpages ubuntu com manpages bionic man8 lsblk 8 html command lsblk You can identify the USB flash drive from its size which is much smaller than the size of the SSDs in the DGX Station and from the mount points of any partitions on the drive which are under media In the following example the device ID of the USB flash drive is sde1 lsblk NAME MAJ MIN RM SIZE RO TYPE MOUNTPOINT sda 8 0 0 1 8T ...

Page 74: ... Obtain the checksum value from the checksum file cat checksum file checksum file The path including the file name to the checksum file This example obtains the checksum value for the image DGXStation 3 1 2_56d4a9 iso from the checksum file DGXStation 3 1 2_56d4a9 crc in the current working directory cat DGXStation 3 1 2_56d4a9 crc 3992706625 3459317760 DGXStation 3 1 2_56d4a9 iso If the value obt...

Page 75: ...the RAID array will be erased The installation requires several minutes to complete Note Licensing requirements prevent some DGX Station software such as the NVIDIA Graphics Drivers from being supplied in the software image The DGX Station automatically installs this software when installation from the software image is complete 7 When the installation is complete respond to the prompts to accept ...

Page 76: ...to one of the USB ports of the DGX Station 5 Power on the DGX Station 6 At the first NVIDIA screen to appear press Delete or F2 to enter the UEFI BIOS setup 7 In the UEFI BIOS Utility EZ Mode screen click Advanced Mode 8 From the Tool menu choose EZ 3 Flash Utility and press Enter 9 In the EZ 3 Flash Update screen select via Storage Device s as the BIOS update method and press Enter 10 In the Driv...

Page 77: ... type NVIDIA X Server Settings DGX OS Desktop 3 releases Open the Dash and in the search box type NVIDIA X Server Settings 2 Click the NVIDIA X Server Settings icon 3 Under each GPU in the list of GPUs in the NVIDIA X Server Settings window click Thermal Settings Thermal sensor information for the GPU is displayed including its current temperature and an indication of whether the temperature is wi...

Page 78: ...m 4 10 2 Checking the Level of the Liquid in the GPU Cooling System In normal operation some coolant liquid may be lost from system Every 12 months check the level of the liquid in the cooling system to ensure that it remains at the required level 1 Remove the side panel on the right of the DGX Station when viewed from the rear a Push the button on the right side of the DGX Station back panel to r...

Page 79: ...m pump to determine the level of the liquid in the cooling system If level of the liquid in the cooling system is at or above the Minimum Level in the reservoir go to the next step If the liquid has fallen below the Minimum Level in the reservoir replenish it as explained in Replenishing the Liquid in the GPU Cooling System 3 Replace the side panel of the DGX Station a Align the bottom edge of the...

Page 80: ...ch contains 6 mm Allen wrench 1 bottle of EK CryoFuel Clear Premix coolant CAUTION Use only the coolant that is supplied with the kit Do not use any other type of coolant Use of other types of coolant will void the DGX Station hardware warranty and may cause damage to or impair the performance of the system Flexible plastic filling bottle with delivery tube 1 Ensure that the DGX Station is powered...

Page 81: ... until the liquid reaches the Maximum Level in the reservoir 6 Replace the filler cap at top of the pump and use the Torx T20 Allen wrench to tighten the cap until it is finger tight Do not over tighten the filler cap 7 Power on the DGX Station and let it run for one minute If the pump makes a grinding noise power off and power on the DGX Station four times 8 Ensure that the level of the liquid in...

Page 82: ... cooling system pump b Dispense more coolant liquid into the pump until the liquid reaches the Maximum Level in the reservoir again c Replace the filler cap at top of the pump d Power on the DGX Station and let it run for one minute e Check the level of the liquid in the cooling system 9 Power off the DGX Station 10 Replace the side panel of the DGX Station a Align the bottom edge of the side pane...

Page 83: ...Maintaining and Servicing the NVIDIA DGX Station DGX Station DU 08255 001 _v4 6 77 ...

Page 84: ...rload temperature material flammability Mechanical Sharp edges moving parts instability Energy Circuits with high energy levels 240 volt amperes or potential as burn hazards Heat Accessible parts of the product at high temperatures Chemical Chemical fumes and vapors Radiation Noise ionizing laser ultrasonic waves Retain and follow all product safety and operating instructions Always refer to the d...

Page 85: ...t attempt to defeat safety interlocks where provided Operate the DGX Station in a place where the temperature is always in the range 10 C to 30 C 50 F to 86 F A 3 Electrical Precautions Power Cable To reduce the risk of electric shock fire or damage to the equipment Use only the supplied power cable and do not use this power cable with any other products or for any other purpose Not all power cabl...

Page 86: ...et is near the equipment and is readily accessible for disconnection To help protect your system from sudden transient increases and decreases in electrical power consider using a surge suppressor or line conditioner Never force a connector into a port Check for obstructions on the port If the connector and port don t join with reasonable ease they probably don t match Make sure that the connector...

Page 87: ...ial special handling may apply See www dtsc ca gov hazardouswaste perchlorate Perchlorate Material Lithium battery CR2032 contains perchlorate Please follow instructions for disposal Nickel The decorative metal foam on the DGX Station casework contains some nickel The metal foam is not intended for direct and prolonged skin contact While nickel exposure is unlikely to be a problem you should be aw...

Page 88: ... Front Panel Connections and Controls ID Type Qty Description 1 Power Button 1 Press to turn the DGX Station on or off B 2 Rear Panel Connections and Controls Current Units ID Type Qty Description 1 USB 3 1 Type C 1 USB 3 1 Type C port 2 Ethernet 2 10G LAN ports see LAN Port Indicators ...

Page 89: ...AC Input 1 Power supply input 7 Reset Button 1 Press to reboot the system without turning off the system power 8 USB 3 1 Type A 1 USB 3 1 Type A port 9 Audio I O 5 3 5 mm I O ports for 2 4 6 or 8 channel audio see Audio I O Connections 10 DisplayPort 3 Ports for connecting up to 3 displays 11 Power Supply Switch 1 Turn the power supply on and off Earlier Units ID Type Qty Description 1 USB 3 1 Typ...

Page 90: ...h 1 Turn the power supply on and off 7 Reset Button 1 Press to reboot the system without turning off the system power 8 USB 3 1 Type A 1 USB 3 1 Type A port 9 Audio I O 5 3 5 mm I O ports for 2 4 6 or 8 channel audio see Audio I O Connections 10 DisplayPort 3 Ports for connecting up to 3 displays 11 AC Input 1 Power supply input B 3 LAN Port Indicators LEDs on each Ethernet LAN port indicate the c...

Page 91: ...s Description Off No link Green Linked Green blinking Data activity B 4 Audio I O Connections ID Port Color 2 Channel 4 Channel 6 Channel 8 Channel 1 Pink Mic In Mic In Mic In Mic In 2 Black N A Rear Speaker Rear Speaker Rear Speaker 3 Orange N A N A Center Subwoofer Center Subwoofer 4 Light Blue Line In Line In Line In Side Speaker 5 Lime Green Line Out Front Speaker Front Speaker Front Speaker ...

Page 92: ...Connections Controls and Indicators DGX Station DU 08255 001 _v4 6 86 ...

Page 93: ...U 08255 001 _v4 6 87 Appendix C Compliance The NVIDIA DGX Station is compliant with the regulations listed in this section C 1 DGX Station Model Number Model P2587 C 2 Argentina S Mark C 3 Australia New Zealand RCM ...

Page 94: ...ence and Economic Development Canada ISED CAN ICES 3 A NMB 3 A The Class A digital apparatus meets all requirements of the Canadian Interference Causing Equipment Regulation Cet appareil numérique de la classe A respecte toutes les exigences du Règlement sur le matériel brouilleur du Canada ...

Page 95: ...Compliance DGX Station DU 08255 001 _v4 6 89 C 6 China RoHS Material Content ...

Page 96: ...he product has been marked with the CE Mark to illustrate its compliance This device complies with the following Directives EMC Directive 2014 30 EU for Class A I T E equipment Low Voltage Directive 2014 35 EU for electrical safety RoHS Directive 2011 65 EU for hazardous substances ErP Directive 2009 125 EC for European Ecodesign A copy of the Declaration of Conformity to the essential requirement...

Page 97: ...Compliance DGX Station DU 08255 001 _v4 6 91 C 8 India BIS Self Declaration Conforming to IS13252 2010 R 41078743 C 9 Israel ...

Page 98: ...Compliance DGX Station DU 08255 001 _v4 6 92 C 10 Japan VCCI C 11 Russia CU TR C 12 South Africa LOA Compliant with SANS IEC 60950 SABS Compliant with SANS 222 CISPR 22 ...

Page 99: ...Compliance DGX Station DU 08255 001 _v4 6 93 C 13 South Korea KC C 14 Taiwan BSMI ...

Page 100: ...device may not cause harmful interference and 2 this device must accept any interference received including any interference that may cause undesired operation of the device NOTE This equipment has been tested and found to comply with the limits for a Class A digital device pursuant to part 15 of the FCC Rules These limits are designed to provide reasonable protection against harmful interference ...

Page 101: ...stalled and used in accordance with the instruction manual may cause harmful interference to radio communications Operation of this equipment in a residential area is likely to cause harmful interference in which case the user will be required to correct the interference at his own expense C 16 United States Canada cULus Listing Mark C 17 Vietnam ICT ...

Page 102: ...U current units 4 NVIDIA Tesla V100 DGXS 32GB featuring 4 125 TeraFLOPS 500 TeraFLOPS total FP16 4 32 GB 128 GB total GPU memory 4 640 2 560 total NVIDIA Tensor Cores 4 5 120 20 480 total NVIDIA CUDA cores GPU earlier units 4 NVIDIA Tesla V100 DGXS 16GB featuring 4 125 TeraFLOPS 500 TeraFLOPS total FP16 4 16 GB 64 GB total GPU memory 4 640 2 560 total NVIDIA Tensor Cores 4 5 120 20 480 total NVIDI...

Page 103: ...a storage to give a total capacity of 13 44 TB in a RAID 0 configuration OS storage 1 1 92 TB 2 5 6 Gb s SATA III SSD D 3 Mechanical Specifications Specification Value Height 25 639 mm Width 10 256 mm Depth 20 518 mm Gross weight 88 lbs 40 kg D 4 Power Specifications Input Comments 115 240 VAC 12 8A 50 60 Hz The DGX Station power consumption can reach 1 500 W ambient temperature 30 C with all syst...

Page 104: ...nterprise Support Portal The best way to file an incident is to log on to NVIDIA Enterprise Support https nvid nvidia com dashboard NVIDIA Enterprise Support Email enterprisesupport nvidia com NVIDIA Enterprise Support Local Language Phone Numbers Visit NVIDIA Enterprise Customer Support https www nvidia com en us support enterprise Our support team can help collect appropriate information about y...

Page 105: ...es in customer s product designs may affect the quality and reliability of the NVIDIA product and may result in additional or different conditions and or requirements beyond those contained in this document NVIDIA accepts no liability related to any default damage costs or problem which may be based on or attributable to i the use of the NVIDIA product in any manner that is contrary to this docume...

Reviews: