background image

10

4.6 

SYNCING YOUR NX DRONE

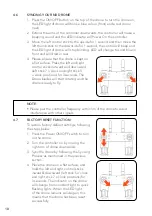
1.  Press the ON/OFF button on the top of the drone to turn the drone on, 

the LED light of drone will blink a blue colour (front) and a red colour 
(rear).

2.  Extend the arms of the controller downwards, the controller will make a 

beeping sound and the LED indicator will Power On the controller.

3.  Move the left control stick to the upside for 1 second and then move the 

left thumb stick to the downside for 1 second, the control will beep and 
the LED light of drone will stop blinking. LED will change to solid blue in 
front and solid red in rear.

4.  Please ensure that the drone is kept on 

a flat surface. Press the left and right 
control sticks outward and downward 
(left stick 7 o'clock and right stick 5 
o'clock positions) for 3 seconds. The 
Drone blades will start rotating and the 
drone is ready to fly.

NOTE:

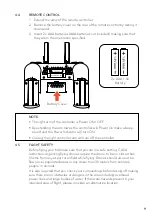
•  Please pair the controller frequency within 5m of the drone to avoid 

interference with other signals

4.7 

FACTORY RESET FUNCTION

To restore factory default settings, following 
the steps below.
1.  Press the Power ON/OFF switch to turn 

on the drone.

2.  Turn the controller on by moving the 

right arm of drone downwards.

3.  Sync the drone by following the Syncing 

Process as mentioned in the previous 
section.

4.  Place the drone on a flat surface, and 

hold the left and right control sticks 
inward & downward (left stick 5 o'clock 
and right stick 7 o'clock positions) for 
3 seconds. The indicator on the drone 
will change from constant light to quick 
flashing lights. When the LED light 
of the drone remains solid again, this 
means that the drone has been reset 
successfully. 

Summary of Contents for NX-HD16100W

Page 1: ...NX HD16100W v1 FHD DRONE WITH OPTICAL FLOW WIFI AND 100M RANGE USER MANUAL ENGINEERED FOR THE NEXT GENERATION ...

Page 2: ......

Page 3: ...7 FACTORY RESET FUNCTION 10 5 0 FLYING YOUR NX DRONE 11 5 1 BASIC FLIGHT 11 5 2 TRIM FUNCTION 11 5 3 SPEED MODE 12 6 0 CAMERA VIDEO FEATURES 13 6 1 CAMERA MODE 13 6 2 VIDEO MODE 13 7 0 FLIP FUNCTION 13 8 0 HEADLESS MODE 14 9 0 ONE KEY REVERSE 14 10 0 EMERGENCY STOP 15 11 0 OPTICAL FLOW POSITION 15 12 0 SAVING VIDEOS PHOTOS USING YOUR SMART PHONE 15 13 0 APP 16 13 1 APP INSTRUCTION 17 14 0 DRONE MA...

Page 4: ...r area Do not fly your NX Drone any closer than 30 meters from people animals or buildings Check to make sure you are no closer than 5 5 kilometers from any airfields or airports For more information on CASA s Australian legislation visit http www casa gov au You must not fly your drone higher than 120 meters 400 ft above the ground You must only fly during the day and keep your drone within visua...

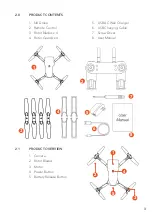
Page 5: ...VIEW 1 Camera 2 Rotor Blades 3 Motor 4 Power Button 5 Battery Release Button 1 2 3 4 5 6 7 8 1 NX Drone 2 Remote Control 3 Rotor Blades x 4 4 Rotor Guards x 4 5 USB AC Wall Charger 6 USB Charging Cable 7 Screw Driver 8 User Manual 1 2 3 5 4 ...

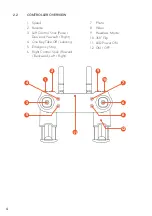
Page 6: ...e 3 Left Control Stick Pulse Descend Yaw Left Right 4 One Key Take Off Landing 5 Emergency Stop 6 Right Control Stick Forward Backward Left Right 7 Photo 8 Video 9 Headless Mode 10 360o Flip 11 LED Power ON 12 ON OFF 1 2 3 4 11 5 6 7 10 9 8 12 ...

Page 7: ... when charging Do not leave batteries in direct sunlight After each flight or crash please check battery for any damage or swelling If the battery is damaged leaking making noise punctured or malformed in any way DO NOT attempt to use it Please dispose of the battery immediately and safely in the correct manner Do not bend puncture crush or scratch the drone s battery Do not store batteries in you...

Page 8: ...g as possible avoid removing the battery from the charging cable before charging is complete If you have just finished flying your NX drone please allow the battery to cool down for at least 30 minutes before recharging When the NX battery has finished charging it is advised that the battery is removed from the charger as soon as possible Overcharging will damage the battery and effect the flight ...

Page 9: ...to be replaced To replace the NX s rotor blades please follow the directions below There are two types of rotor blades included with the NX A blades clockwise rotation and B blades counter clockwise rotation The blades are marked on top showing either A or B The arms of the drone are also marked A and B showing what blades each motor is compatible with It is important that the rotor blades are ins...

Page 10: ...des are installed on the correct motors If they are installed incorrectly the drone will not fly and you could potentially burn out the drone s motors When replacing multiple rotor blades please replace the blades one at a time to avoid any confusion in reattaching the rotor blades 4 3 INSTALLING ROTOR GUARDS Replacing the rotor guards is an option Installing the rotor guards will protect your rot...

Page 11: ...off the controller 4 5 FLIGHT SAFETY Before flying your NX make sure that you are in a safe setting CASA restrictions regarding flying drones require the drone to be no closer than 5 5kms from any airport or airfield while flying Drones should also not be flown over populated areas or any closer than 30 meters from vehicles people or animals It is also required that you check your surroundings bef...

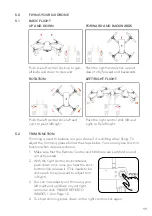
Page 12: ...tick 7 o clock and right stick 5 o clock positions for 3 seconds The Drone blades will start rotating and the drone is ready to fly NOTE Please pair the controller frequency within 5m of the drone to avoid interference with other signals 4 7 FACTORY RESET FUNCTION To restore factory default settings following the steps below 1 Press the Power ON OFF switch to turn on the drone 2 Turn the controlle...

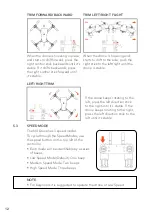
Page 13: ...ck button click release it This needs to be done each time you want to adjust trim in flight 3 You can now adjust your trim using your left right and up down on your right controller stick PLEASE REFER TO IMAGES 1 3 on Page 12 4 To stop trimming press down on the right control stick again Push the right control stick up and down to fly forward and backwards FORWARD AND BACKWARDS Push the left cont...

Page 14: ...KWARD If the drone keeps rotating to the left press the left direction stick to the right until it s stable If the drone keeps rotating to the right press the left direction stick to the left until it s stable LEFT RIGHT TRIM 5 3 SPEED MODE The NX Drone has 3 speed modes To cycle through the Speed Modes use the speed button on the top left of the controller Each mode will be identifiable by a seri...

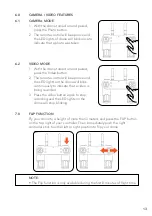
Page 15: ...l beep once and the LED lights on the drone will blink continuously to indicate that a video is being recorded 3 Press the video button again to stop recording and the LED lights on the drone will stop blinking 7 0 FLIP FUNCTION Fly your drone to a height of more than 3 meters and press the FLIP button on the top right of your controller Then immediately push the right controller stick to either l...

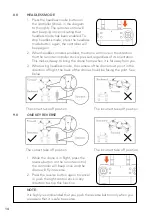
Page 16: ...is far away from you 3 When using headless mode the camera of the drone must point in the direction of flight the back of the drone should be facing the pilot See below 9 0 ONE KEY REVERSE 1 While the drone is in flight press the reverse button on the remote control the controller will beep once and the drone will fly in reverse 2 Press the reverse button again to cancel or push the right control ...

Page 17: ...ution 3 During flight the drone will follow images from the bottom camera thereby making the drone more stable NOTE The ground surface pattern requires variance for the drone to recognise it and add stability with Optical Flow mode 12 0 SAVING VIDEOS PHOTOS USING YOUR SMART PHONE The NX drone uses your connected smart phone to save all videos and photos This makes reviewing and transferring your d...

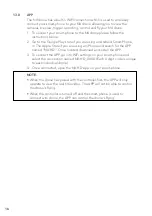
Page 18: ...re using an iPhone and search for the APP named NX HD Once located download and install the APP 3 To connect the APP go into WiFi settings on your smart phone and select the connection named NX HD_XXXX Each 4 digit code is unique to each individual drone 4 Once connected open the NX HD App on your smart phone NOTE When the drone has paired with the controller first the APP will only operate to view...

Page 19: ... Camera Change 3 Folder 4 One Key Take Off Landing 5 Throttle 6 Emergency Stop 7 Rudder 8 Flight 9 Record Video 10 Take Photo 11 Speed 30 60 100 12 Headless Mode 13 Invert View 14 VR 15 Track Flight 3 4 2 1 6 7 5 9 8 11 12 13 14 15 10 ...

Page 20: ...is exposed to dust or sand use a soft brush to remove any visible particles 15 0 REPLACEMENT PARTS We understand that it s not always easy learning how to fly a drone and sometimes a close call can turn into a crash landing For all spare part enquiries please contact our customer service team on 61 03 8331 4800 or visit our website www nx tech com au ...

Page 21: ...tisfactory proof of purchase The retailer will then return the goods to NX NX will repair replace or refurbish the product at its discretion The retailer will contact you when the product is ready for collection All costs involved in claiming this warranty including the cost of the retailer sending the product to NX will be borne by you NX Address 115 119 Link Road Melbourne Airport Australia Ph 6...

Page 22: ...NE OR DAMAGE TO YOUR PROPERTY AS A RESULT OF USING YOUR DRONE YOU WILL PURCHASE IT IN THE EVENT OF ANY LOSS DAMAGE OR INJURY YOU WILL NOT LOOK TO NX TO COMPENSATE YOU OR ANYONE ELSE YOU RELEASE AND WAIVE FOR YOURSELF AND YOUR INSURER ALL SUBROGATION AND OTHER RIGHTS TO RECOVER AGAINST NX ARISING AS A RESULT OF THE PAYMENT OF ANY CLAIM FOR LOSS DAMAGE OR INJURY NX S EQUIPMENT AND SERVICES DO NOT CA...

Page 23: ... CONTENT ANY ERRORS OR OMISSIONS IN ANY CONTENT OR ANY LOSS OR DAMAGE OF ANY KIND INCURRED IN CONNECTION WITH USE OF OR EXPOSURE TO ANY CONTENT POSTED EMAILED ACCESSED TRANSMITTED OR OTHERWISE MADE AVAILABLE VIA THE NX APP NX LIABILITY FOR DAMAGES ESPECIALLY FOR BREACH OF DUTY OR OBLIGATION DELAY IN PERFORMANCE NON PERFORMANCE OR MALPERFORMANCE SHALL BE PRECLUDED EXCEPT WHEN THESE ARE DUE TO NEGLI...

Page 24: ...22 ...

Page 25: ...23 20 0 NOTES ...

Page 26: ...24 ...

Page 27: ...25 ...

Page 28: ...www nx tech com au www nx tech co nz NX v1 0 2020 All Images Information and Content are Copyright 2020 Directed Electronics Australia Pty Ltd All Rights Reserved ENGINEERED FOR THE NEXT GENERATION ...

Reviews: