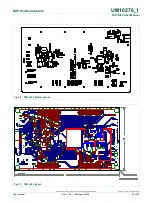
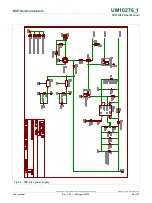
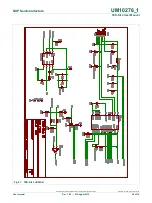
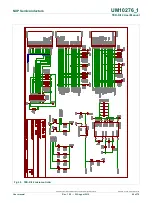
background image


NXP Semiconductors 

UM10276_1 


TED-Kit 2 User Manual 


All information provided in this document is subject to legal disclaimers. 

© NXP B.V. 2010. All rights reserved. 

User manual 

Rev. 1.29 — 20 August 2010 

65 of 79 


Fig 74.  XBoard/ABIC1 main circuit 

Summary of Contents for TED-Kit 2

Page 1: ...Document information Info Content Keywords TED Kit 2 HITAG Immobilizer PKE RKE Abstract The purpose of this document is to describe how to install and use the TED Kit 2 and its GUI software The intend...

Page 2: ...in this document is subject to legal disclaimers NXP B V 2010 All rights reserved User manual Rev 1 29 20 August 2010 2 of 79 Contact information For additional information please visit http www nxp c...

Page 3: ...fter wards Section 4 gives a quick start in 5 simple steps to authenticate with a HITAG 2 trans ponder and show the content of its EEPROM Section 5 introduces the GUI and shows how to accomplish commo...

Page 4: ...Each of them can take one XBoard con taining actual functionality like e g an ABIC1 base station IC On one side of the box the USB connector and the external power supply can be found The later is us...

Page 5: ...the software 3 1 System requirements The computer system used as host for the TED Kit 2 software and hardware must meet the following requirements 1 It must run Windows XP Although it is expected tha...

Page 6: ...he one closer to the USB and power supply plugs It might be necessary to open the TED Kit 2 box first 3 Plug the antenna in port LF0 Port LF0 is the antenna port closer to the 4 status LEDs 4 Plug the...

Page 7: ...ev 1 29 20 August 2010 7 of 79 Fig 2 TED Kit 2 main window 2 Expand the H HI IT TA AG G 2 2 node of the I Im mm mo ob bi il li iz ze er r tree in the applet view and double click P PC CF F7 79 93 36 6...

Page 8: ...s reserved User manual Rev 1 29 20 August 2010 8 of 79 Fig 4 HITAG2 authentication starting 4 The immobilizer applet runs and authenticates the transponder with the default communication and authentic...

Page 9: ...s For a detailed reference of all functions offered p 7 page 39 To explain the functionality the Immobilizer application with a PCF7991 ABIC1 base station and a PCF7937EA HITAG2 Extended transponder i...

Page 10: ...1 0 config dat 5 2 Exploring the connected TED Kit 2 boxes The upper left part of the main window always shows the hardware view Here a list with all connected TED Kit 2 boxes appears For each TED Kit...

Page 11: ...in For each XBoard found the connected antenna s are shown in the tree also Fig 8b The TED Kit 2 box currently connected has one XBoard In slot 0 an ABIC1 which is connected to LF antenna 0 LF0 The s...

Page 12: ...sted In the current version of the software three different applets exist Immobilizer Immobilizer RKE and Immobilizer RKE PKE Expanding the Immobilizer node shows all transponder families supported by...

Page 13: ...1 XBoard and one LoPSTer board must be plugged in This can be done without closing the TED Kit 2 GUI Note If an applet e g Immobilizer consumes all remaining resources the af fected parts of the apple...

Page 14: ...and stopping the applica tion Currently it is stopped the start button is active and window title says stopped The C Co on nf fi ig gu ur ra at ti io on n frame at the bottom of the window allows mak...

Page 15: ...uration 5 4 2 Communication settings The Immobilizer applet allows configuring the transmission and reception parameters for the LF Link in detail To view or change the transmission and reception clic...

Page 16: ...16 of 79 Fig 16 Tx Rx configuration 5 4 3 Starting immobilizer To run the Immobilizer application return to the applet window Before actually starting the application the communication settings have t...

Page 17: ...s the default values for the selected transponder for the authentication trans mission and reception parameters at once To start the immobilizer applet one has to click the S St ta ar rt t button only...

Page 18: ...ication is visualized in the status bar For a successful authentication it looks like Fig 21 Fig 21 Immobilizer authenticated For a failed authentication e g bad passwords the status bar looks like Fi...

Page 19: ...ion are shown Fig 24 EEPROM read timings The middle part with the tabs shows the different views for the EEPROM content and its configuration Note In the EEPROM Tab only the memory pages currently vis...

Page 20: ...6 EEPROM TMCF In the picture shown above the SKL bit is set and thus cannot be altered anymore Be sides that the ENC bit is set instructing the immobilizer to run ciphered authentication The C Co on n...

Page 21: ...f the EEPROM window has to be acti vated To do so click the E Ed di it t button at the bottom of the window Fig 28 Fig 28 EEPROM edit enable The refresh cycle will stop and the other 4 buttons at the...

Page 22: ...ro om m F Fi il le e and select the proper file 5 4 6 Stopping immobilizer To stop the Immobilizer applet the S St to op p button has to be clicked Fig 30 Fig 30 Immobilizer stopping 5 5 Running RKE a...

Page 23: ...o L Li in nk k base station is needed for the Tag resynchronization The UHF R RK KE E P PK KE E L Li in nk k base station is need for the one way RKE application itself The Tag combo box allows choosi...

Page 24: ...ng the LoPSTer Click on the C Co on nf fi ig gu ur re e button of the Base Station for the RKE PKE Link Fig 33 Fig 33 Immobilizer RKE configure LoPSTer The LoPSTer configuration window will appear Fig...

Page 25: ...ion window 5 5 3 Configuration persistence An entire package of settings can be loaded from a file by pressing the L Lo oa ad d button Fig 35 An appropriate LoPSTer configuration file is required this...

Page 26: ...ob bi il li iz ze er r applet 5 5 5 Resynchronization Before you can start the RKE applet the tag must be resynchronized Select a manual or random value like shown below and press the R Re es sy yn n...

Page 27: ...g 38 Fig 38 RKE starting After the application was started any button on the tag can be pressed and the corres ponding LED display will light up in the GUI like shown below Additional the polling sta...

Page 28: ...p button Fig 40 RKE stopping 5 6 Running PKE applet To run the PKE applet double click at one of the transponders of the desired family node below the I Im mm mo ob bi il li iz ze er r R RK KE E P PK...

Page 29: ...mily The application section in the lower part of the window shows all necessary parts to run different PKE applications 5 6 1 Configuring the ABIC1 For a detailed description of the settings please r...

Page 30: ...ntication Select one of the available tags Enabling the C Cy yc cl li ic c A Au ut th he en nt t checkbox performs a cyclic authentication using the HITAG2 crypto algorithm The exchanged authenticatio...

Page 31: ...d after each press on the S Si in ng gl le e A Au ut th he en nt t button The exchanged authentication values will be displayed like shown in Fig 44 Fig 44 PKE single authentication 5 6 7 Cyclic RSSI...

Page 32: ...45 PKE cyclic RSSI Disabling the C Cy yc cl li ic c R RS SS SI I checkbox stops the RSSI measurement The RSSI values are no longer available thus the progress bars are empty Fig 46 Fig 46 PKE cyclic...

Page 33: ...lic VBat Select one of the available Tags Enabling the C Cy yc cl li ic c C Ch he ec ck k checkbox performs a cyclic measurement of the Tag battery voltage The voltage will be displayed like in Fig 48...

Page 34: ...C Ch he ec ck k checkbox stops the Tag battery voltage measurement The current voltage is no longer available Fig 49b 5 7 Getting Help The H He el lp p menu of the GUI s main window contains links to...

Page 35: ...easily copied in a document or an Email and will help the support team to analyze the issues reported 5 8 Updating the firmware Each time the GUI is started it checks the firmware version of each of t...

Page 36: ...reactivate the TED Kit 2 unplug it from the PC and plug it in again or restart the GUI and actually update the firmware Note To ensure each TED Kit 2 runs exactly the firmware which is known by the GU...

Page 37: ...lements are organized in groups each group represents one module e g window of the interface 6 1 Menu bar The menu bar of the main window contains the following menus and sub menus 6 1 1 Board This me...

Page 38: ...open in style Tile Vertical Cascade Arranges all windows currently open in a cascade style 6 1 3 Help The help menu contains links to certain documents which are installed along with the software Thes...

Page 39: ...ked 6 3 Applet view The applet view visualizes all currently available applets along with the supported trans ponder families and types To open an applet window the transponder type intended to use ou...

Page 40: ...tab named G Ge en ne er ra al l shows status messages from the GUI software itself Right to the G Ge en ne er ra al l tab is the S Sc ca an nn ne er r tab The messages shown here represent the command...

Page 41: ...peration Red rows indicate that an error happened during the execution of the command Note The trace information with detailed data about the execution steps done by the TED Kit 2 firmware is availabl...

Page 42: ...ge view 6 4 2 Logging All activities shown in the message view are also logged in a file This file contains all messages for one TED Kit 2 session If the GUI is restarted the file is emptied and log g...

Page 43: ...ir changes The information and actions available are shown in Table 2 Table 2 TED Kit 2 status window items Name Auto Update Description TED Kit 2 Serial Number The main board s unique serial number B...

Page 44: ...XSlot Antenna LF XBoard is connected to a LF antenna UHF XBoard is connected to a UHF antenna Ability Transmit XBoard is capable of transmitting data via an antenna Receive XBoard is capable of recei...

Page 45: ...indow Currently two XBoards are supported by the TED Kit 2 GUI ABIC1 and LoPSTer Thus two different configuration windows exist Nevertheless they have some elements in common The largest part of this...

Page 46: ...y chosen transponder family is preset for the default button 6 6 2 LoPSTer configuration window The configuration and monitoring window allows to set the LoPSTer XBoard configura tion as wells as to m...

Page 47: ...ar rt t starts the immobilizer application S St to op p stops the immobilizer application L Lo oo ok k U Up p S Se ec cr re et t K Ke ey y P Pa as ss sw wo or rd d Looks up the secret key or password...

Page 48: ...ally no records are read In order to get the current values click R Re ea ad d R Re ec co or rd ds s To create a new distance record click N Ne ew w R Re ec co or rd d and fill the data in the upcomin...

Page 49: ...YNC value can be given ei ther manually or by a random generator In both cases the new value will be displayed R Re es sy yn nc c s st ta at tu us s C Ch ha an ng ge ed d the new SYNC value has been c...

Page 50: ...Cy yc cl li ic c R RS SS SI I checkbox stops the RSSI measurement The RSSI values are no longer available Select different ADC Resolutions for the RSSI measurements using the A AD DC C R Re es so ol l...

Page 51: ...ntent The content of the memory page shown as hexadecimal 32 bit number Description A textual description of the memory content The T TM MC CF F tab to setup transponder modes is available for the HIT...

Page 52: ...p pa ar ra am me et te er rs s i in n t th he e T Tr ra an ns sm mi is ss si io on n t to o T Tr ra an ns sp po on nd de er r t ta ab b Check the BPLM coding timings and the Reset timings Check the r...

Page 53: ...appropriate PWS checkbox is enabled locked The read access mode can t be changed anymore if the appropriate PWM checkbox is enabled locked HITAG Pro The read access of the entire memory is controlled...

Page 54: ...e memory the according segments and block sizes have to be opened The first definition with block size zero disables the rest of the memory Thus Check the block size of each segment in the B Bl lo oc...

Page 55: ...ugust 2010 55 of 79 4 The first segment of the transponder s XMA memory must be writeable in at least ci phered mode or ciphered plain in order to write new distance records in the trans ponder 8 PCB...

Page 56: ...ED Kit 2 User Manual All information provided in this document is subject to legal disclaimers NXP B V 2010 All rights reserved User manual Rev 1 29 20 August 2010 56 of 79 Fig 62 TED Kit 2 top values...

Page 57: ...TED Kit 2 User Manual All information provided in this document is subject to legal disclaimers NXP B V 2010 All rights reserved User manual Rev 1 29 20 August 2010 57 of 79 Fig 64 TED Kit 2 bottom va...

Page 58: ...rs UM10276_1 TED Kit 2 User Manual All information provided in this document is subject to legal disclaimers NXP B V 2010 All rights reserved User manual Rev 1 29 20 August 2010 58 of 79 Fig 66 TED Ki...

Page 59: ...tors UM10276_1 TED Kit 2 User Manual All information provided in this document is subject to legal disclaimers NXP B V 2010 All rights reserved User manual Rev 1 29 20 August 2010 59 of 79 Fig 67 TED...

Page 60: ...UM10276_1 TED Kit 2 User Manual All information provided in this document is subject to legal disclaimers NXP B V 2010 All rights reserved User manual Rev 1 29 20 August 2010 60 of 79 Fig 68 TED Kit...

Page 61: ...M10276_1 TED Kit 2 User Manual All information provided in this document is subject to legal disclaimers NXP B V 2010 All rights reserved User manual Rev 1 29 20 August 2010 61 of 79 Fig 69 TED Kit 2...

Page 62: ...l All information provided in this document is subject to legal disclaimers NXP B V 2010 All rights reserved User manual Rev 1 29 20 August 2010 62 of 79 8 2 ABIC1 a Names d Values Fig 70 XBoard ABIC1...

Page 63: ...ors UM10276_1 TED Kit 2 User Manual All information provided in this document is subject to legal disclaimers NXP B V 2010 All rights reserved User manual Rev 1 29 20 August 2010 63 of 79 Fig 72 XBoar...

Page 64: ...0276_1 TED Kit 2 User Manual All information provided in this document is subject to legal disclaimers NXP B V 2010 All rights reserved User manual Rev 1 29 20 August 2010 64 of 79 Fig 73 XBoard ABIC1...

Page 65: ...UM10276_1 TED Kit 2 User Manual All information provided in this document is subject to legal disclaimers NXP B V 2010 All rights reserved User manual Rev 1 29 20 August 2010 65 of 79 Fig 74 XBoard A...

Page 66: ...M10276_1 TED Kit 2 User Manual All information provided in this document is subject to legal disclaimers NXP B V 2010 All rights reserved User manual Rev 1 29 20 August 2010 66 of 79 Fig 75 XBoard ABI...

Page 67: ...UM10276_1 TED Kit 2 User Manual All information provided in this document is subject to legal disclaimers NXP B V 2010 All rights reserved User manual Rev 1 29 20 August 2010 67 of 79 Fig 76 XBoard A...

Page 68: ...TED Kit 2 User Manual All information provided in this document is subject to legal disclaimers NXP B V 2010 All rights reserved User manual Rev 1 29 20 August 2010 68 of 79 8 3 LoPSTer Fig 77 XBoard...

Page 69: ...er Manual All information provided in this document is subject to legal disclaimers NXP B V 2010 All rights reserved User manual Rev 1 29 20 August 2010 69 of 79 Fig 78 XBoard LoPSTer component IC val...

Page 70: ...6_1 TED Kit 2 User Manual All information provided in this document is subject to legal disclaimers NXP B V 2010 All rights reserved User manual Rev 1 29 20 August 2010 70 of 79 Fig 80 XBoard LoPSTer...

Page 71: ...6_1 TED Kit 2 User Manual All information provided in this document is subject to legal disclaimers NXP B V 2010 All rights reserved User manual Rev 1 29 20 August 2010 71 of 79 Fig 81 XBoard LoPSTer...

Page 72: ...r manual Rev 1 29 20 August 2010 72 of 79 8 4 LF Antenna The LF Antenna is provided by VACUUMSCHMELZE GmbH Co KG VACUUMSCHMELZE GmbH Co KG Dr Achim Kipper Phone 49 6181 38 2029 or 49 6181 38 0 E Mail...

Page 73: ...UM10276_1 TED Kit 2 User Manual All information provided in this document is subject to legal disclaimers NXP B V 2010 All rights reserved User manual Rev 1 29 20 August 2010 73 of 79 Fig 82 LF antenn...

Page 74: ...UM10276_1 TED Kit 2 User Manual All information provided in this document is subject to legal disclaimers NXP B V 2010 All rights reserved User manual Rev 1 29 20 August 2010 74 of 79 Fig 83 LF antenn...

Page 75: ...imita tion specifications and product descriptions at any time and without notice This document supersedes and replaces all information supplied prior to the publication hereof Suitability for use NXP...

Page 76: ...r Interface I2C I 2 C Inter Integrated Circuit IC Integrated Circuit IDE Unique 32 Bit Identifier used by NXP transponders ISK Immobilizer Secret Key LED Light Emitting Diode LF Low Frequency LIN Loca...

Page 77: ...tion saving 26 Fig 37 RKE resynchronization 27 Fig 38 RKE starting 27 Fig 39 RKE polling 28 Fig 40 RKE stopping 28 Fig 41 PKE starting 29 Fig 42 PKE tag scanning 30 Fig 43 PKE cyclic authentication 30...

Page 78: ...provided in this document is subject to legal disclaimers NXP B V 2010 All rights reserved User manual Rev 1 29 20 August 2010 78 of 79 12 List of tables Table 1 Supported applications and hardware 5...

Page 79: ...nization 26 5 5 6 Starting RKE 27 5 5 7 Stopping RKE 28 5 6 Running PKE applet 28 5 6 1 Configuring the ABIC1 29 5 6 2 Configuring the LoPSTer 29 5 6 3 Transponder memory during PKE 29 5 6 4 Tag scann...

Page 80: ...Mouser Electronics Authorized Distributor Click to View Pricing Inventory Delivery Lifecycle Information NXP OM6716 434 599...

Reviews: