background image


12 

3.3.2. Rack Mount installation 

Warning:


Do not use rack mount kit to carry 

Battery Bank 

Step 1 


Step 2 


Summary of Contents for NPB12-36R

Page 1: ...0 Battery Bank Installation User s MANUAL NPB12 36R...

Page 2: ...Descriptions 5 Chapter 3 Installation and Operation 6 3 1 Unpacking 6 3 2 Selecting Installation Position 8 3 3 Installation Instructions 10 3 3 1 Tower installation 10 3 3 2 Rack Mount installation...

Page 3: ...warranty will be void To prevent overheating of the battery bank keep all ventilation openings free from obstruction Keep the battery bank front rear panel 20 cm away from the wall Make sure the batt...

Page 4: ...ld be recharged every 2 3 months if unused If this is not done then the Warranty will be null and void During UPS normal operation batteries will be automatically maintained in full charged condition...

Page 5: ...AUTION A Battery can present a Risk of Electrical Shock and High Short Circuit Current The Following Precaution Should be Observed When Working on Batteries A Remove watches rings or other metal weari...

Page 6: ...del 1 DC Breaker Option 1 Battery Over current Protection 2 Easily remove battery bank from system 2 DC Fuse s Battery Over current Protection 3 Earth Terminal For safety grounding connection 4 Batter...

Page 7: ...efore installation Retain the packing material for future use 3 1 Unpacking Remove the packing foams and take the battery bank out of the box Warning The unit could be quite heavy Check the weight of...

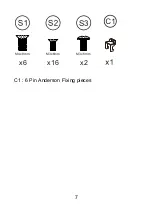
Page 8: ...7 C1 6 Pin Anderson Fixing pieces M3x6mm x16 M4x8mm x6 S3 x2 M3x6mm...

Page 9: ...the batteries Please follow the instructions below 1 Keep at least 20cm 8 inches clearance from the rear panel of the battery bank from the wall or other obstructions 2 Do not block the air flow to t...

Page 10: ...9 4 Do not place the battery bank in a dusty or corrosive environment or near any flammable objects 5 This battery bank is not designed for outdoor use...

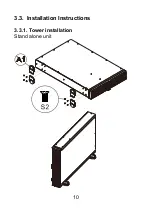
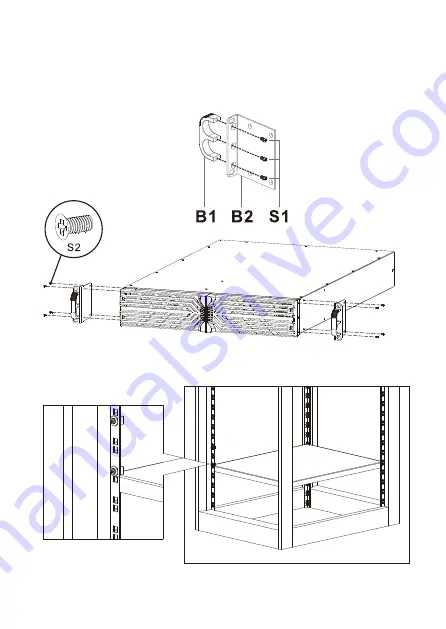
Page 11: ...10 3 3 Installation Instructions 3 3 1 Tower installation Stand alone unit...

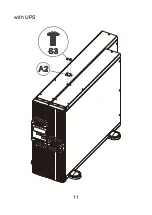
Page 12: ...11 with UPS...

Page 13: ...12 3 3 2 Rack Mount installation Warning Do not use rack mount kit to carry Battery Bank Step 1 Step 2...

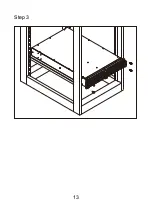
Page 14: ...13 Step 3...

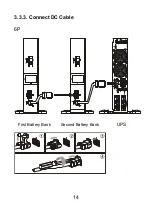
Page 15: ...14 3 3 3 Connect DC Cable 6P UPS First Battery Bank Second Battery Bank...

Page 16: ...hours every 6 months by plugging the UPS power cord into the wall receptacle or by an external charger Repeat this every 3 months under high temperature 30 to 45 C 86 to 113 F environment Warning Lead...

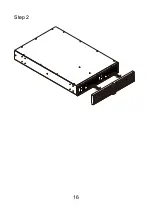
Page 17: ...16 Step 2...

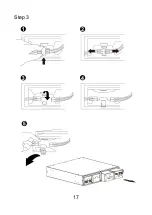
Page 18: ...17 Step 3...

Page 19: ...ion Model NO NPB12 36R Voltage Rating 36VDC Capacity x Strings 7 9Ah x 12 DC Sockets 6p DC Plugs 6p Dimensions WxHxD inch mm 17 3x3 5x22 9 440x88x584 Weight 9AH kg lb 83 33 lb 37 8 kg Weight 7AH kg lb...

Page 20: ...19 Recommended Recharge Current 10 8A max Output Current max 50A Operation Environment 0 40 C 32 104 30 90 RH non condensing Storage Environment 15 45 C 30 90 RH non condensing Compliance UL cUL...

Page 21: ...20 3 7 Recycling the Used battery Contact your local recycling or hazardous waste center for information on proper disposal of the used battery...

Page 22: ...23 192321752083003...

Reviews: