6
As supplied, the FS-70S
Ⅱ,
FS-91S
Ⅱ
and FS-91S
Ⅱ
-P have their
throttle lever on the right hand side and needle-valve control on
the left. However, where more convenient for certain installations,
these positions may be reversed after rotating the carburettor
through 180˚ horizontally.
Proceed as follows:
1.
2.
3.
4.
5.
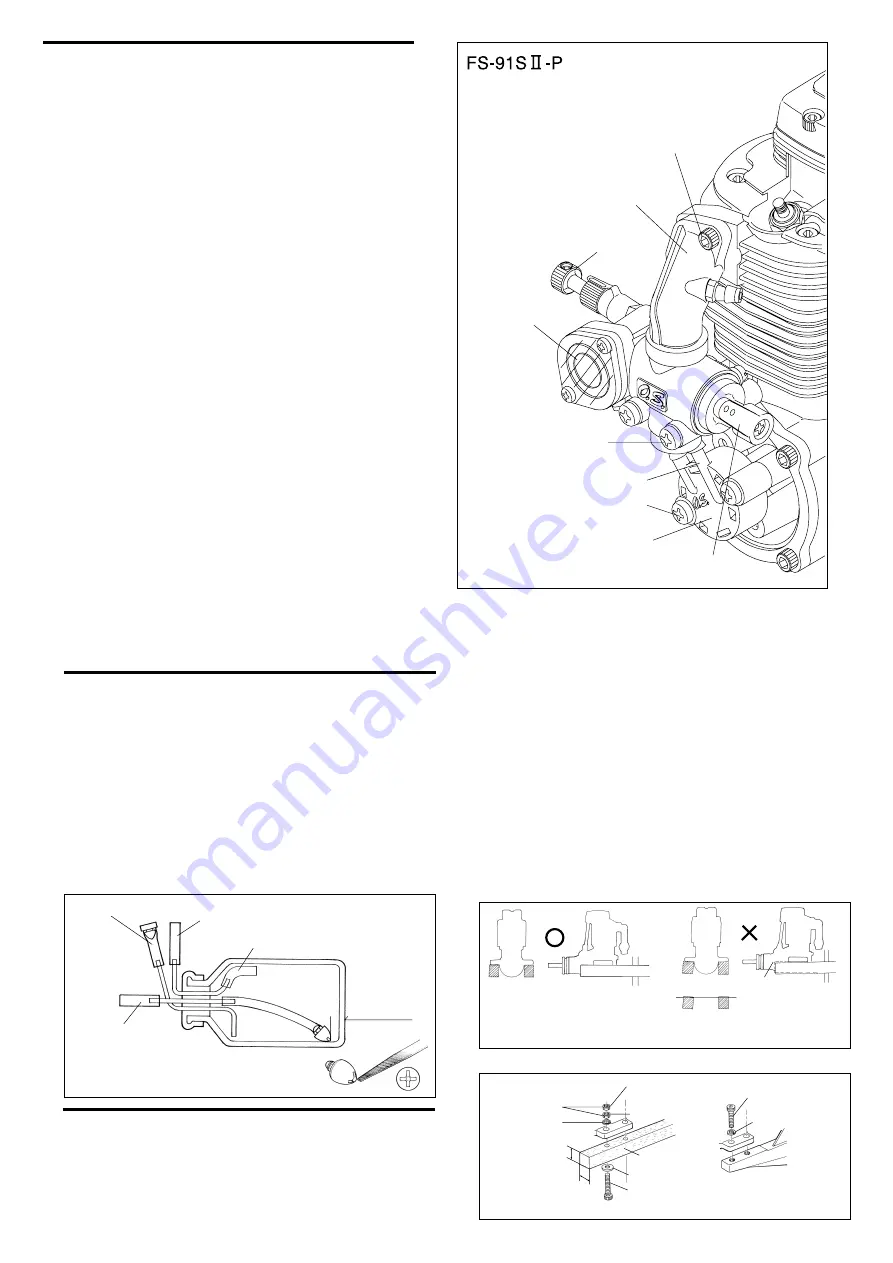
RELOCATION OF CARBURETTOR CONTROLS
Remove the intake pipe mounting screws from the cylinder head
(taking care not to lose the flange gasket [91S
Ⅱ
/91S
Ⅱ-
P] ) and
the carburettor mounting screws from the crankcase cover plate
bracket.
Detach short tubing connecting carburettor to pump unit (FS-
91S
Ⅱ
-P) and gently rotate the carburettor through 180
°
without
separating it from the intake pipe or removing the enclosed O-
ring seal.
Re-install the complete sub-assembly of intake pipe and
carburettor, making sure that adjoining surfaces are clean.
Tighten screws evenly and firmly but not excessively.
Remove pump mounting screws from the crankcase cover
plate lugs, carefully rotate the pump clockwise one-quarter turn
and attach it to the second pair of lugs provided, taking care that
the central tubing connecting the crank chamber to the pump
diaphragm chamber is not twisted.
Finally, make sure that all external tubing connections are
secure and do not leak.
Intake Pipe
Mounting Screw
Intake Pipe
Throttle Lever
Carburettor
Mounting Screw
Needle Valve
FueI Inlet
PD-07 Pump
Pump Mounting Screw
Pressure Regulator
7
⇔
10〜15mm
Because these are powerful, large-displacement, single-cylinder
four-stroke-cycle engines, it is essential to use very substantial
engine mounting. Conventional wooden mounting beams should
be of rigid hardwood and of at least 15mm or 5/8-in square
section.
INSTALLATION
FUEL TANK
A fuel tank of approximately 300cc capacity is suggested. This
allows up to 12-13 minutes flying time, dependent upon the type of
fuel used, the size of the propeller and on the proportion of full-
throttle to part-throttle operation through the flight. Make sure that
the tank is well rinsed out with methanol or glow fuel before
installation and that the pickup weight is well clear of the bottom of
the tank when held vertically (see sketch). To prevent the pickup
from adhering to the tank wall under suction and restricting fuel
flow, slots may be filed in the end of the weight as shown.
Alternatively, a Non-Bubble type weight (Code No. 71531000)
may be used.
Make sure that the mounting beams are parallel and that their top
surfaces are in the same plane.
How to fasten the mounting screws.
Hardwood mounting beams
O.S. radial motor mount
(cast aluminum)
For filling or emptying tank
To fuel inlet
Air vent
Use thick-walled sillcone tubing
Tighten second nut firmly
down onto first nut.
Tighten this nut first.
Steel washer
3.5mm steel nuts
4mm steel screw
Spring washer or
lock washer
15mm min.
15mm min.
Hardwood such as
cherry or maple.
Spring washer
3.5mm steel Allen screw
Make sure that these mounting beams are accurately aligned and
firmly integrated with the airframe, reinforcing the adjacent
structure to absorb vibration. Use 3.5mm or larger steel screws,
preferably Allen type hexagon socket head cap screws, with
washers and locknuts, for bolting the engine to the bearers.
As an alternative to wooden beam mounting, a special O.S. cast
aluminium radial motor mount, complete with 3.5mm mounting
screws, is available as an optional extra part, where front bulkhead
(firewall) type mounting is called for. Engine installation should, in
any case, be made in such a way that basic maintenance can be
conveniently carried out.
Front view
CORRECT
Side view
Top surfaces are in the same plane.
Re-align the surfaces
as necessary
INCORRECT
Top surfaces are not
in the same plane.
Opposite beam
Top surfaces are not
in the same plane.
Engine does not
rest firmly.


