18
e500 User Manual
(15PL1011 - Rev.7 6_6_2017) English version
4.2 Pre-use Check
The following check must be performed and confirmed by the Health care provider
in the following cases:
Prior to use
After replacing hoses, patient circuits or batteries.
At least every 6 months.
1
Visually inspect the ventilator for mechanical damage
2
Ensure that battery is fully charged.
3
Ensure the e500 is connected to a gas supply (Cylinder or piping system)
that delivers a minimum of 45 PSI (3 Bar) and a maximum 87 PSI (6 Bar)
output pressure and a minimum 120 L/min flow
4
Ensure that the patient circuit and monitoring hoses have been properly
connected.
5
Performance check (Leak & Function test):
To undertake the performance check, you will need the following:
Full Oxygen cylinder.
Calibrated test lung (Provided with the unit).
Oxygen pressure regulator capable of delivering flow of 120 L/min and
maintaining a minimum pressure of 45 PSI (3 Bar) and a maximum 87
PSI (6 Bar) output pressure.
a-
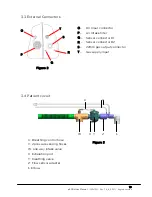
Connect Input hose to input connector (T) and the other side of input
hose to pressure regulator outlet.
b-
Connect power supply to DC input socket.
c-
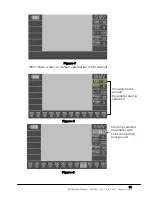
Connect the 2 sensor hoses of patient circuit to sensor connectors #1 (Q)
and #2 (R) and connect the corrugated hose of patient circuit to output
connector (S) (Refer to Figure 2).
d-
Once the ventilator is started, connect the other end of patient circuit to
test lung.
Leak Test
Once all connections are verified, slowly and fully turn on the oxygen cylinder
valve. From the pressure regulator gauge reading, ensure cylinder pressure is
above 650 PSI (45 bar) otherwise replace with new oxygen cylinder.
Once pressurized, turn off the oxygen cylinder and observe the pressure
regulator gauge reading. If pressure does not drop more than 0.5 PSI every 30
seconds, the system is free from leaks.
To identify and repair the leak:
1-
Release the remaining gas from the system.
2-
Tighten all connecters firmly.
3-
Slowly and fully turn on oxygen cylinder and repeat the above leak test
procedure.

