background image

Instruction Manual                                                                                                                                  PC 300 


31 

7.1 

Advanced SETUP Mode Overview  

1. 

In either pH or Conductivity measurement mode, press the 

SETUP

 key to enter Set up 

mode.  

2. Press 

the 


or


 keys to scroll through sub groups. 

3. Press 

ENTER

 key to enter a particular parameter. 

See Addendum 4 for a table of meter factory default settings.  

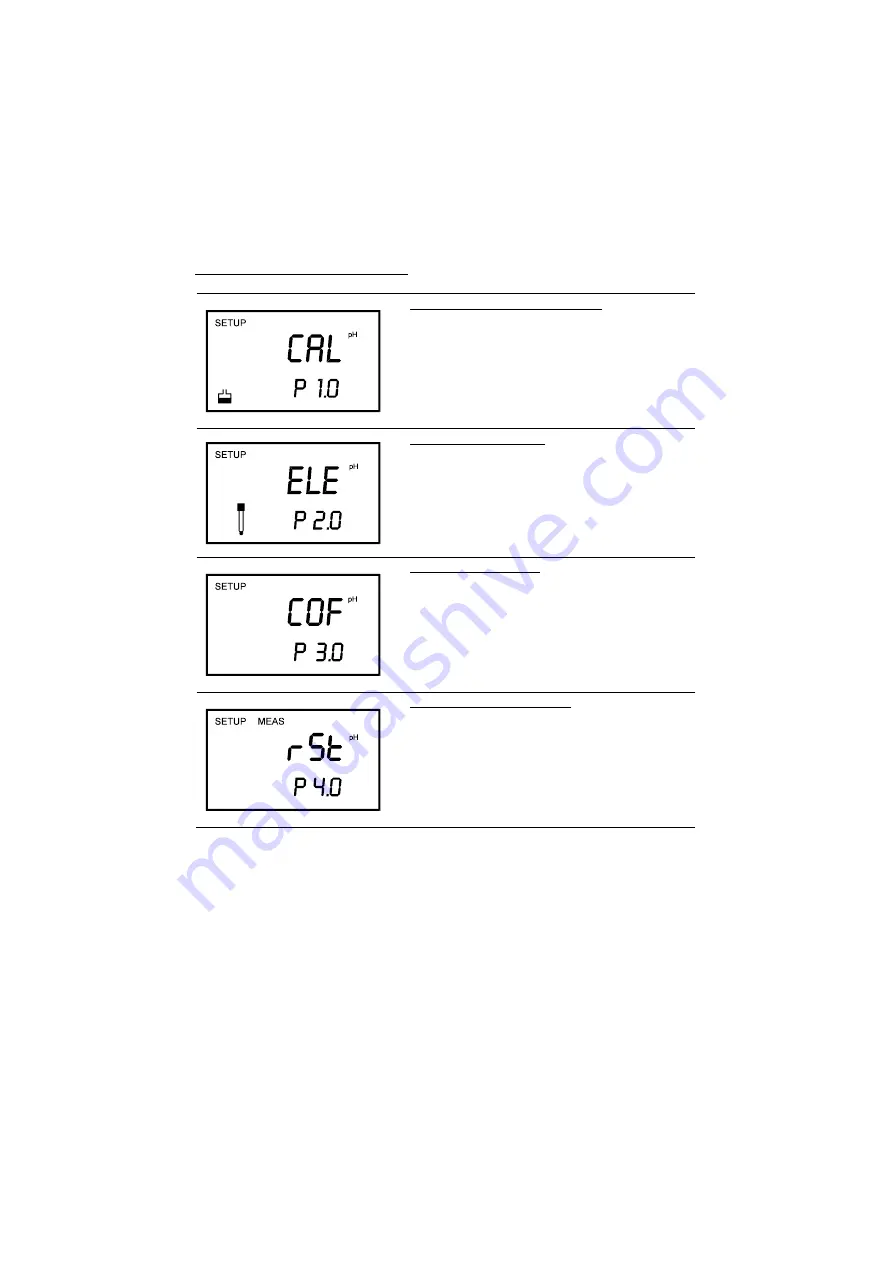
SETUP in pH Measurement Mode


P1.0: View previous calibration data 

P1.1 

First calibration point (pH 1.68) 

P1.2 

Second calibration point (pH 4.01) 

P1.3 

Third calibration point (pH 7.00 or 6.86) 

P1.4 

Fourth calibration point (pH 10.01 or 9.18) 

P1.5 

Fifth calibration point (pH 12.45) 


Instructions on Section 7.2. 


P2.0: View electrode data 

P2.1 

pH electrode offset 

P2.2 

pH electrode slope  


Instructions in Section 7.3.


P3.0:  Unit configuration 

P3.1 

READY indicator and auto endpoint function 
– select on or off 

P3.2 

Number of pH calibration points: 2, 3, 4 or 5 

P3.3 

Select buffer group: USA or NIST 

P3.4 

Select °C or °F 


Instructions in Section 7.4.


P4.0: Reset to factory defaults  

P4.0 

Reset meter to factory defaults 


Instructions in Section 7.5.


Summary of Contents for PC 300

Page 1: ...tion Manual PC 300 Waterproof Hand held pH Conductivity TDS Temperature Meter 35631 00 68X248908 Rev3 01 04 99 Washington Street Melrose MA 02176 Phone 781 665 1400 Toll Free 1 800 517 8431 Visit us a...

Page 2: ...the PC 300 please do not hesitate to contact the nearest Eutech Instruments Oakton Instruments Authorized Distributor Eutech Instruments Oakton Instruments cannot accept any responsibility for damage...

Page 3: ...ng previous pH calibration data 34 7 3 P2 0 Viewing pH electrode data 35 7 4 P3 0 pH Measurement configuration 36 7 5 P4 0 Resetting to factory default settings pH 40 7 6 P5 0 Viewing Previous Conduct...

Page 4: ...ity TDS and Temperature It is completely WATERPROOF and it FLOATS This meter has many user friendly features all of which are completely accessible through the water resistant membrane keypad Your met...

Page 5: ...Full LCD Screen 1 SETup mode indicator 8 micro siemens indicator 15 Low battery indicator 2 MEASurement mode indicator 9 parts per thousand indicator 16 Probe indicator 3 CALibration indicator 10 part...

Page 6: ...H measurement mode press CAL MEAS to enter pH calibration mode 2 If you are in conductivity measurement mode press CAL MEAS to enter conductivity calibration mode 3 If you are in TDS measurement mode...

Page 7: ...iver to remove the two screws holding the battery cover See Figure 3 below 2 Remove battery cover to expose batteries 3 Insert batteries Follow the diagram inside the cover for correct polarity 4 Repl...

Page 8: ...ndard pH electrode with a BNC connector with this meter Conductivity probes 3 in 1 pH electrodes with a built in temperature element and temperature probes require a notched 6 pin connector see Figure...

Page 9: ...tal sleeve to lock the probe connector into place See Figure 4 2 To remove probe unscrew the metal sleeve and slide up the probe connector While holding onto metal sleeve pull probe away from the mete...

Page 10: ...ivity meter at 300 ppm in the 0 to 999 ppm range and you re calibrate at 500 ppm which is also in the 0 to 999 ppm the meter will replace the old calibration data 300 ppm in that range The meter will...

Page 11: ...g buffer options pH 1 68 4 01 7 00 10 01 and 12 45 USA pH 1 68 4 01 6 86 9 18 12 45 NIST The meter automatically recognizes and calibrates to these standard buffer values which makes pH calibration fa...

Page 12: ...r The end of the probe must be completely immersed into the sample Stir the probe gently to create a homogeneous sample NOTE The temperature element is in the conductivity cell For temperature compens...

Page 13: ...ion points See Figure 6 9 When calibration is complete press CAL MEAS to return to pH measurement mode NOTES To exit from pH calibration mode without confirming calibration DO NOT press ENTER in step...

Page 14: ...is approximately 2 3 the full scale value of the measurement range you plan to use For example in the 0 to 1999 S conductivity range use a 1413 S solution for calibration Table 1 Range Indicator and...

Page 15: ...andard 3 Dip the probe into the calibration standard Immerse the probe tip beyond the upper steel band Stir the probe gently to create a homogeneous sample See Figure 8 4 Wait for the measured conduct...

Page 16: ...g calibration DO NOT press the ENTER key in step 7 Press CAL MEAS instead This will retain the meter s old calibration data in the measuring range of the calibration You can offset the conductivity re...

Page 17: ...le Allow time for the reading to stabilize 4 Press CAL MEAS to enter TDS calibration mode The CAL indicator will appear in the upper right corner of the display 5 Press the or keys to change the value...

Page 18: ...tivity to TDS Instead of calibrating for TDS directly described above you can calibrate the PC 300 meter by 1 calibrating to conductivity standards as described above and then 2 entering the appropria...

Page 19: ...obe Temperature calibration is accessible during pH or conductivity or TDS calibration Temperature Calibration 1 Make sure the conductivity electrode or temperature probe or 3 in 1 electrode is attach...

Page 20: ...eading increments of 0 1 C 7 Once you have selected the correct temperature press the ENTER key The meter automatically returns to pH measurement mode See Figure 11 NOTES You can offset the temperatur...

Page 21: ...05 or The 3 in 1 pH Temperature combination electrode EC FE73528 01W 35808 71 If there is no temperature sensor plugged into the meter the default manual temperature setting is automatically 25 C You...

Page 22: ...on mode The primary display shows the current temperature setting and the secondary display shows the default value 25 C 4 Check the temperature of your sample using an accurate thermometer 5 Press th...

Page 23: ...utomatic Temperature Compensation NOTE For pH manual temperature compensation you must disconnect the conductivity cell from the 6 pin connector The ATC indicator will disappear from the display You a...

Page 24: ...he reading holds until the measured value exceeds the tolerance 0 02 pH 0 8 mV 400 1 2 mV 400 Then the READY annunciator turns off Taking measurements with the auto endpoint feature selected on When a...

Page 25: ...vate the temperature probe Selecting Manual Temperature Compensation for conductivity Selecting between Automatic Temperature Compensation ATC and Manual Temperature Compensation in the SETUP program...

Page 26: ...C off See Figure 18 6 Press the ENTER key to confirm selection and to return to the subgroup menu Press the CAL MEAS key to return to measurement mode Note that the ATC indicator no longer appears on...

Page 27: ...le in conductivity or TDS calibration mode press the MODE key to enter temperature calibration mode The primary display shows the current temperature setting and the secondary display shows the defaul...

Page 28: ...band Stir the probe gently in the sample to create a homogenous sample See Figure 9 in Section 4 4 5 Allow time for the reading to stabilize Note the reading on the display If the READY I indicator i...

Page 29: ...ip the conductivity probe into a standard solution say 12 88 mS 2 It will automatically select the most appropriate range r 4 which is 0 00 to 19 99 mS refer to Table 1 in Section 4 4 3 The secondary...

Page 30: ...he RANGE key again if needed until desired range is selected 3 To re select the Auto ranging function repeatedly press the RANGE key until the MEAS indicator appears without blinking NOTES If the valu...

Page 31: ...ff automatically after 20 minutes of last key press If the meter is shut off either automatically or manually the HOLD value will be lost Your meter has an auto endpoint feature When this feature is s...

Page 32: ...that organize setup parameters The sub groups are For pH For Conductivity TDS P 1 0 View calibration data CAL P 5 0 View calibration data CAL P 2 0 View electrode data ELE P 6 0 View electrode data E...

Page 33: ...Instruction Manual PC 300 30 Figure 25 Overall view of SETUP programs for pH on left and conductivity TDS on right...

Page 34: ...1 2 Second calibration point pH 4 01 P1 3 Third calibration point pH 7 00 or 6 86 P1 4 Fourth calibration point pH 10 01 or 9 18 P1 5 Fifth calibration point pH 12 45 Instructions on Section 7 2 P2 0...

Page 35: ...for second range 0 0 199 9 S P6 3 Effective cell constant for third range 0 1999 S P6 4 Effective cell constant for fourth range 0 00 19 99 mS P6 5 Effective cell constant for fifth range 0 0 199 9 m...

Page 36: ...r second range 0 0 99 9 ppm P6 3 Effective cell constant for third range 0 999 ppm P6 4 Effective cell constant for fourth range 0 00 9 99 ppt P6 5 Effective cell constant for fifth range 0 0 200 ppt...

Page 37: ...e or keys to scroll through subgroups until you view parameter P1 0 4 Press the ENTER key repeatedly to view previous calibration data See Figure 26 USA NIST P1 1 pH 1 68 1 68 P1 2 pH 4 01 4 01 P1 3 p...

Page 38: ...meter 2 1 5 The display shows the electrode offset value It is the mV offset at pH 7 00 If you have not calibrated at any buffer the primary display shows 0 00 mV 6 Press the ENTER key to proceed to P...

Page 39: ...FF 2 Select the number of pH calibration points 3 Select between USA and NIST buffers 4 Select between C and F units for temperature readings Figure 28 on the right shows the setup sequence for this p...

Page 40: ...ions From measurement mode 1 Press the MODE key to select pH measurement mode 2 Press SETUP key to enter Set Up mode 3 Press the or keys to scroll through subgroups until you view parameter P3 0 4 Pre...

Page 41: ...measurement mode 1 Press the MODE key to select pH measurement mode 2 Press SETUP key to enter Set Up mode 3 Press the or keys to scroll through subgroups until you view parameter P3 0 4 Press the ENT...

Page 42: ...Press the ENTER key four times to select parameter 3 4 5 Press the or keys to toggle between C and F 6 Press the ENTER key to confirm selection and to return to the subgroup menu Press the CAL MEAS ke...

Page 43: ...ect pH measurement mode 2 Press SETUP key to enter Set Up mode 3 Press the or keys to scroll through subgroups until you view parameter P4 0 4 Press the ENTER key to enter parameter P4 0 See Figure 32...

Page 44: ...ntil you view parameter P5 0 4 Press ENTER key repeatedly to view previous calibration data 5 Each calibration data corresponds to each measurement range P5 1 Range 1 0 00 19 99 S or 0 00 9 99 ppm P5...

Page 45: ...e ENTER key repeatedly to view the effective cell constant for each range P6 1 Range 1 0 00 19 99 S or 0 00 9 99 ppm P6 2 Range 2 0 0 199 9 S or 0 0 99 9 ppm P6 3 Range 3 0 1999 S or 0 999 ppm P6 4 Ra...

Page 46: ...From measurement mode 1 Press the MODE key to select conductivity or TDS measurement mode 2 Press SETUP key to enter Set Up mode 3 Press the or keys to scroll through subgroups until you view paramete...

Page 47: ...groups until you view parameter P7 0 10 Press the ENTER key two times to select parameter 7 2 11 Press the or keys to toggle between C and F 12 Press the ENTER key to confirm selection and to proceed...

Page 48: ...ess the or keys to scroll through subgroups until you view parameter P7 0 4 Press the ENTER key three times to select parameter 7 3 The upper display shows ATC and the lower display shows P7 3 5 Press...

Page 49: ...TDS conversion factor between 0 4 and 1 0 meter default is 0 5 From measurement mode 1 Press SETUP key to enter Set Up mode 2 Press the or keys to scroll through subgroups until you view parameter P7...

Page 50: ...Up mode 3 Press the or keys to scroll through subgroups until you view parameter P8 0 4 Press the ENTER key to select parameter 8 1 The display shows t CO on the upper display 5 Press the ENTER key ag...

Page 51: ...s SETUP key to enter Set Up mode 3 Press the or keys to scroll through subgroups until you view parameter P8 0 4 Press the ENTER key three times to select parameter 8 2 The display shows t nr on the u...

Page 52: ...de 3 Press the or keys to scroll through subgroups until you view parameter P9 0 4 Press the ENTER key to enter parameter P9 0 5 Press the or keys to toggle between NO and YES NO retains current setti...

Page 53: ...lectrode storage or as recommended by the manufacturer 3 Prior to next use rinse the liquid junction with de ionized water and tap dry never wipe electrode NOTE If this does not restore electrode to n...

Page 54: ...entilation and waste disposal Safety goggles and protective clothing must be worn while performing this procedure If possible replace with another electrode instead of performing this re activation pr...

Page 55: ...merse the probe in oily solutions Clean the electrode thoroughly by stirring it in a mild detergent bath or isopropyl alcohol Wipe the probe with a soft tissue paper Rinse thoroughly in tap water and...

Page 56: ...d Air bubbles in probe e Dirty probe f Probe not deep enough in sample g External noise pickup or induction caused by nearby electric motor h Broken probe d Tap probe to remove bubbles e Clean the pr...

Page 57: ...libration error Wrong value input at calibration Dirty probe Check your input value clean probe See Calibration sections or Probe Maintenance section Battery indicator blinks Low battery level Need ne...

Page 58: ...o five points one point per range pH Slope Offset Display Yes pH Buffer Option USA pH 1 68 4 01 7 00 10 01 12 45 NIST pH 1 68 4 01 6 86 9 18 12 45 Conductivity Cell constant k 1 0 1 0 Conductivity Tem...

Page 59: ...00 Epoxy body double junction pH electrode with 1 m cable EC FE72522 01B 35641 51 3 ring SS Ultem body Electrode with ATC cell constant 1 0 12x110 mm 1m cable length EC CONSEN91W 35608 50 3 in 1 pH Te...

Page 60: ...ation Solution in 480 ml leak proof bottle 1 pint EC CON 1288BT 00606 10 2 764 S KCl Calibration Solution in 480 ml leak proof bottle 1 pint EC CON 2764BT 00653 20 10 S conductivity standard sachet 20...

Page 61: ...lues and conversion factors for future reference Factor Actual TDS Actual Conductivity 25 C TDS KCl TDS NaCl Conductivity at 25 C ppm Value Factor ppm Value Factor 84 S 40 38 0 5048 38 04 0 4755 447 S...

Page 62: ...Actual TDS Value from the solution bottle label or as a standard you make using high purity water and precisely weighed salts Actual Conductivity Value measured using a properly calibrated Conductivi...

Page 63: ...NTER key twice The lower display reads tCO and the upper display shows the temperature coefficient value D Press the key until the upper display shows 0 0 E Press ENTER key to confirm the value F Pres...

Page 64: ...r display shows the temperature coefficient value should be 0 as per step 1 above D Press the key until the upper display shows your calculated temperature coefficient E Press ENTER key to confirm the...

Page 65: ...points 3 3 pH calibration points available 1 5 pt range P3 3 C or F No default C or F remains as selected P4 0 pH factory default No Retains your current settings Conductivity and TDS parameters P5 1...

Page 66: ...t mode 1 Press the MODE key to select pH measurement mode 2 Press SET key to enter Setup mode 3 Press the or key to scroll through subgroups until you view parameter P3 0 4 Press ENTER three times to...

Page 67: ...od please return freight pre paid and correction will be made without charge Eutech Instruments Oakton Instruments will determine if the product problem is due to deviations or customer misuse Out of...

Page 68: ...reason the items are to be returned For your protection items must be carefully packed to prevent damage in shipment and insured against possible damage or loss Eutech Instruments Oakton Instruments...

Page 69: ...h Instruments Oakton Instruments products contact your nearest distributor or visit our website listed below 99 Washington Street Melrose MA 02176 Phone 781 665 1400 Toll Free 1 800 517 8431 Visit us...

Reviews: