Guide to Physical Installation
4
1.
When delivered, the turnstile will either be flat packed on a pallet or shrink wrapped and free standing, if flat packed you must
assemble the turnstile making sure that everything is aligned. Check for any physical damage or defects before you sign!
2.Taking into consideration that the plinth has been prepared correctly and is absolutely level and true,
Lower the
turnstile onto the plinth and visually align.
Make sure that you have pulled all cables through the ducting before bolting
down and that the duct is in the centre of the cable channel in the frame!
3.
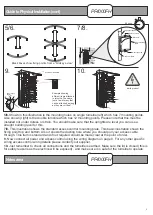
Using one M12 fixing, bolt down through one of the holes, it is advisable to blow the excess dust out of the hole before
inserting the bolt.
4.
Now make sure that the turnstile is now aligned perfectly, continue to bolt down through the other holes using the remaining
M12 bolts see below.
Now move on to step 5
The numbers in the text document below relate to the drawings below.
3.
1.
2.
4.
45 mins
Component Identification and Notes:
You should check that you have received the following in your order as they are referred to throughout this
manual (note this can change per turnstile spec i.e. single components are different from double):
M12 Bolt
8 No.
(To bolt turnstile to floor)
PF4000FH
PF4000FH
A
utomatic Turnstile
Single or Double
Duty Cycle: 100%
GB
O&M Manual
Revision 3.0
O&M Manual 1 No.
60 5
10
15
20
25
30
35
40
45
50
55
PF4000FH
Turnstile
(fully erected)
Optional Canopy
Access Control
Mounting Plate
Rotor Arms
Header Cover
Optional Bulk
Head Light
Main Turnstile
Frame
Line the cable
channel up
Cut out showing
cable in channel
When turnstile is level
and secure mark one
of the holes.
Drill a 12mm hole to suit
the M12 stud. Hammer
the stud home then locate
the turnstile hole over the
stud. Once done then fasten
the nut onto the stud.
ACME TOOLS
Now using a 19mm spanner
tighten up all the other nuts.
Manual Release
keys x2


