5
- English -
Start-up
Prior to this observe the following operating steps: Connect the air hose to the unit prior to switching on. We recom-
mend to fit the aeration stones approx. 12 in. (30 cm) below the water surface. Keep the length of the air hoses as
short as possible. Protect the connection cable when burying and connect the transformer to a socket. Air will emerge
from the aeration stones after a short start-up time.
Cleaning
Attention! Dangerous electrical voltage.
Possible consequences:
Death or severe injury.
Protective measures:
Disconnect the power plug prior to reaching into the water and commencing
work.
Disconnect the power supply first, then secure the unit to prevent unintentional switching on. Should the performance
reduce, clean the air intake opening in the base of the housing.
Replacing the diaphragms
Diaphragms need to be replaced occasionally. Always replace diaphragms in pairs, left and right.
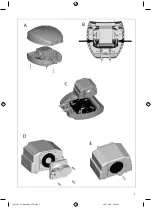
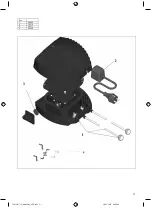
Disconnect the power supply first, then secure the unit to prevent unintentional switching on. Remove the hood by
unscrewing the screws from the unit underside (A). Disconnect the connection hose from the pump heads (B) on the
left-hand and right-hand side. Lift the motor block (C) and remove the diaphragm chamber (D) fitted with four screws.
The membrane can be replaced after loosening the screw and removing the support disk (E). Ensure correct insertion
(note the shape).
Reassemble the unit in the reverse order and put it back into operation.
Wearing parts
Diaphragms are wear parts and are excluded from the warranty.
Storage/Over-wintering
Take the air hoses out of the water and clean. Check the unit for damage and store it in a frost-free environment.
Disposal
Do not dispose of this unit with domestic waste! For disposal purposes, please use the return system provided.
Disable the unit beforehand by cutting off the cables.
Remedy of faults
Malfunction Cause Remedy
Unit does not run
No mains voltage
Transformer defective
Check mains voltage
Replace transformer
Unit does not deliver air
Diaphragms defective
Regulating valve incorrectly set
Valves soiled
Replace diaphragms, clean air slots
Check settings
Clean
Insufficient delivered quantity
Diaphragms defective
Excessive loss in the supply hoses
Regulating valve incorrectly set
Exchange diaphragms
Reduce hose length to a minimum
Check settings
19672-01-14_AquaOxy_USA.pdf 5
28.01.2014 08:54:24


