


3
WARNING
OASE UNDERWATER LIGHTS must be connected by a certified electrician to a properly grounded and GFCI (Ground
Fault Circuit lnterrupter) protected 120 Volt AC circuit in accordance with local electrical code requirements. Cord to be
connected to the supply source in a certified and appropriate junction box located above maximum water level.
Do not use OASE UNDERWATER LIGHTS in swimming pools, spas, hot tubs, etc. OASE UNDERWATER LIGHTS must
be submersed before lighting.
Do not operate light in dry conditions. Read product label carefully and thoroughly.
PLEASE READ THE FOLLOWING INSTRUCTIONS CAREFULLY AND THOROUGHLY. FAILURE TO COMPLY WITH
THESE IMPORTANT REQUIREMENTS COULD CAUSE SERIOUS OR FATAL INJURY OR DAMAGE.
ELECTRICAL REQUIREMENTS
OASE UNDERWATER LIGHTS must be connected by a certified electrician to a properly grounded and GFCI (Ground
Fault Circuit Interrupter) protected 120 Volt AC circuit in accordance with local electrical code requirements.
DISCONNECT ELECTRICAL
circuit before
- Moving light, cleaning light, replacing lamp.
- Use replacement lamps of same electrical ratings, shape and size only.
- Avold water penetration into light housing when replacing lamp.
- Disconnect electrical circuit before entering water area.
- Do not remove cord.
- Do not pinch or twist cord.
- Do not remove any labels.
- Do not expose light to other than water.
- Do not operate light at low water level.
SAFETY INSTRUCTIONS
- Disconnect electrical circuit before moving or cleaning light.
- Disconnect electrical circuit before opening light enclosure for lamp replacement.
- Avoid water penetration into light housing when replacing lamp.
- Do not carry or pull light by power cord.
- Mechanical damage to light could cause serious or fatal injury or damage.
- Disconnect electrical circuit before entering water area.
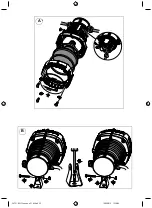
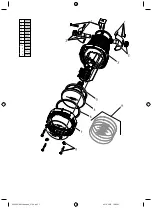
SETUP and STARTUP (A-B)
The unit comes fully assembled. (B) Undo screw M6 and nut M6 and remove the foot from the retaining rings, fit the foot
on firm ground using a 6 mm screw connection so as to ensure that the unit presents no danger for anybody and cannot
be disassembled without tools (permanent local installation). Fasten the unit to the foot using an M6 screw and an M6
nut and ensure firm seating. Connect the power supply and check the spotlight function.
Fitting a coloured glass or safety glass (optional)
Insert the coloured glass (a = blue, b = yellow, c = green, d = red,) or the safety glass (e) in the corresponding recess in
the upper section of the housing and fix using four retaining elements and 5x10 screws.
Exchanging the bulb
Adhere to the safety information given above! Disconnect the power supply and take measures to prevent unintentional
switching on. Use the appropriate original bulb PAR 38 120 V/ 80 W from OASE. Undo the four M5x35 screws and
remove the upper section of the housing. Ensure that no moisture can enter the unit. Replace bulb and O rings, refit the
upper section of the housing. Reconnect to the power supply and check function.
Important! Only original bulbs from OASE may be used.
Wearing parts
Bulbs and sealing rings are wear parts and are excluded from the warranty.
Cleaning
Adhere to the safety information given above! Carry out the steps as specified under 'Replacing the bulbs'. Only use water
and a soft brush. Ensure that no moisture can enter the unit.
Repair
In the event of damage of the housing, the unit cannot be repaired and, therefore, has to be disposed of.
Disposal
Dispose of the unit in accordance with the national legal regulations.
Malfunctions
Trouble shooting
Cause
Remedy
Lamp does not light up
Power supply interrupted
Check power supply
Check bulb, replace, if necessary
Clean contacts
Light intensity decreases
Lamp glass soiled
Cleaning
Water in the spotlight
Seal defective
Check and replace seal
English
Beschreibung.pdf 1
19.09.2013 15:40:17


