background image

-  English  -

7

6

Questions, problems, missing parts? 

Before returning to your retailer, call us at 1-866-627-3435, 8 a.m.-6 p.m., EST, Monday-Friday, or email 

us at customercare@oase-livingwater.com.  Or visit our website at www.oase-livingwater.com

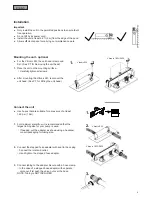
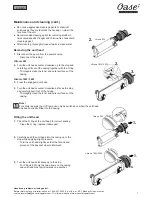
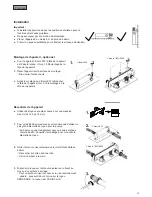
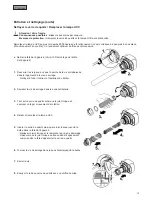
Removing the unit head

1.

   Disconnect the pump from the power source.

○ Disconnect the tubing.

Vitronic 9W
2.

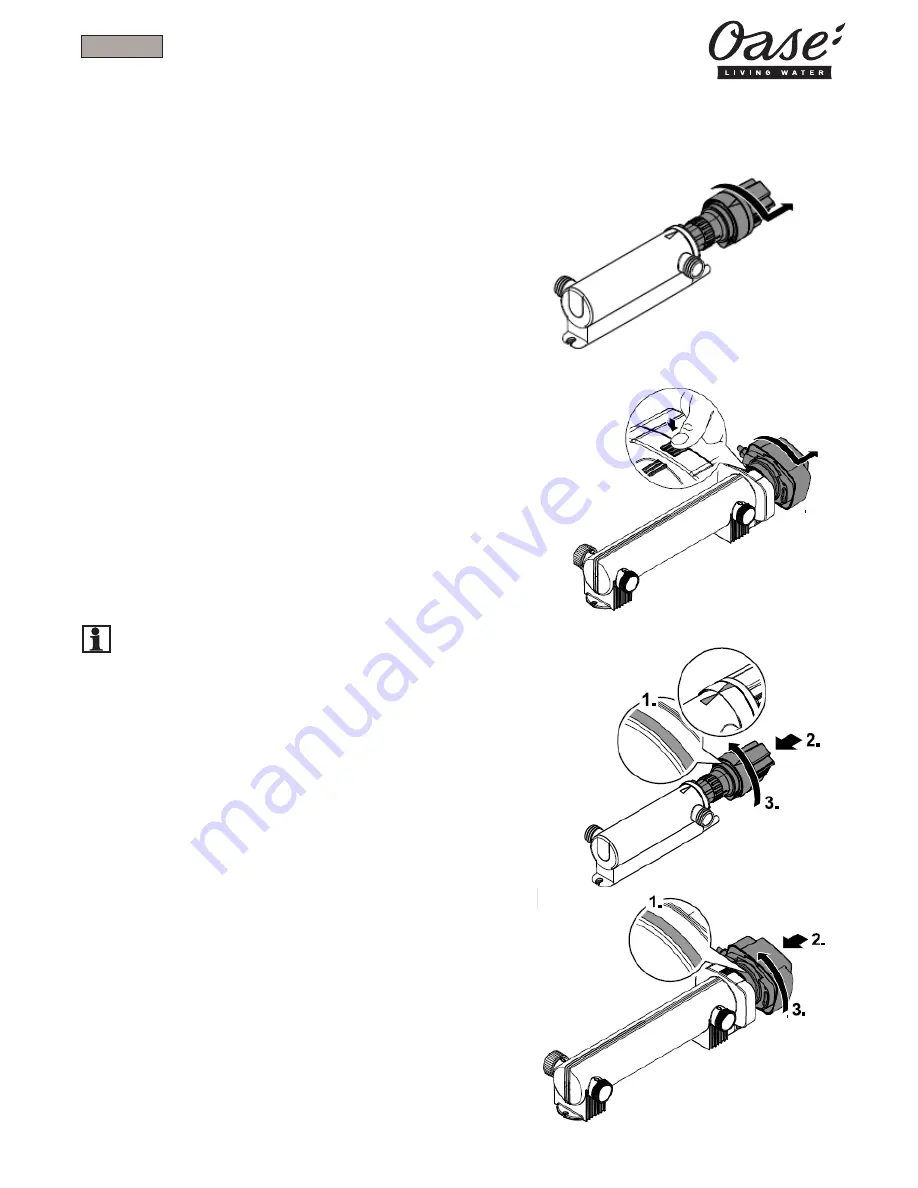
   Turn the unit head counter-clockwise up to the stop and 

carefully pull it out of the casing together with the O ring.

○ Thoroughly clean the inner and outer surfaces of the 

casing.

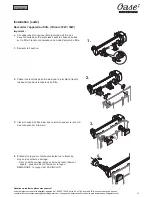
Vitronic 18W / 36W
2.

   Press the engagement hooks.

3.

   Turn the unit head counter-clockwise as far as the stop 

and carefully pull it out of the casing.

○ Thoroughly clean the inner and outer surfaces of the 

casing.

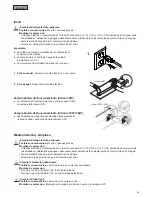
Maintenance and cleaning (cont.)

2.

Vitronic 9W

●   

Do not use aggressive cleaning agents or chemical 

solutions as they could attack the housing or impair the 

functionof the unit.

●   

Recommended cleaning agent for removing stubborn 

limescale deposits: Vinegar and chlorine-free household 

cleaning agent.

●   

After cleaning, thoroughly rinse all parts in clean water.

Vitronic 18W / 36W

3.

2.

Note!

For safety reasons the UVC lamp can only be switched on when the unit head 

has been correctly fitted into the casing.

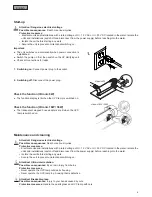
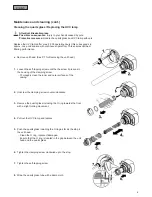
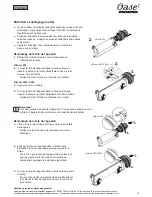
Fitting the unit head

1.

   Check the O ring at the unit head for correct seating.

○ Clean the O ring, replace if damaged.

2.

   Carefully push the unit head into the casing up to the 

stop while applying slight pressure.

○ Turn the unit head slightly so that the tenons and 

grooves of the bayonet closure intermesh.

3.

   Turn the unit head clockwise up to the stop.

○ For Vitronic 9W only the two arrows on the casing 

and unit head must point towards one another.

Vitronic 9W

Vitronic 18W / 36W

Summary of Contents for Vitronic 9

Page 1: ...Vitronic 9 18 36 Operating instructions Notice d emploi Instrucciones de uso...

Page 2: ...ions Welcome to OASE Living Water You made a great choice with the purchase of this product Vitronic 9W 18W 36W Prior to operating the unit please read the instructions of use carefully and fully fami...

Page 3: ...t the function of pacemakers Important information for trouble free operation Intended use Vitronic 9W 18W 36W referred to in the following as unit may only be used as specified in the following For c...

Page 4: ...a hacksaw consult packaging for tubing size 2 Connect the stepped hose adapter with seal to the casing Connect the inlet and outlet Hand tighten the stepped hose adapter 3 Connect tubing to the adapte...

Page 5: ...flow through filters Both outlet sockets are screwed to the inlet nozzles on the flow through filter Adhere to the instructions for use of the flow through filter 1 Unscrew the cover cap 2 Guide the...

Page 6: ...n the UVC lamp is switched on Check the function Vitronic 18W 36W The transparent stepped hose adapters are lit when the UVC lamp is switched on Maintenance and cleaning Attention Dangerous electrical...

Page 7: ...ning cont 2 Vitronic 9W Do not use aggressive cleaning agents or chemical solutions as they could attack the housing or impair the functionof the unit Recommended cleaning agent for removing stubborn...

Page 8: ...ng the O ring as far as the stop in the unit head Clean the O ring replace if damaged Ensure that the O ring is located in the gap between the unit head and the quartz glass 6 Tighten the clamping scr...

Page 9: ...VC lamp quartz glass and O ring for quartz glass are wear parts and are excluded from the warranty Disposal Do not dispose of this unit with domestic waste Disable the unit beforehand by cutting off t...

Page 10: ...W constitue un excellent choix Avant d utiliser l appareil lisez les instructions attentivement et familiarisez vous parfaitement avec l appareil Assurez vous que tout travail effectu sur cet appareil...

Page 11: ...rs cardiaques Renseignements importants pour un bon fonctionnement Utilisation pr vue Les appareils Vitronic 9W 18W 36W d sign s ci apr s comme l appareil peuvent tre utilis s seulement comme indiqu d...

Page 12: ...allage pour conna tre le diam tre du tuyau 2 Relier l embout universel ainsi que le joint d tanch it au bo tier Raccorder l entr e et la sortie Serrer l embout la main 3 Brancher le tuyau sur l embout...

Page 13: ...pour tre raccord au filtre Les deux conduits de sortie sont viss s avec les buses d entr e sur le filtre Prendre connaissance du mode d emploi du filtre 1 D visser le bouchon 2 Passer les raccords de...

Page 14: ...ume lorsque la lampe UVC est sous tension V rification fonctionnelle Vitronic 18W 36W Les embouts transparents sont clair s lorsque la lampe UVC est sous tension Entretien et nettoyage Attention Tensi...

Page 15: ...u des solutions chimiques qui pourraient endommager le bo tier ou entraver le fonctionnement de l appareil Produits nettoyants recommand s pour liminer les d p ts calcaires tenaces vinaigre ou produit...

Page 16: ...dans la t te de l appareil Nettoyer le joint torique et le remplacer en cas de dommage S assurer que le joint torique se trouve dans l espacement compris entre la t te d appareil et le verre de quartz...

Page 17: ...UVC le verre quartz et le joint torique pour le verre de quartz sont des pi ces d usure et sont exclus de la garantie limination Ne pas jeter cet appareil avec les d chets domestiques D sactiver pr a...

Page 18: ...una excelente decisi n al comprar este producto de Vitronic 9W 18W 36W Antes de poner la unidad en operaci n por favor lea las instrucciones de uso cuidadosamente y completamente para conocer la unida...

Page 19: ...gn tico puede afectar el funcionamiento de marcapasos card acos Informaci n importante para garantizar operaci n sin problemas Uso previsto Vitronic 9W 18W 36W llamada a continuaci n unidad se puede u...

Page 20: ...e la tuber a en el empaque 2 Conecte la boquilla de manguera escalonada con la junta en la caja Conecte la entrada y la salida Apriete la boquilla de manguera escalonada a mano 3 Coloque el tubo flexi...

Page 21: ...de salida se atornillan con las toberas de entrada en el filtro de paso Tenga en cuenta las instrucciones de uso del filtro de paso 1 Desatornille la tapa de cierre 2 Gu e las tubuladuras de salida co...

Page 22: ...est conectada la l mpara UVC Comprobaci n del funcionamiento Vitronic 18W 36W Las boquillas de manguera escalonadas transparentes se iluminan cuando est conectada la l mpara UVC Mantenimiento y Limpi...

Page 23: ...ductos de limpieza fuertes o soluciones qu micas Estos podr an atacar la superficie del alojamiento o afectar el funcionamiento Agente de limpieza recomendados para eliminar los dep sitos calc reos ob...

Page 24: ...unidad hasta el tope Limpie la junta t rica Sustit yala si estuviera da ada La junta t rica tiene que estar en la ranura entre la cabeza del unidad y el vidrio cuarzoso 6 Enrosque el tornillo de fija...

Page 25: ...ca para vidrio cuarzoso son componente de desgaste y est n excluido de la garant a Desecho No deseche esta unidad en conjunto con la basura dom stica Primero deshabilite la unidad al cortar los cables...

Page 26: ...La temp rature de l eau Longueur du cordon Lampe UVC SP Modelo No de modelo Tensi n nominal Consumo el ctrico Dimensiones Presi n de funcionamiento Tasa de flujo m xima La temperatura del agua Longit...

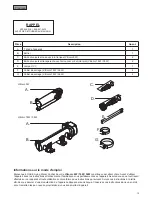
Page 27: ...7 Pos Vitronic 9W 1 44095 2 40964 3 13312 4 15535 5 27576 6 26940 Pos Vitronic 18W 36W 1 37551 40641 2 40965 40966 3 21763 21763 4 15748 15748 5 22206 22206 6 35877 35877 7 19491 19491 8 15445 15445 2...

Page 28: ...OASE North America INC www oase livingwater com 46637 08 16...

Reviews: