background image

12 

- English - 


Pos: 39 /Lampen/Wasserspieltechnik/Water-Jet Lightning USA/Handsender einlernen Water Jet Lightning USA @ 10\mod_1235557100548_121.doc @ 60755 @  


The manual transmitter contained in the scope of delivery is already taught in to the 12 V control box.  Each further 
manual transmitter has to be newly taught in for the 12 V control box. 

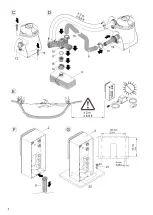
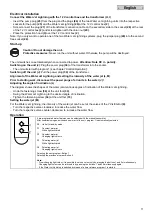
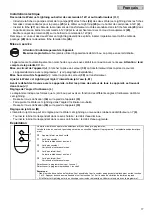
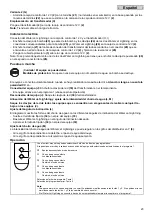
Manual transmitter teach-in (K)


The 12 V control box 

(2)

 is equipped with a teach-in button 

(31)

 to be able to carry out the manual transmitter teach-in. 

  Insert a pin 

(32)

 in the opening for the teach-in button 

(31)

  Actuate the teach-in button 

(31)

 using the pin 

(32)

 for approx. 1 sec.  

  Press any button of the manual transmitter for at least 1 sec.  

Deleting the manual transmitter (K)


  Actuate the teach-in button 

(31)

 using a pin 

(32)

 for at least 5 sec. 

All manual transmitters saved in the 12 V control box 

(2)

 are deleted. 

Note

: A maximum of 10 manual transmitters can be set to the receiver. The manual transmitter has a maximum range 

of 80 m (260 ft). Obstacles between transmitter and receiver, a low battery in the manual transmitter, or electro-
magnetic radiation of electrical equipment will impair the range. 

Pos: 40 /Alle Produkte/Überschriften/H1 Reinigung und Wartung @ 7\mod_1196625212761_121.doc @ 41469 @  


Maintenance and cleaning 

Pos: 41 /Lampen/Wasserspieltechnik/Water Jet Lightning/WAR_Reinigung und Wartung_Water-Jet-Lightning @ 8\mod_1221040256101_121.doc @ 52343 @  


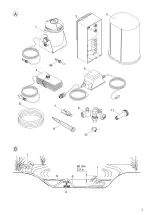
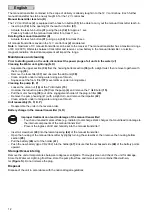
Prior to starting work on the units, disconnect the power plugs of all units in the water (J)! 
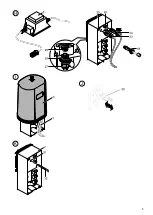
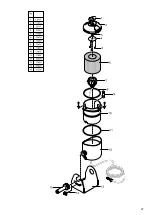
Cleaning the Water Jet Lightning (N, O)


  Separate the upper section 

(34)

 from the housing bottom section 

(36) 

with a slight twist, then remove together with 

the O-ring 

(35) 

.  


Remove the foam filter 

(37) 

and unscrew the LED unit 

(38) 

  Clean all parts under running water using a soft brush. 

  Squeeze out the foam filter 

(37)

 several times under running water. 

Cleaning the pump (D, P)


  Loosen the union nut 

(14)

 at the Y distributor 

(15)

.  

  Unscrew the reduction piece 

(16)

 from the pump 

(4)

 and remove the Y distributor 

(15)

  Pull the motor housing 

(39)

 out of the engagement holder of the plug-in filter 

(40)

  Remove the pump housing (41) with a slight turn, and remove the impeller 

(42) 

  Clean all parts under running water using a soft brush. 

Unit reassembly


(N, O, D, P)


  Reassemble the units in the reverse order. 

Pos: 42 /Lampen/Wasserspieltechnik/Water Jet Lightning/Batteriewechsel Handsender Water-Jet-Lightning @ 8\mod_1221040331102_121.doc @ 52369 @  


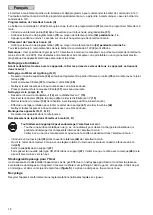
Battery change in the manual transmitter (Q, R)


Improper treatment can lead to damage of the manual transmitter! 

  Touch an uncoated metal surface (e.g. radiator) to discharge static charges that could lead to damage to 

the internal components of the manual transmitter! 

  Prevent the ingress of dirt and humidity into the manual transmitter! 


  Insert a screwdriver 

(43)

 into the lateral opening 

(44)

 of the manual transmitter. 

  Open the housing of the manual transmitter by slightly turning the screwdriver, then remove the housing bottom 

section 

(45)

  Pull the battery 

(46)

 out of the holder 

(47)

  Push the new battery (type CR 2032) into the holder 

(47)

. Ensure that the embossed side 

(48)

 of the battery points 

upward. 


Pos: 43 /Alle Produkte/Überschriften/H1 Lagern / Überwintern @ 7\mod_1196625251745_121.doc @ 41495 @  


Storage/Over-wintering 

Pos: 44 /Lampen/Wasserspieltechnik/Water Jet Lightning/Lagern und Überwintern Water Jet Lightning @ 8\mod_1221564068782_121.doc @ 52503 @  


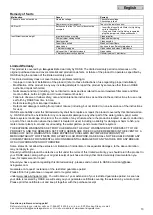
Remove the unit at temperatures below zero degrees centigrade. Thoroughly clean and check the unit for damage. 
Store the Water Jet Lightning frost-free, store the pump frost-free and immersed in a container filled with wa-
ter 

(Figure S)

. Do not immerse the plug. 

Pos: 45 /Alle Produkte/Überschriften/H1 Entsorgung @ 7\mod_1196625583904_121.doc @ 41547 @  


Disposal 

Pos: 46 /Alle Produkte/Entsorgung - gem. Bestimmungen @ 8\mod_1223247321369_121.doc @ 53910 @  


Dispose of the unit in accordance with the national legal regulations. 

Pos: 47 /Alle Produkte/Dummy_module/===== Seitenwechsel ===== @ 0\mod_1125648978015_0.doc @ 1631 @  


Summary of Contents for Water Jet Lightning

Page 1: ...rating Instructions Garantie mode d emploi et consignes de s curit Garantia Instructivo de Seguridad y de Operaciones Water Jet Lightning Pos 1 Alle Produkte Dummy_module Hochformat Querformat 0 mod_1...

Page 2: ...r Longitud del tubo flexible Longitud del cable Water Jet Lightning DC 12 V 150 x 115 x 200 mm 5 9 x 4 5 x 7 9 in 1 3 kg 2 9 lb max 0 9 m max 3 ft 8 m 26 3 ft 12V control box DC 12 V 41 W 215 x 180 x...

Page 3: ...3...

Page 4: ...4...

Page 5: ...5 Pos 9 Lampen Wasserspieltechnik Water Jet Lightning USA Grafik_Montage 4 Water Jet Lightning USA 10 mod_1235981227505_0 doc 60986...

Page 6: ...6 Pos 10 Lampen Wasserspieltechnik Water Jet Lightning USA Grafik_Montage 5 Water Jet Lightning USA 10 mod_1235981279789_0 doc 61013...

Page 7: ...7 Pos 11 Alle Produkte L nderkennzeichen 00 LEER 0 mod_1126786111024_0 doc 5631 Pos 12 Alle Produkte Dummy_module Seitenwechsel 0 mod_1125648978015_0 doc 1630...

Page 8: ...er Jet Lightning 8 mod_1220883184590_121 doc 52015 The unit is suitable for use in swimming ponds Fig E if the national regulations valid for installers are met Pos 21 Alle Produkte berschriften H1 Ni...

Page 9: ...ower supply of all units located in water and of this unit prior to performing work on the unit For your own safety consult a qualified electrician if you have questions or encounter prob lems Pos 21...

Page 10: ...equences Death or severe injury when touching unit sections connections or in the event of contact with the pond water Protective measures Install transformer and 12 V control box at a minimum safety...

Page 11: ...Alignment of the Water Jet Lightning and setting the intensity of the water jet L M Prior to starting work disconnect the power plugs of all units in the water J Adjusting the angle of inclination L...

Page 12: ...union nut 14 at the Y distributor 15 Unscrew the reduction piece 16 from the pump 4 and remove the Y distributor 15 Pull the motor housing 39 out of the engagement holder of the plug in filter 40 Remo...

Page 13: ...misuse including but not limited to non observance of the instructions for use OASE s sole liability under this limited warranty shall be to replace or repair the product covered by this limited warra...

Page 14: ...les de construction Pos 62 Alle Produkte berschriften H1 Nicht bestimmungsgem e Verwendung 7 mod_1204017506555_200 doc 44515 Utilisation non conforme la finalit Pos 63 Alle Produkte Nicht bestimmungsg...

Page 15: ...retirer la prise secteur de tous les appareils se trouvant dans l eau et de cet appareil avant de proc der des travaux sur cet appareil En cas de questions et de probl mes pri re de vous adresser un...

Page 16: ...e l appareil des raccordements ou de l eau du bassin Cons quences ventuelles mort ou blessures graves lors du contact avec les parties de l appareils les raccordements ou de l eau du bassin Mesures de...

Page 17: ...t Lightning et r gler l intensit du jet d eau L M Avant le d but des travaux avec les appareils retirer les prises de secteur de tous les appareils se trouvant dans l eau J R glage de l angle d inclin...

Page 18: ...ouplement 14 sur le distributeur en Y 15 D visser le r ducteur 16 de la pompe 4 et retirer le distributeur en Y 15 Retirer le carter du moteur 39 de la fixation encliquetage du filtre insertion 40 Eff...

Page 19: ...ropri des d fauts ou des d t riorations provoqu s par une utilisation abusive du produit y compris entre autres le non respect des instructions de service Dans le cadre de cette garantie limit e OASE...

Page 20: ...ra ser empleado en estanques para nadar y piscinas ilustraci n E si se cumplen las prescripciones de construcci n nacionales Pos 103 Alle Produkte berschriften H1 Nicht bestimmungsgem e Verwendung 7 m...

Page 21: ...e expresamente en las instrucciones de uso Saque siempre la clavija de la red de todos los equipos que se encuentran en el agua antes de ejecutar trabajos en el equipo En caso de preguntas y problemas...

Page 22: ...4 Montaje Atenci n Tensi n el ctrica peligrosa Una instalaci n el ctrica incorrecta puede conllevar a una tensi n el ctrica peligrosa en las piezas del equipo en los puntos de conexi n y en el agua de...

Page 23: ...el equipo J Saque la clavija de red 30 del transformador Pos 116 Lampen Wasserspieltechnik Water Jet Lightning Ausrichten Water Jet Lightning 8 mod_1221040206242_271 doc 52320 Alineaci n del Water Jet...

Page 24: ...racor 14 en el distribuidor en Y 15 Desatornille el reductor 16 de la bomba 4 y quite el distribuidor en Y 15 Saque la carcasa del motor 39 del soporte de retenci n del filtro de encaje 40 Gire liger...

Page 25: ...inadecuado defectos o da os causados por el abuso del producto incluyendo entre otras cosas el incumplimiento de las instruc ciones de servicio En el marco de esta garant a limitada OASE se responsab...

Page 26: ...ordance with the instructions may cause harmful interference to radio communications However there is no guarantee that interference will not occur in a particular installation If this equipment does...

Page 27: ...serspieltechnik Water Jet Lightning Grafik Explo1 Water Jet Lightning 8 mod_1221040434728_0 doc 52393 Pos 180 Lampen Wasserspieltechnik Water Jet Lightning Grafik Explo2 Water Jet Lightning 8 mod_1221...

Page 28: ...Pos 181 Alle Produkte Dummy_module Seitenwechsel 0 mod_1125648978015_0 doc 1630 OASE North America INC www oase livingwater com 12751 10 18...

Reviews: