background image

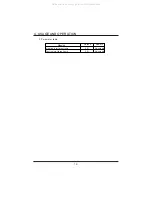
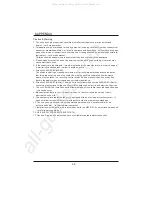
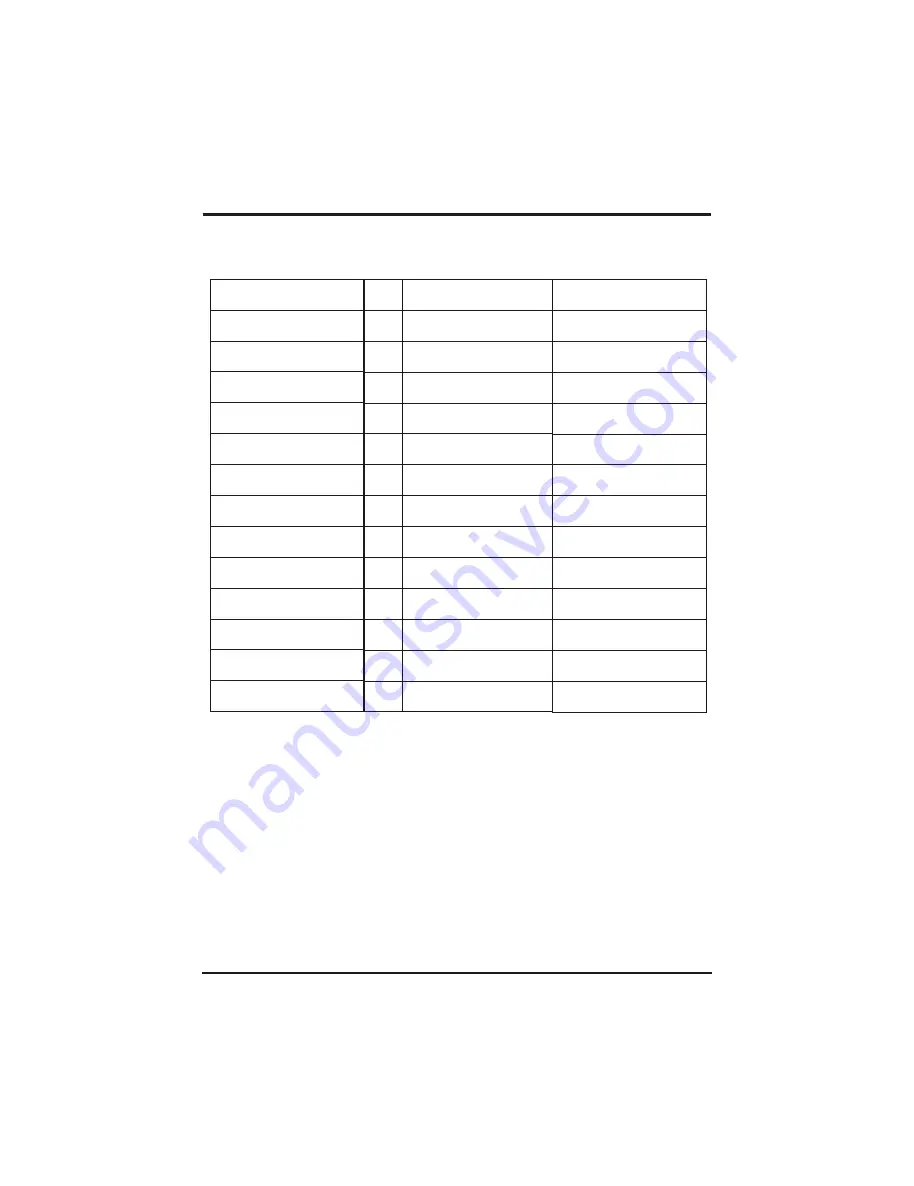
5.2  Trouble Shooting Guide 

5. MAINTENANCE AND INSPECTION

26

Temp. is too much different  
between water-inlet and outlet

Antifreezing  under  cooling mode

The primary anti-freezing 
protection start.

The second anti-freezing 
protection start

Malfunction

Ambient temp. Sensor failure

Communication failure

Water inlet temp. Sensor failure

Water outlet  temp. Sensor failure

Pipe temp. Sensor failure

Evaporator temp.Sensor failure

High pressure protect

Low pressure protect

Flow switch failure

E06

E07 

E19

E29

Display

P04

E08

P01

P02

P05

P07

E01

E02

E03

Water flow volume not enough,Water 
system pressure difference is small

Water flow volume not enough

Ambient temperature is too low 

Ambient temperature is too low 

Canse

The ambient temp.


sensor 

is open or short circuit

Communication failure  between 
remote wire controller and main board 

The water inlet temp. Sensor 
is open or short circuit

The water outlet  temp.


sensor 

is open or short circuit

The pipe temp.


sensor is 

open or short circuit

The evaporator temp.


Sensor

 is open or short circuit

The exhaust pressure is high ,
 high pressure switch action

The suction pressure is low, 
Low pressure switch action

No water or litter water 
in water system

Check the flow volume,water 
system is jammed or not

Solution

Check or change the 
ambient temp.

 S

ensor

Check the wire connection  between 
remote wire controller and main board 

Check or change the water 
inlet  temp. Sensor

Check or change the water 
outlet  temp.

 S

ensor

Check or change the pipe temp.

 S

ensor

Check or change the 
evaporator temp.


Sensor

Check high pressure switch 
and cooling return circuit

Check low pressure switch and 
cooling return circuit

Check the flow volume ,water 
pump is failure or not

Check the flow volume,water 
system is jammed or not

All manuals and user guides at all-guides.com

Summary of Contents for EH9bp

Page 1: ...SWIMMING POOL HEAT PUMP UNIT Installation Instruction Manual All manuals and user guides at all guides com a l l g u i d e s c o m ...

Page 2: ...All manuals and user guides at all guides com ...

Page 3: ...to Your Pool 3 4 Swimming Pool Heat Pumps Plumbing 3 5 Swimming Pool Heat Pumps Electrical Wiring 3 6 Initial Start up of the Unit 4 Usage and Operation 4 1 Function of the controller 4 2 Usage of the controller 4 3 5 Maintenance and Inspection 5 1 Maintenance 5 2 Trouble Shooting Guide 6 Appendix Parameter table 4 4 Wiring cliagram CONTENTS 1 2 2 4 6 6 7 7 8 9 9 10 10 11 19 20 25 25 26 27 All man...

Page 4: ...ed time and frequency as stated in this manual Use genuine standard spare parts only Failure to comply with these recommendations will invalidate the warranty Swimming Pool Heat Pump Unit heats the swimming pool water and keeps the temperature constant For split type unit The indoor unit can be Discretely hidden or semi hidden to suit a luxury house Our heat pump has following characteristics 1 Du...

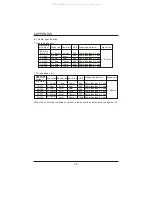
Page 5: ...ssor Quantity Compressor Fan Quantity Fan Power Input Fan Rotate Speed Fan Direction Noise Water Connection Water Flow Volume Water Pressure Drop max Unit Net Dimensions L W H Unit Shipping Dimensions L W H Net Weight Shipping Weight Model kW BTU h kW A W RPM dB A 3 m h kPa mm mm kg kg mm Oasis C17bp 18 2 62000 3 0 13 4 230V 50Hz 1 rotary 1 150 850 horizontal 56 40 6 0 10 1115 455 868 1220 510 880...

Page 6: ...26 1002 425 1248 1200 490 1380 117 135 88000 4 3 8 7 380V 3N 50Hz 1 scroll 2 120 2 850 horizontal 56 40 9 0 15 Unit Heating Capacity Heating Power Input Running Current Power Supply Compressor Quantity Compressor Fan Quantity Fan Power Input Fan Rotate Speed Fan Direction Noise Water Connection Water Flow Volume Water Pressure Drop max Unit Net Dimensions L W H Unit Shipping Dimensions L W H Net W...

Page 7: ...et Water Outlet C Oasis H17bp C17bp C21bp 2 2 The dimensions for Swimming Pool Heat Pump Unit 2 SPECIFICATION 4 Eh9h 9bp Oasis H13bp C13bp B D A E G F C H I 40 Water outlet 40 Water inlet All manuals and user guides at all guides com ...

Page 8: ...bp TYPE A B C D E F G H I SIZE Oasis C25sbp C25tbp 1002 1248 425 430 630 455 395 103 440 Oasis H17bp C17bp C21bp 1115 868 455 447 790 470 430 98 400 Eh9h 9bp Oasis H13bp C13bp 956 600 385 360 545 372 340 98 350 2 SPECIFICATION All manuals and user guides at all guides com ...

Page 9: ...low these steps when using for the first time 1 Open valve and charge water 2 Make sure that the pump and the water in pipe have been filled with water 3 Close the valve and start the unit ATTN It is necessary that the water in pipe is higher than the pool surface 3 INSTALLATION AND CONNECTION 6 Chlorinator cell Water outlet Pool Valve Water supply Water inlet Water pump Sand filter or other type ...

Page 10: ... heat delivery 3 2 Swimming Pool Heat Pumps Location Normally the pool heat pump is installed within 7 5 metres of the pool The longer the distance from the pool the greater the heat loss from the piping For the most part the piping is buried Therefore the heat loss is minimal for runs of up to15 meters 15 meters to and from the pump 30 meters total unless the ground is wet or the water table is h...

Page 11: ...n drain fitting on the side of the basepan This fitting is designed to accept 20mm clear vinyl tubing which can be pushed on by hand and run to a suitable drain It is easy to mistake the condensation for a water leak inside the unit NB Aquick way to verify that the water is condensation is to shut off the unit and keep the pool pump running If the water stops running out of the basepan it is conde...

Page 12: ...quipped with a 3 minute built in solid state restart delay included to protect control circuit components and to eliminate restart cycling and contactor chatter This time delay will automatically restart the unit approximately 3 minutes after each control circuit interruption Even a brief power interruption will activate the solid state 3 minute restart delay and prevent the unit from starting unt...

Page 13: ...n On off Mode Up Press this button can start up or shut down the unit cancel the current operation or back to the upper interface Press this button can switch modes or save parameter setting Press this button can move up or increase parameter value Press this button can move down or decrease the parameter value Down 5 Press this button can set the clock and timer All manuals and user guides at all...

Page 14: ...ater It is showed when the AUX display area gives the outlet water temperature measured value Minute It is showed when the main display area gives minute value Centigrade It is showed when the main AUX display area gives centigrade value Parameter setting It is showed when the parameter can be setted Lock It is showed when the keyboard is locked Flow It is showed when the main display area gives t...

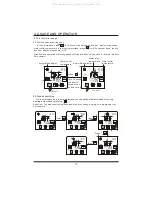
Page 15: ...s TEMP OUT MODE SET TEMP IN C TEMP OUT MODE SET TEMP OUT MODE SET TEMP OUT MODE SET TEMP OUT MODE SET A TEMP OUT MODE SET TEMP OUT MODE SET MODE SET MODE SET MODE SET MODE SET MODE SET In the off interface press for 0 5s can start up the unit and aux display area shows water outlet temperature In the running interface press for 0 5s can shut down the unit and aux display area shows OFF Attention t...

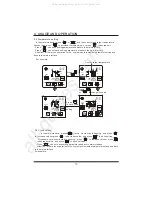
Page 16: ...ess to decrease value and press to save setting Press can not save setting parameter and back to main interface Attention If there is no operation for 5s system will remember parameter setting and back to the main interface For example In the main interface press or and the current mode target temperature flashes then press to increase the temp value or press to decrease it Press can save setting ...

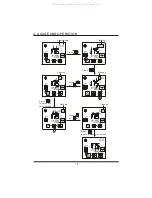
Page 17: ...IN C TEMP OUT MODE SET Flashing Press TEMP IN C TEMP OUT MODE SET Press or TEMP IN C TEMP OUT MODE SET Press to save hour value setting TEMP IN C TEMP OUT MODE SET Press or TEMP IN C TEMP OUT MODE SET Press to save minute value setting Flashing Flashing Flashing 14 All manuals and user guides at all guides com ...

Page 18: ...l Attention 1 If there is no operation for 5s system will remember clock setting and back to the main interface 2 By pressing till the off flashing you can set the timer off without timer on TEMP IN C TEMP OUT MODE SET TEMP IN C TEMP OUT MODE SET ON Press for 2 second TEMP IN C TEMP OUT MODE SET Press ON Flashing Flashing TEMP IN C TEMP OUT MODE SET ON Flashing press or TEMP IN C TEMP OUT MODE SET...

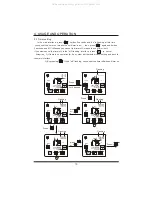
Page 19: ... MODE SET ON OFF TEMP IN C TEMP OUT MODE SET ON OFF Press Press or TEMP IN C TEMP OUT MODE SET ON OFF TEMP IN C TEMP OUT MODE SET Press ON OFF The timer on and off has been set Flashing Flashing Flashing Flashing Flashing Flashing Flashing Flashing 4 USAGE AND OPERATION All manuals and user guides at all guides com ...

Page 20: ...OUT MODE SET ON OFF The timer on off has been set Press for 2s TEMP IN C TEMP OUT MODE SET ON OFF ON is flashing TEMP IN C TEMP OUT MODE SET OFF The setting of timer on has been cancelled Press TEMP IN C TEMP OUT MODE SET OFF Press for 4s OFF is flashing TEMP IN C TEMP OUT MODE SET The setting of timer off has been cancelled Press 4 USAGE AND OPERATION All manuals and user guides at all guides com...

Page 21: ...larming state the key lock can be removed automaticly TEMP IN C TEMP OUT MODE SET Hold on Locked TEMP IN C TEMP OUT MODE SET MODE SET 2 5 Malfunction display There will be malfunction code showing on the controller screen when relative malfunction occurs You can refer to the malfunction table to find out the failure cause and solution For example Water inlet temp Sensor failure 4 USAGE AND OPERATI...

Page 22: ...19 28 28 Meaning Heating inlet target temp Adjustable Adjustable 3 Parameter table Cooling inlet target temp Remark Default 4 USAGE AND OPERATION All manuals and user guides at all guides com ...

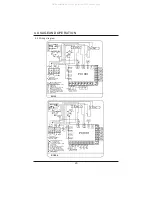
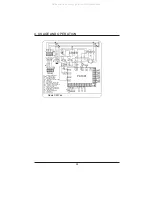
Page 23: ... Transformer FS Flow switch HP Highpressure protection EEV Electronic expand valve FM C2 BLK BLU RED L N RED BLU P N N N N N L N 1 2 N N N L 1 3 2 4 5 6 7 8 01 N EH9bp N 4V N P2 COM P10 NO Soft start COMP RED BLK WHT CR CC CS CR CC CS C1 CC N N CR L FS HP LP 4V K1 N L L 1 3 2 4 5 6 7 8 02 CC CC CC CC L K1 L CC TO POWER SUPPLY 220 240V 50Hz BLU BRN Y G TO PUMP t 5K t 5K t 5K t 5K IT IT OT OT AT AT ...

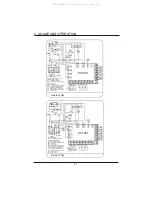
Page 24: ...hpressure protection EEV Electronic expand valve CT Coil temperature L N RED BLU P N N N N N N N L N 1 2 N N L N 1 3 2 4 5 6 7 8 01 N Oasis C13bp K1 N 4V N L P2 COM P10 NO Soft start COMP RED BLK WHT CR CC CS CR CC CS KM1 L CC N N CR N KM1 FS HP LP 4V FM C2 BLK BLU C1 t 5K t 5K t 5K t 5K OUT1 OUT2 PC1001 IT IT OT OT AT AT CT CT OUT3 OUT4 OUT5 AC N 3 4 3 4 CN19 GND AI05 GND AI04 GND AI03 GND AI02 G...

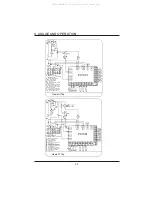
Page 25: ...c expand valve SUT Suction temperature C1 N N L L N N N TO PUMP TO POWER SUPPLY 220 240V 50Hz L N RED BLU P CC COMP CS 2 1 5 KS C2 CR BLK WHT RED CS KS KM1 N 1 3 2 4 5 6 7 8 01 N L N KS CS CS CC CC CR N CS N CC N L KM1 TC 12V K1 N EEV 5 FM C3 BLK BLU RED N N Oasis C17bp Controller FS HP LP t 5K t 5K t 5K t 5K OUT3 OUT4 OUT5 AC N 3 4 3 4 CN19 GND AI05 GND AI04 GND AI03 GND AI02 GND CN1 CN2 12V NET ...

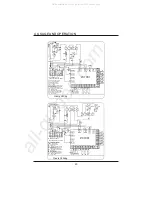
Page 26: ...way valve C1 CC BLK CC CR CS CS N N N N L N TO PUMP TO POWER SUPPLY 220 240V 50Hz L N RED BLU P CC COMP CS 2 1 5 KS C2 CR BLK WHT RED CS KS KM1 L N N 1 3 2 4 5 6 7 8 01 N N L L N L N KS CH L1 CS CS CC CC CR L KM1 N N CS N CC N L KM1 TC 12V K1 N EEV 5 FM1 C3 BLK BLU RED N N Oasis C25sbp Controller FS HP LP t 5K t 5K t 5K t 5K OUT3 OUT4 OUT5 AC N 3 4 3 4 CN19 GND AI05 GND AI04 GND AI03 GND AI02 GND ...

Page 27: ... 3 4 CN19 GND AI05 GND AI04 GND AI03 GND AI02 GND CN1 CN2 12V NET GND DI01 GND DI02 GND DI03 GND DI04 GND DI05 GND AI01 GND DI06 GND CN6 AI06 CN16 GND 5V IT IT OT OT AT AT CT CT K1 K2 4V 2 2 FS FS LP LP HP HP OUT1 OUT2 PC1001 N N N N BLU Y G BRN EEV 5 t 5K SUT SUT TC 12V AT Ambient temperature COMP Compressor CT Coil temperature FM Fan motor IT Inlet water temperature LP Low pressure protection OT...

Page 28: ...sure of the refrigerant system should only be serviced by a certified technician Discharge all water in the water pump and water system so that freezing of the water in the pump or water system does not occur You should discharge the water at the bottom of water pump if the unit will not be used for an extended period of time You should check the unit thoroughly and fill the system with water full...

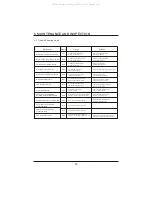
Page 29: ...n remote wire controller andmain board The water inlet temp Sensor is open or shortcircuit The water outlet temp sensor is open or shortcircuit The pipe temp sensor is open or short circuit The evaporator temp Sensor is open or shortcircuit The exhaust pressure ishigh high pressure switch action The suction pressure islow Low pressure switch action No water or litterwater in water system Check the...

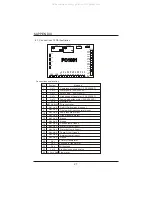
Page 30: ...mp 220 230VAC OUT4 High speed of fan motor 220 230VAC OUT3 OUT1 No Symbol Meaning 4way valve 220 230VAC Compressor of system1 220 230VAC NET GND 12V Wire controller DI01 GND On Off Switch input no use No use Flow switch input normal close 7 8 9 10 11 12 14 15 High pressure protect Low pressure protect 5 Neutral wire AC N OUT5 Low speed of fan motor 220 230VAC 6 16 AI01 GND AI02 GND AI03 GND AI04 G...

Page 31: ...be taken to a recycling centre for electric and electronic devices or handed back to the dealer when purchasing an equivalent appliance 6 Directive 2002 95 EC RoHs This product is compliant with directive 2002 95 EC RoHs concerning restrictions for the use of harmful substances in electric and electronic devices 7 The unit CANNOT be installed near the flammable gas Once there is any leakage of the...

Page 32: ...A 25 30A 30 40A 40 55A 55 70A Phase line 2 3 1 5mm 2 3 4mm 2 3 6mm 2 3 10mm 2 3 16mm 2 3 25mm 2 1 5mm 2 4mm 2 6mm 2 10mm MCB 20A 40A 40A 63A 80A 100A Creepage protector Signal line 2 n 0 5mm Nameplate maximum current Earth line No more than 13A 30mA less than 0 1 sec 30mA less than 0 1 sec 30mA less than 0 1 sec 30mA less than 0 1 sec 30mA less than 0 1 sec 30mA less than 0 1 sec 2 1 5mm 2 4mm 2 4...

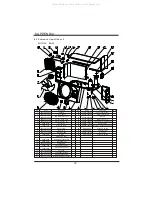
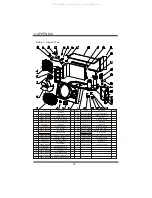
Page 33: ...ical box Relay Compressor capacitor Fan capacitor Transformer Two seat connector Five seat connector Top cover Top supportplate 2 Fin heat exchanger Middle separation panel Code 32012 210224 20000 360005 20000 220249 32012 210269 32008 120034 20000 110117 20000 140238 2000 3603 2004 1444 20000 140150 2001 3605 NO 1 2 3 4 5 6 7 8 9 10 11 12 13 14 15 16 17 18 19 20 21 NO 22 23 24 25 26 27 28 29 30 3...

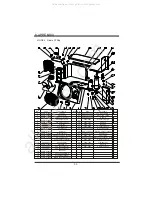
Page 34: ...citor Fan capacitor Transformer Two seat connector Five seat connector Top cover Top supportplate 2 Fin heat exchanger Middle separation panel Code 32012 210224 20000 360005 20000 220249 32012 210269 32008 120034 20000 110117 2001 1418 20000 140238 2000 3603 2004 1444 20000 140150 2001 3605 NO 1 2 3 4 5 6 7 8 9 10 11 12 13 14 15 16 17 18 19 20 21 NO 22 23 24 25 26 27 28 29 30 31 32 33 Note Note Pa...

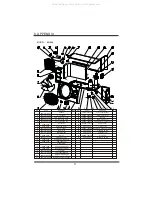
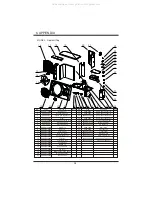
Page 35: ...capacitor Transformer Two seat connector Five seat connector Top cover Top supportplate 2 Fin heat exchanger Middle separation panel Code 32012 210224 20000 360005 20000 220249 2000 2802 2000 1415 2000 1415 2000 2802 32012 210269 32012 120041 20000 110134 20000 140234 2000 3603 2004 1444 20000 140150 2001 3605 NO 1 2 3 4 5 6 7 8 9 10 11 12 13 14 15 16 17 18 19 20 21 NO 22 23 24 25 26 27 28 29 30 3...

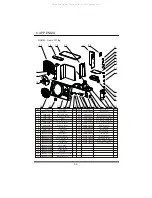
Page 36: ... seat connector Five seat connector Top cover Top supportplate 2 Fin heat exchanger Middle separation panel Code 32012 210224 20000 360005 20000 220249 2000 2802 2000 1415 2000 1415 2000 2802 32012 210269 32012 120041 20000 110134 2004 1437 20000 140234 2000 3603 2004 1444 20000 140150 2001 3605 NO 1 2 3 4 5 6 7 8 9 10 11 12 13 14 15 16 17 18 19 20 21 NO 22 23 24 25 26 27 28 29 30 31 32 33 34 35 3...

Page 37: ...an protection net Axial fan Axial fan motor Fan bracket Rear Grill Support panel Top cover Middle separation panel Right side panel Junction box C Note Code 2000 3920 2000 3933 20000 350004 2000 3524 32009 210118 95005 310145 20000 360007 2000 3676 2000 3509 20000 370003 32009 210117 20000 360005 32009 120025 32009 120021 Part name Three seat connector Three seat connector Compressor capacitor Com...

Page 38: ... protection net Axial fan Axial fan motor Fan bracket Rear Grill Support panel Top cover Middle separation panel Right side panel C Note Code 20000 220249 2000 3920 2000 3933 20000 350004 2000 3524 32009 210118 95005 310145 20000 360007 2000 3676 2000 3509 20000 370003 32009 210117 20000 360005 32009 120025 32009 120021 Part name Junction box Three seat connector Three seat connector Compressor ca...

Page 39: ... protection net Axial fan Axial fan motor Fan bracket Rear Grill Support panel Top cover Middle separation panel Right side panel C Note Code 20000 220249 2000 3920 2000 3933 20000 350004 2000 3510 32009 210118 95005 310145 20000 360007 2000 3676 2000 3509 20000 370003 32009 210021 20000 360005 32010 120012 32010 120016 Part name Junction box Three seat connector Three seat connector Compressor ca...

Page 40: ...t exchanger Code 20000 110119 32019 210045 2000 1440 95005 310152 20000 220188 20000 220068 32019 210044 3500 2701 32018 120007 32018 210086 32018 210075 3404 3301 32018 210057 32018 210046 32019 210048 32018 210051 32018 210053 2000 3524 2000 3527 95005 310145 20000 360007 Part name Compressor Chassis Flash chamber CM103 Fan protection net LED water proof box FN Front panel Axial fan Fin heat exc...

Page 41: ... 32019 210045 2000 1440 95005 310152 20000 220188 20000 220068 32019 210044 3500 2701 32018 120007 32018 210086 32018 210075 3404 3301 32018 210057 32018 210046 32019 210048 32018 210051 32018 210053 95005 310145 2000 3653 2000 3619 2000 3909 Part name Compressor Chassis Flash chamber CM103 Fan protection net LED water proof box FN Front panel Axial fan Fin heat exchanger Rear Grill Support panel ...

Page 42: ...Note All manuals and user guides at all guides com ...

Page 43: ...All manuals and user guides at all guides com ...

Page 44: ...Code 20140723 0002 All manuals and user guides at all guides com ...

Reviews: