2
Before using the scan functions
2-14
CS230 (Phase3)
2.5
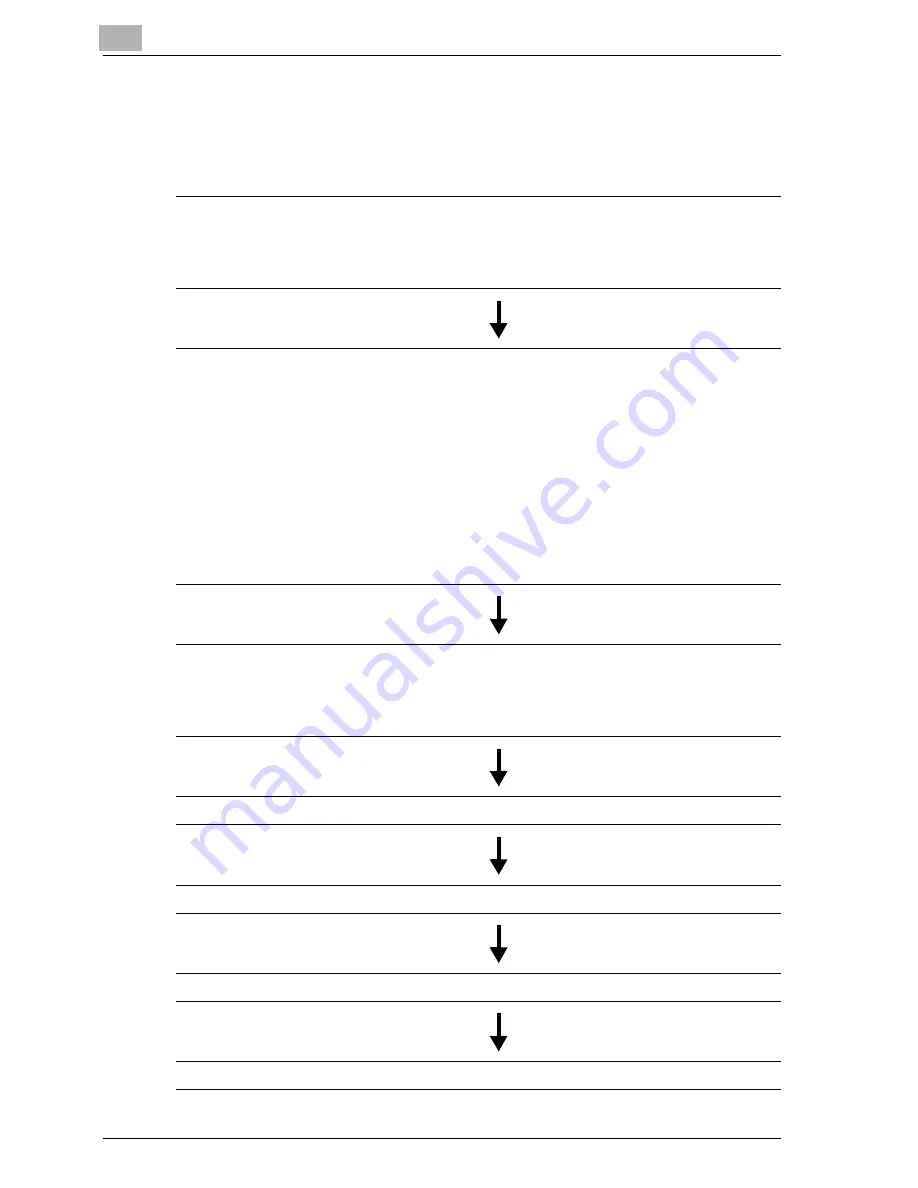
Flow chart of setup and scanning operations
The sequence from the setup operations required to use the scanning
functions to the scanning operation is shown below.
Specify scan settings in the screen that appears after pressing the [Utility/Counter] key, then
touching [User Setting].
* Specify basic settings such as the format in which scanned data is saved. (Refer to "Setting
the main scan mode screen" on page 4-34 and "Setting the save format of the data to be
scanned" on page 4-40.)
Specify network settings in the screen that appears after pressing the [Utility/Counter] key, then
touching [Administrator Setting].
* Specify settings in order to use the machine on the network. (Refer to "TCP/IP settings" on
page 4-59, "NetWare settings" on page 4-69, "http server settings" on page 4-75, "FTP set-
tings" on page 4-83, "SMB settings" on page 4-86, "AppleTalk settings" on page 4-91, "Ena-
bling LDAP settings" on page 4-93, "Setting Up LDAP settings" on page 4-95, "Search default
setting" on page 4-105, "E-mail TX (SMTP) settings" on page 4-106, "E-mail RX (POP) settings"
on page 4-116, "Device settings" on page 4-121, "Time adjustment settings" on page 4-123,
"Status notification settings" on page 4-127, "Total counter report setting" on page 4-130,
"PING confirmation" on page 4-136, "SLP settings" on page 4-140, "LPD settings" on
page 4-141, "Prefix/Suffix settings" on page 4-142, "Job for the disable proof" on page 4-146,
"SNMP settings" on page 4-148, "Bonjour setting" on page 4-154, "TCP socket setting" on
page 4-156, "OpenAPI settings" on page 4-158, and "External server authentication" on
page 4-163.)
Register destinations in the screen that appears after pressing the [Utility/Counter] key.
* Specify e-mail addresses for e-mail transmissions, register FTP servers, and
specify destination computers. (Refer to "Registering abbreviated destinations" on page 4-12,
"Registering group destinations" on page 4-25, "Registering program destinations" on
page 4-27, and "Specifying e-mail settings" on page 4-30.)
Load the document.
Specify the destination.
Specify the scan settings (refer to page 3-48).
Press the [Start] key in the control panel.
Summary of Contents for CS230
Page 1: ...Oc CS230 Phase 3 User s Guide Network Scanner...
Page 13: ...1 Introduction...
Page 14: ......
Page 26: ...1 Introduction 1 14 CS230 Phase3...
Page 27: ...2 Before using the scan functions...
Page 28: ......
Page 42: ...2 Before using the scan functions 2 16 CS230 Phase3...
Page 43: ...3 Scanning documents...
Page 44: ......
Page 125: ...Scanning documents 3 CS230 Phase3 3 83 4 Touch Yes to delete the job 5 Touch Close...
Page 131: ...4 Specifying settings from the control panel...
Page 132: ......
Page 303: ...5 Specifying settings Using Web Connection...
Page 304: ......
Page 392: ...5 Specifying settings Using Web Connection 5 90 CS230 Phase3 TCP IP Specify TCP IP settings...
Page 402: ...5 Specifying settings Using Web Connection 5 100 CS230 Phase3 5 24 SNMP Specify SNMP settings...
Page 412: ...5 Specifying settings Using Web Connection 5 110 CS230 Phase3 4 Specify the desired settings...
Page 441: ...6 Scan function troubleshooting...
Page 442: ......
Page 444: ...6 Scan function troubleshooting 6 4 CS230 Phase3...
Page 445: ...7 Appendix...
Page 446: ......


