background image

Introduction

1

IP Scanner

1-5

1.8

Specifying the IP Address

Be sure to specify the IP address of the copier before using the IP 
Scanner.

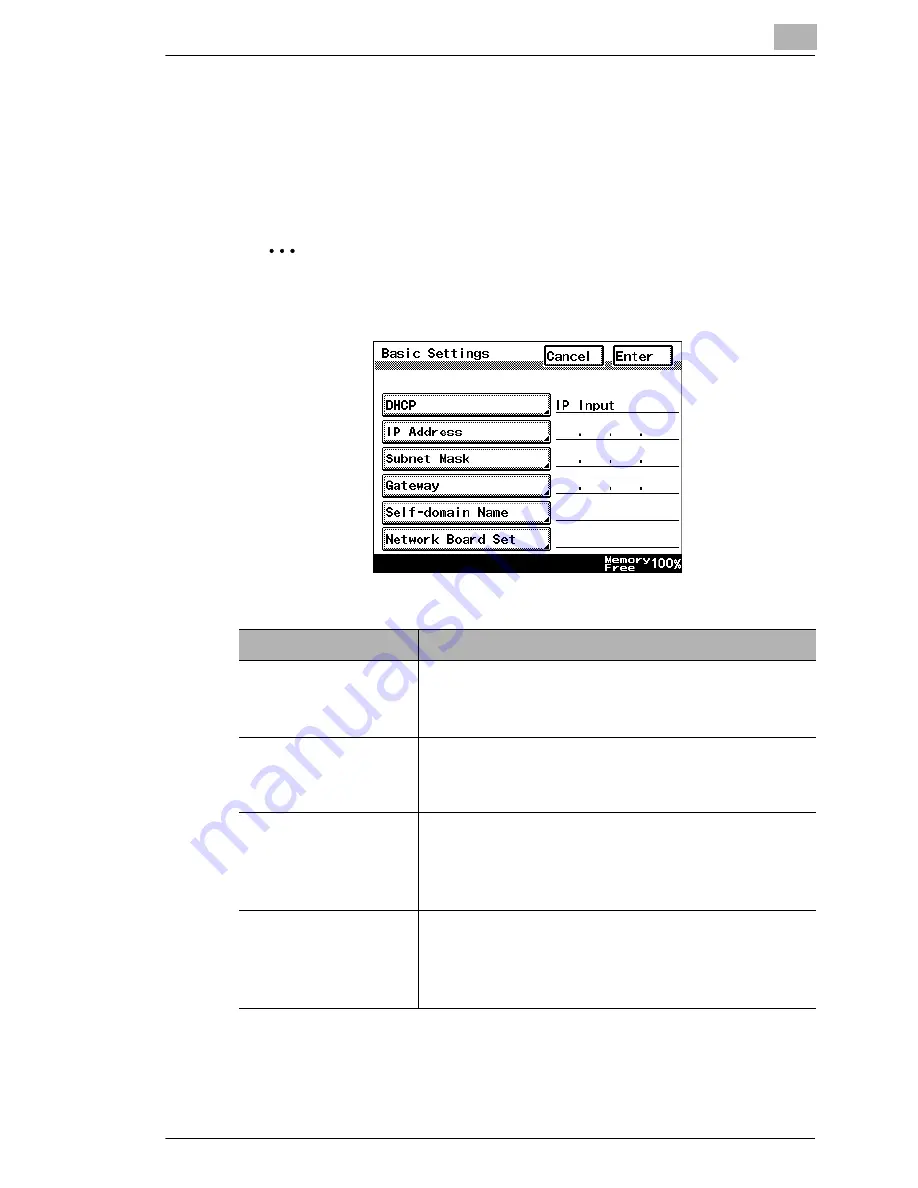
Specify the IP address from the Basic Settings screen.

Note

After changing the settings, turn the unit off, then on again.

Parameter

Description

DHCP

Specify whether to automatically retrieve the IP 
address from the DHCP server or to specify a 
fixed IP address.

IP Address

Type in the IP address of this unit.
*Type in the IP address only if the “DHCP” 
parameter is set to “IP Input”.

Subnet Mask

Type in the subnet mask of the connected 
network.
*Type in the subnet mask only if the “DHCP” 
parameter is set to “IP Input”.

Gateway

Type in the default gateway address of the 
connected network.
*Type in the default gateway address only if the 
“DHCP” parameter is set to “IP Input”.

im2020, im2520, im2520f, im3520

Summary of Contents for im2020

Page 1: ...IP Scanner 4514 7704 01 im2020 im2520 im2520f im3520...

Page 2: ...nnection 2 1 Connecting the LAN cable 2 1 LED indicators 2 2 2 2 Installing IP Scanner 2 3 Utilities disk 2 3 Installing IP Scanner Windows Me 98 95 XP 2000 and NT4 0 2 3 Uninstalling Windows Me 98 95...

Page 3: ...IP Scanner 3 3 Basic Transmission 3 21 Programming the scanner button from the computer 3 21 Scanning documents from the copier 3 24 Viewing the scanned image from the computer 3 25 im2020 im2520 im2...

Page 4: ...e the User Manual and utilities disk in a safe place Trademark Acknowledgements Windows Windows NT Microsoft and its logo are registered trademarks of Microsoft Corporation in the United States and ot...

Page 5: ...cation functions differs depending on the customer the configuration of specific products and the suitability of the application software should be determined specifically for the customer 6 We assume...

Page 6: ...eparing the LAN Cable and IP Address In order to use the IP Scanner a LAN cable and a registered IP address are required The LAN cable is not included it must be prepared by the user Note The LAN cabl...

Page 7: ...more 128 MB recommended for Windows XP or Windows 2000 Utility Operating System IP Scanner Windows Me Windows 98 Windows 95 Windows 2000 Windows NT4 0 Windows XP IP Scanner Processor Pentium 133 MHz o...

Page 8: ...ally retrieve the IP address from the DHCP server or to specify a fixed IP address IP Address Type in the IP address of this unit Type in the IP address only if the DHCP parameter is set to IP Input S...

Page 9: ...gement 3 Use the keypad to type in the administrator access code and then touch Enter 4 Touch Admin 2 5 Touch Network Set 6 Touch Basic Setting 7 Specify the settings described above 8 Touch Enter Not...

Page 10: ...one plug on the LAN cable into the connector marked LAN at the back of the machine and then insert the other plug into the hub Tip The connector is at the back of the machine The LAN cable should be a...

Page 11: ...or Condition Meaning Green Lit The LAN is connected correctly Off The copier has not been turned on The LAN is not connected correctly Flashing Data is being sent or received Red Lit Operating at 100...

Page 12: ...ll each utility the amount of hard disk space shown below must be available G IP Scanner About 5 MB G Network FAX About 22 MB Installing IP Scanner Windows Me 98 95 XP 2000 and NT4 0 1 Start up Window...

Page 13: ...ck the Next button To change the folder where IP Scanner will be installed click the Browse button and then select the desired folder While specifying settings in the installer dialog boxes if you cho...

Page 14: ...ed and then click the Next button The installation begins 6 Click the Finish button A message may appear informing you that the computer should be restarted Restart the computer to complete the instal...

Page 15: ...2 Making Connections 2 6 IP Scanner 8 Restart the computer Click the Yes button to restart the computer im2020 im2520 im2520f im3520...

Page 16: ...lling IP Scanner 1 In Windows click the Start button point to Settings and then click Control Panel to display the Control Panel window 2 Double click the Add or Remove Programs icon 3 Select IP Scann...

Page 17: ...ows click the Start button point to Settings and then click Control Panel to display the Control Panel window 2 Double click the Add Remove Programs icon the Add or Remove Programs icon in Windows XP...

Page 18: ...that folder This setting is available only if the document is scanned with a scanner function For details on saving the data when the received fax document is transferred to IP Scanner refer to Sort...

Page 19: ...e dial up router may be unnecessarily dialed up regardless of whether the correct IP address was specified Using a modem or terminal adapter G If a computer with a built in modem or a computer connect...

Page 20: ...ettings dialog box Refer to Scanner Settings dialog box on page 3 8 3 Check RX now button Checks if scan data has arrived 4 Large Icons button Small Icons button List button Details button Allows the...

Page 21: ...ton on the copier is erased 8 Save folder as a key check box If this check box is selected a folder with the same name as the button is automatically created when the scanner button is programmed 9 De...

Page 22: ...the name of the selected file or folder to be changed Exit Quits IP Scanner 2 Edit Allows the selected image file to be viewed Cut Selects moves copies etc the file or folder Copy Paste Select All 3 V...

Page 23: ...tration Programs a scanner button on the copier Scanner Key Delete Erases the scanner button registered in the main unit Reg same as previous Programs the button with the same settings as when it was...

Page 24: ...g box Refer to Notify Settings dialog box on page 3 17 Selected folder as saving location Specifies the displayed folder as the save destination Configure Arrival Notification Specifies the displayed...

Page 25: ...ox in the main window was selected a folder with the same name as the button is created on the computer 2 Scan Area box From the drop down menu select the size of the scanning area Auto Detect A4P A4L...

Page 26: ...nt of encoded data exists in image data however generally MMR has more than MH 6 Specify File Name parameter If Yes is selected a specified file name will be given to the image data when it is saved I...

Page 27: ...fault settings 11 Save and Close button Saves the current settings and closes the Scanner Settings dialog box 12 Scanner Key Registration button Programs a button on the copier for specifying the loca...

Page 28: ...Description 1 Folder by key name check box If this check box is selected a folder with the same name as the button is automatically created when the scanner button is programmed This check box is conn...

Page 29: ...n the scanner button is programmed This check box functions independently of the Save folder as a key check box in the main window Refer to Forwarding a Received FAX to IP Scanner of the Scanner Mode...

Page 30: ...top of the list will be given priority when the data is classified 7 Create a new folder check box If this check box is selected and there is no folder created with transmission source information fo...

Page 31: ...ber Item Name Description 1 Divide doc to save check box If this check box is selected the scanned document is separated and saved as individual files This enables you to scan in a single operation a...

Page 32: ...if the Divide doc to save check box is selected Note Load the documents so that the left sides of the pages leading edges are aligned 1 Document 1 2 Document 2 3 Interleaf document with a different le...

Page 33: ...is setting is available only if the Divide doc to save check box is selected Note Load the documents so that the top edges of the pages edges toward the rear of the machine are aligned 1 Document 1 2...

Page 34: ...r and Browse box Select the folder where image data will be saved 2 Notify List Displays information on the notification destination specified for the folder selected in the list A faint icon beside a...

Page 35: ...Normally 25 4 Edit button The selected notification destination can be corrected or changed Folders faint icons where a notification destination is set for the containing folder cannot be edited 5 Del...

Page 36: ...x appears on the computer specified as the notification destination Image Receiver must be started up on the computer specified as the notification destination In addition a test notification cannot b...

Page 37: ...t be displayed Images created with a device other than this copier for example with a computer may not be displayed Num ber Description 1 Click an image to view the file 2 Appears when the file contai...

Page 38: ...button from the computer 1 On the computer start up IP Scanner Start Programs IP Scanner IP Scanner 2 Type in the IP address of the main device and then click the OK button If the IP address of the m...

Page 39: ...has started up Normally Image Receiver starts up automatically when Windows starts up If Image Receiver has not started up start it up as described below Start Programs IP Scanner Image Receiver 4 In...

Page 40: ...ox on the Scanner Settings dialog box type in the name 6 Specify the settings for Scan Area Quality and Contrast and then click the Scanner Key Registration button 7 Click the OK button The scanner bu...

Page 41: ...um of six scanner buttons on a copier can be programmed If the maximum number of scanner buttons is reached they can be deleted from the touch panel Select the scanner button that you wish to delete a...

Page 42: ...Images folder If the Save folder as a key check box in the main window was selected a new folder with the same name as the button is created and the image file is saved in that folder Click the Thumbn...

Page 43: ...3 Using IP Scanner 3 26 IP Scanner im2020 im2520 im2520f im3520...

Page 44: ...The information contained in this manual is subject to change without notice to incorporate improvements made on the product or products the manual covers 2003 7 im2020 im2520 im2520f im3520...

Reviews: