104
Chapter 4 Use the PLC applications to control your workflow
Create destinations
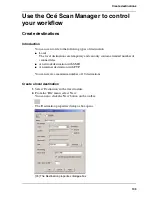
3.
Enter a name for the destination in the 'Name' text box.
This name will appear on the scanner panel.
4.
From the 'Type' drop-down list box, select 'On the controller'.
5.
Enter a path of the target folder in the 'Path' text box.
You can also click the 'Browse' button to select the path.
6.
Click 'OK' to accept the destination properties.
Create a network destination with SMB
1.
Create a shared folder on a workstation. For example c:\Scan.
2.
From the 'File' menu on the Océ Scan Manager, select 'New'.
You can also click the 'New' button on the toolbar.
The 'Destination properties' dialogue box opens.
3.
From the 'Type' drop-down list box, select 'SMB'.
4.
Enter the system name of the workstation where you created the shared folder in the
'System' text box.
Note:
Find the system name of the workstation on the control panel of the
workstation (Control panel - Network - Identification - System name)
5.
Enter a path of the target folder in the 'Path' text box.
The path name is the name of the shared folder on your workstation. For Windows
NT
®
, Windows
®
2000 and XP, use the DOS name of the shared folder. For Windows
95/98
®
use the folder name. This is case sensitive.
You can also select a shared folder from the drop-down list.
6.
If you defined a user name and a password for the shared folder on the workstation,
then enter the user name and the password in the required fields.
Note:
Make sure the user has write-access privileges on the destination.
7.
Define the required file naming properties.
8.
Click 'OK'.
Océ Scan Manager connects to the new SMB destination. Océ Scan Manager then
shows the contents of the new SMB destination.
Summary of Contents for TCS500
Page 1: ...Océ TCS500 Océ User manual User manual ...
Page 4: ...4 Trademarks ...
Page 11: ...11 Chapter 1 Introduction ...
Page 21: ...21 Chapter 2 Get to know the Océ TCS500 colour printing system hardware ...
Page 47: ...47 Chapter 3 Prepare the Océ TCS500 for use ...
Page 70: ...70 Chapter 3 Prepare the Océ TCS500 for use Configure the network settings of the Océ TCS500 ...
Page 71: ...71 Chapter 4 Use the PLC applications to control your workflow ...
Page 77: ...77 The user interface of the Océ Settings Editor 51 51 The settings area ...
Page 124: ...124 Chapter 4 Use the PLC applications to control your workflow Change the password ...
Page 125: ...125 Chapter 5 Use the Océ TCS500 for scan to file jobs ...
Page 144: ...144 Chapter 5 Use the Océ TCS500 for scan to file jobs Remove strip ...
Page 145: ...145 Chapter 6 Use the Océ TCS500 for print jobs ...
Page 159: ...159 Chapter 7 Use the Océ TCS500 for copy jobs ...
Page 187: ...187 Chapter 8 Ensure the best output quality ...
Page 217: ...217 Chapter 9 Optional Document Management applications for your Océ TCS500 ...
Page 223: ...223 Chapter 10 License management with Océ License Logic ...
Page 235: ...235 Chapter 11 Maintain the Océ TCS500 ...
Page 258: ...258 Chapter 11 Maintain the Océ TCS500 Replace the maintenance cassette ...
Page 259: ...259 Chapter 12 System messages and solutions ...
Page 271: ...271 Appendix A Specifications of the Océ TCS500 ...
Page 291: ...291 Appendix B Reader s comment sheet ...
Page 294: ...294 Appendix B Reader s comment sheet Reader s comment sheet ...
Page 295: ...295 Appendix C Addresses of local Océ organisations ...
Page 306: ...306 Index ...


