background image

#5: 

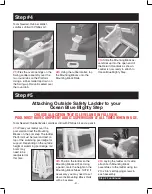
Check to make sure the hole 

locations in the Platform are clear 
of pool wall and supports. Drill two 
5/16 holes through the Platform 
and pool ledge. Fasten the ladder 
platform to the pool ledge using 

two 

¼-20 x 2-1/4” bolts, ¼-20 hex nuts.


OUTSIDE TREADS MUST 

BE IN THE UP POSITION 

AND LOCKED AT ALL 

TIMES WHEN POOL IS 

NOT IN USE.

- 5 -

Step #5 

continued

#4: 

Position the ladder over the pool step with the Mounting Blocks sitting flat on the top tread. Center the 

ladder side-to-side and align the back of the Mounting Blocks next to the groove in the back of the Platform as 
shown. Attach using four #10 x 3/4” self-tapping screws in each Mounting Block.

#6: 

When the pool is not in use, 

rotate the Swing-up Ladder to the 

up position and secure it in place 

with the padlock as shown. 

Summary of Contents for 400950

Page 1: ...ean Blue Outside Safety Ladder Assembly and Installation Manual Part no 400950 Use with 30 38 Ocean Blue Mighty Step to make a complete pool entrance system Outside Safety Ladder alone cannot be used...

Page 2: ...Boot 1 Left Adjustable Rail Boot 2 Swing up Rails 3 Swing up Treads 1 Bottom Swing up Tread 1 Fixed Ladder Tread 1 Hardware Safety Pack Hardware Bag 10 1 4 20 hex nuts 20 1 4 10 x3 4 Phillips self tap...

Page 3: ...long bolts and two 1 4 20 hex nuts fasten the Adjustable Rail Boot to the Side Rail Repeat for remaining Side Rail Step 3 continued Step 2 Tools Needed Rubber Mallet cordless drill with Phillips bit 2...

Page 4: ...LATFORM ALL THE WAY DOWN ONTO LUGS 4 Laying the assembly on its side insert the Return Hand rails through the bottom of the remaining holes in the Platform until seated on the lugs 5 Using two 10 x 3...

Page 5: ...ide Safety Ladder to your Ocean Blue Mighty Step CHOOSE A LOCATION THAT IS LEVEL AND IN FULL VIEW POOL MUST HAVE COMPETENT ADULT SUPERVISION AT ALL TIMES WHEN IN USE Step 5 1 Place your ladder over th...

Page 6: ...OCKED AT ALL TIMES WHEN POOL IS NOT IN USE 5 Step 5 continued 4 Position the ladder over the pool step with the Mounting Blocks sitting flat on the top tread Center the ladder side to side and align t...

Page 7: ...o over the instructions and procedures again to make sure nothing has been overlooked n Be sure and safe The manufacturer IS NOT responsible for improper assembly installation and use To keep your new...

Page 8: ...or when there is no qualified adult supervision n Consult your local Building Department before installation of your pool and equipment n DANGER Use a cordless drill for assembly and installation NEVE...

Reviews: