background image

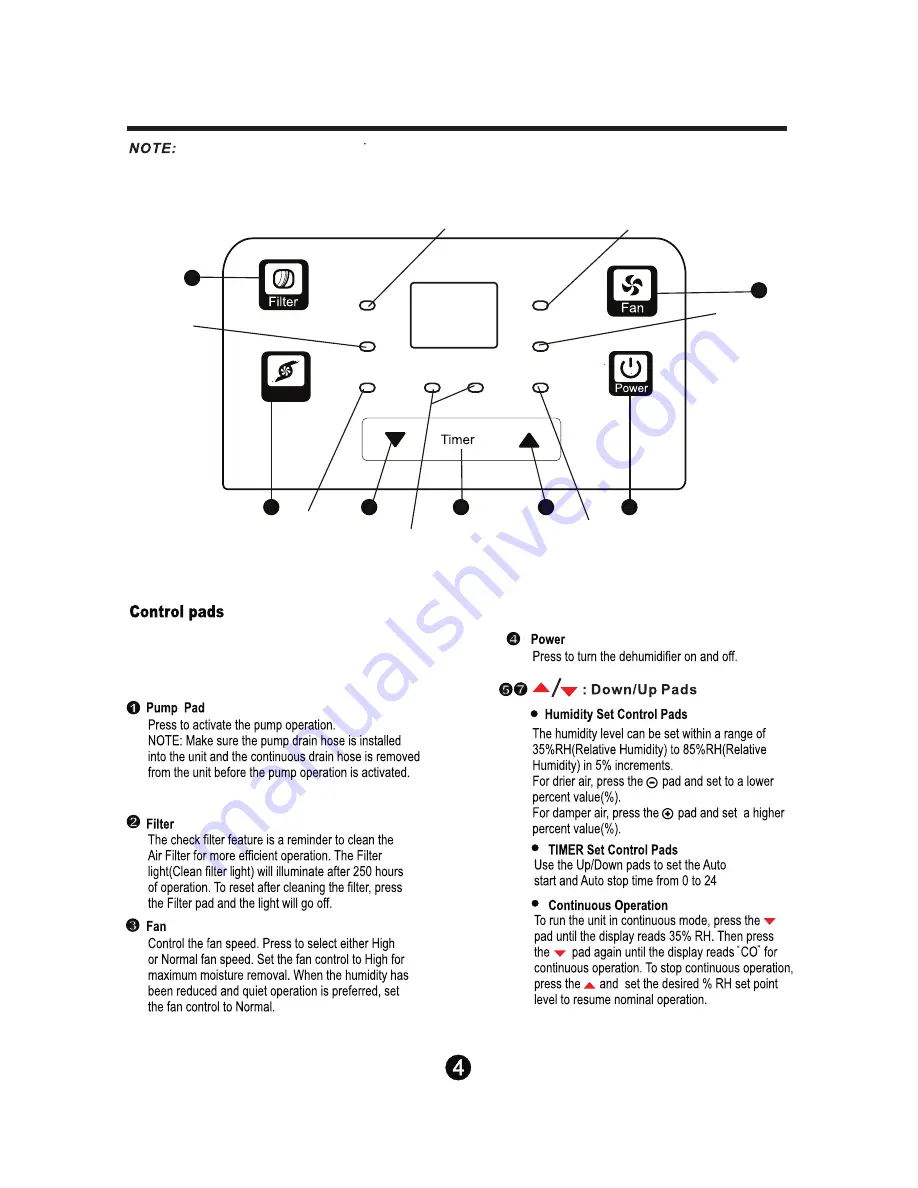
Fig.1

3

High fan 

indicator light

Filter

Full

Cont.

On Off

Turbo

Auto defrost

1

2

4

5

6

7

Clean filter

indicator light 

Pump

operation

indicator light

Timer on/off

indicator light

Bucket full 

indicator light

Auto defrost operation on

indicator light

Continuous operation

indicator light

Pump

Pump

The control panel of the unit you purchased may be slightly different depending on the model.

When you push the button to change 

operation modes, the unit will make a 

beep to confirm mode change.

Refer to page 8 for insctrutions on removal of the 

collected water.

button

button

button

hours.

DEHUMIDIFIER CONTROLS

Summary of Contents for OBZ-50DEP

Page 1: ...MODEL OBZ 50DEP Before operating this product please read the instructions carefully and save this manual for future use Service Number 1 866 277 7878...

Page 2: ...ERATING THE UNIT Before operating the unit 7 Removing the collected water 9 CARE AND MAINTENANCE Cleaning and Care 10 TROUBLESHOOTING TIPS Troubleshooting 11 DEHUMIDIFIER CONTROLS Control panel 4 Othe...

Page 3: ...To prevent injury to the user or others the followiing instructions must be followed Improper operation due to not following the instructions may cause harm or damage...

Page 4: ...This will cause the corrosion to the unit due to chemicals evaporated in the air...

Page 5: ...ght Auto defrost operation on indicator light Continuous operation indicator light Pump Pump The control panel of the unit you purchased may be slightly different depending on the model When you push...

Page 6: ...remind that the the filter needs cleaning After finishing cleaning and putting back the air filter be sure to press the filter button to reset the clean filter counter and turn off the indicator light...

Page 7: ...DESCRIPTION OF PARTS Identifiying the parts...

Page 8: ...it Before Operating the Unit 7 8 in 3 minutes to restart the unit Plug the unit into an electric outlet with a grounded connection level Please be careful when moving the unit to prevent the unit from...

Page 9: ...einstall the pump properly to the unit before replace the bucket back into the unit see Fig 8 After you remove the bucket if there is some water in the unit you must dry it out When the unit is on if...

Page 10: ...and fan speed on the unit for pump draining to start Drain hose subassembly Continuous drain hose Plastic cover Fig 11 Pump drain hose Pump drain hose outlet Fig 12 NOTE The pump operation on light fl...

Page 11: ...or on some models remove the bucket then pull filter Store the unit upright in a dry well ventilated area...

Page 12: ...er openings are securely closed O O Room temperature is too low below 5 C 41 F There is a kerosene heater or something giving off water vapor in the room The unit makes a loud noise when operating The...

Reviews: