background image

22

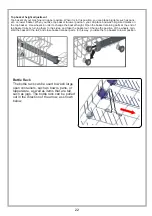
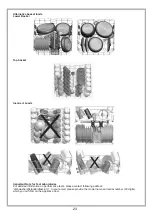
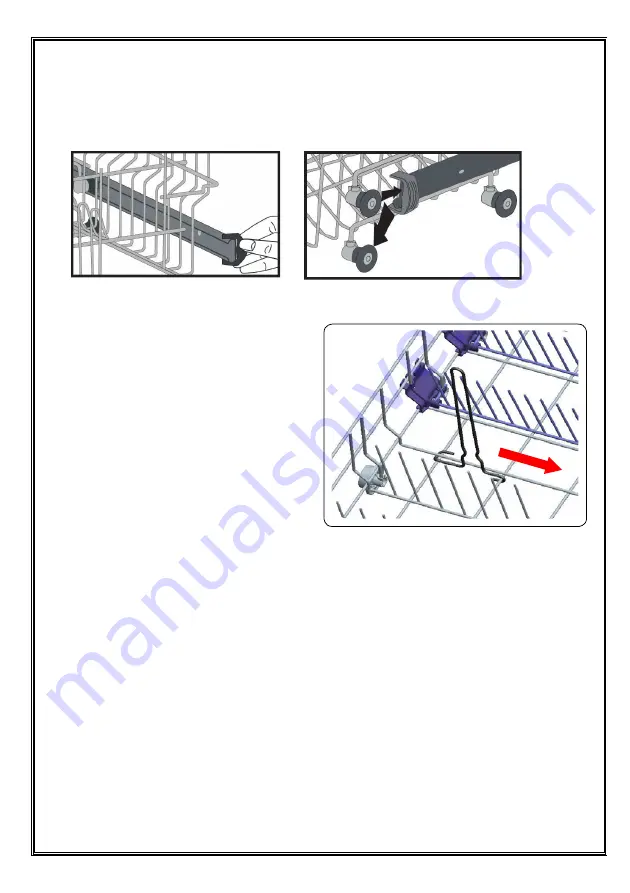
Top basket height adjustment 

Top basket of your machine is in upper position. When it is in this position, you can place big items such as pans, 

etc. on lower basket. When you take top basket to lower position, you can place and wash big sized plates on 

the top basket.  Use wheels in order to change the basket height. Open the basket retaining parts at the end of 

top basket rails by turning them to the sides, and take the basket out. Change the position of the wheels; rein

-

stall the basket to the rail, and close basket retainer parts. In this way, you take the top basket to lower position

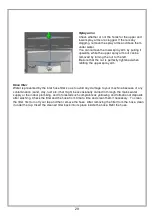
Bottle Rack

The bottle rack can be used to wash large 

open containers, such as bowls, pans, or 

tupperware, as well as items that are tall, 

such as jugs. The bottle rack can be pulled 

out in the direction of the arrow, as shown 

below.

Summary of Contents for ODY 9 V

Page 1: ...Dishwasher User Manual EN ODY 9 V ...

Page 2: ...ning the machine 9 Water connections 10 Water inlet hose 11 Water outlet hose 12 Electrical connection 13 Fitting the machine undercounter 14 Prior to using the machine 16 Preparing the machine for use 16 The importance of water decalcification 16 Filling with salt 16 Testing strip 17 Adjusting salt consumption 17 Detergent usage 19 Filling the detergent compartment 19 Combined detergent 19 Fillin...

Page 3: ...tems 24 3URJUDPPH 6HOHFWLRQ DQG 2SHUDWLQJ WKH 0DFKLQH Changing a programme Cancelling a programme Maintenance and Cleaning Filters 28 Spray arms 29 Hose filter 29 Failure codes and what to do in case of failure 3 Practical and useful information 3 2 Getting familiar with your machine 2 27 27 ...

Page 4: ...Lower basket 5 Lower spray arm 6 Filters 13 Active Drying Unit This system provides better drying performance for your dishes 7 Rating plate 8 Control Panel 9 Detergent and rinse aid dispenser 10 Cutlery basket 11 Salt dispenser 12 Upper basket track latch 3 ...

Page 5: ...rent 10 A Technical specifications Important Note for User For softcopy of this user manual please contact following address dishwasher standardtest info In your e mail please provide the model name and serial number 20 digits which you can find on the appliance door Conformity with the standards and Test data E Declaration of Conformity This product meets the requirements of all applicable EU dir...

Page 6: ...ormation on methods and points of disposal Safety Information When you take delivery of your machine Check for any damage to your machine or to its packaging Never start a machine damaged in any way make sure to contact an authorised service Unwrap the packaging materials as indicated and dispose of them in accordance with the rules The points to pay attention during machine installation Choose a ...

Page 7: ...e of the dishwasher will void the guarantee Do not get up sit or place a load on the open door of the dishwasher it may fall over Never put into the detergent and rinse aid dispensers of your machine anything other than those detergents and rinse aids which are produced specifically for dishwashers Our company will not be responsible for any damage that might occur in your machine otherwise The wa...

Page 8: ...if the door is opened Do not leave your dishwasher s door open Failure to do so may lead to accidents Place knives and other sharp ended objects in the cutlery basket in blade down position If the supply cord is damaged it must be replaced by the manufacturer its service agent or similarly qualified persons in order to avoid a hazard This appliance is not intended for use by persons including chil...

Page 9: ...ction in the machine should be repaired definitely by qualified persons Any repair work performed by anyone other than the authorised service personnel will cause your machine to be left outside the scope of warranty Prior to any repair work on the machine be sure that the machine is cut off from the mains Switch off the fuse or unplug the machine Do not pull by the cable when unplugging Make sure...

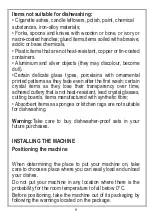
Page 10: ...n crystal items as they lose their transparency over time adhered cutlery that is not heat resistant lead crystal glasses cutting boards items manufactured with synthetic fibre Absorbent items as sponges or kitchen rags are not suitable for dishwashing Warning Take care to buy dishwasher proof sets in your future purchases INSTALLING THE MACHINE Positioning the machine When determining the place t...

Page 11: ...machine s adjustable feet so that it can stand level and balanced Proper positioning of the machine ensures problem free opening and closing of its door If the door of you machine does not close properly check if the machine is stable on the floor it stands if not adjust the adjustable feet and ensure its stable position Water connection Be sure that the indoor plumbing is suitable for installing ...

Page 12: ...re supplied by the tap should be at a minimum of 0 03 Mpa and and at a maximum of 1 Mpa If the water pressure is above 1 Mpa a pressure relief valve should be fitted inbetween After the connections are made the tap should be turned on fully and checked for water tightness For the safety of your machine make sure to always turn off the water inlet tap after each wash programme is finished NOTE Aqua...

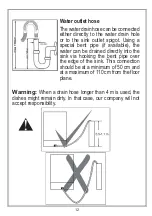
Page 13: ...pe if available the water can be drained directly into the sink via hooking the bent pipe over the edge of the sink This connection should be at a minimum of 50 cm and at a maximum of 110 cm from the floor plane Warning When a drain hose longer than 4 m is used the dishes might remain dirty In that case our company will not accept responsibility ...

Page 14: ...our location is 110 V connect a transformer of 110 220 V and 3000 W inbetween The machine should not be plugged in during positioning Always use the coated plug supplied with your machine Running in low voltage will cause a decline in washing quality The machine s electrical cable should be replaced by an authorised service or an authorised electrician only Failure to do so may lead to accidents F...

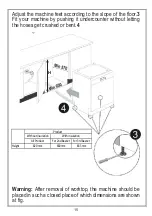
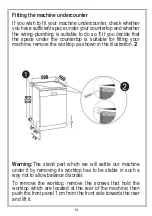
Page 15: ...e countertop is suitable for fitting your machine remove the worktop as shown in the illustration 2 Warning The stand part which we will settle our machine under it by removing its worktop has to be stable in such a way not to allow balance disorder To remove the worktop remove the screws that hold the worktop which are located at the rear of the machine then push the front panel 1 cm from the fro...

Page 16: ... undercounter without letting the hoses get crushed or bent 4 Warning After removal of worktop the machine should be placed in such a closed place of which dimensions are shown at fig H Without Insulation All Product For 2nd Basket For 3rd Basket Height 820 mm 830mm 835 mm With Insulation Product ...

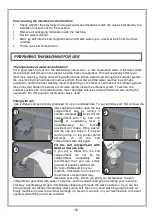
Page 17: ...e dishwasher salt is used Filling with salt Use softener salt specifically produced for use in dishwashers To put softener salt first remove the lower basket and then open the salt compartment cap by turning it counter clockwise 1 2 At first fill the compartment with 1 kg salt and water3 at overflowing level If available using the funnel4 provided will make filling easier refit the cap and close i...

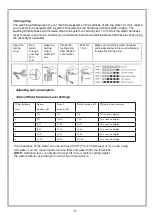
Page 18: ...the testing strip after taking it out of water Wait for 1 min Make your machine s water hardness setting according to the result obtained through the testing strip 17 Water hardness level German hardness dH French hardness dH British hardness dH Water hardness indicator 1 0 5 0 9 0 6 L1 is seen on display 2 6 11 10 20 7 14 L2 is seen on display 3 12 17 21 30 15 21 L3 is seen on display 4 18 22 31 ...

Page 19: ...ss set is recognized SL is shown for 2 seconds Release program button 2 The last setting level is viewed Press program button 2 to set the desired level At any pressure of program button hardness level is incremented Hardness level 1 returns after hardness level 6 The last selected water hardness level is stored in the memory by turning the machine off with On Off button 1 2 1 ...

Page 20: ...s also produce combined detergents called 2 in 1 3 in 1 or 5 in 1 etc 2 in 1 detergents contain detergent salt or rinse aid When using 2 in 1 detergents make sure to check the specifications of the tablet Other tablet detergents contain detergent rinse aid salt varlous extra functions Generally combined detergents produce sufficient results under certain usage conditions only Such detergents conta...

Page 21: ...d making the setting 20 To fill the rinse aid compartment open the rinse aid compartment cap Fill the compartment with rinse aid to the MAX level and then close the cap Be careful not to overfill the rinse aid compartment and wipe up any spills In order to change the rinse aid level follow the below steps before turning on the machine Push the programme button and hold it down Turn on the machine ...

Page 22: ...to one another You are recommended to use the cutlery grid in order to obtain the best result To avoid any possible injuries always place such long handle and sharp pointed dishes as serving fork bread knife etc with their sharp points facing down or horizontally on the baskets Warning Place your dishes into your machine in a way that they will not prevent the upper and lower spray arms from spinn...

Page 23: ...et height Open the basket retaining parts at the end of top basket rails by turning them to the sides and take the basket out Change the position of the wheels rein stall the basket to the rail and close basket retainer parts In this way you take the top basket to lower position Bottle Rack The bottle rack can be used to wash large open containers such as bowls pans or tupperware as well as items ...

Page 24: ...Loads Important Note for Test Laboratories For detailed information on performance tests please contact following address dishwasher standardtest info In your email please provide the model name and serial number 20 digits which you can find on the appliance door ...

Page 25: ...ergent amount B 25 cm3 15 cm3 A 5 cm3 B A B A B Prewash 40 C wash Prewash Prewash End Cold rinse 50 C wash 60 C Wash Hot rinse Hot rinse Cold Rinse End Dry Hot Rinse End Dry End Programme duration min 15 30 171 94 Electricity consumption kW hours 0 45 0 90 0 90 1 38 Water Consumption liters 4 2 10 9 9 0 14 4 Warning Short programs do not include a drying step The values declared above are the valu...

Page 26: ...ally soups sauces pasta eggs pilaf potato and oven dishes fried foods Level of soil Medium Small Small Medium Medium Detergent amount B 25 cm3 15 cm3 A 5 cm3 A B A B B A B A B 65 C wash Washing steps are determined automatically according to the level of soil Prewash Intermediate rinse 65 C wash Hot rinse Cold rinse End Intermediate rinse Hot rinse Dry End Programme duration min 50 64 92 100 121 1...

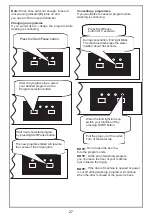
Page 27: ...hing rinsing steps will be added into the selected program so you can ensure that your dishes will be extracted cleaner and glosser Note If Drying lamp is on extra heating and drying steps will be added into the selected program so you can ensure that your dishes will be extracted dryer NOTE If you have used an extra feature on the latest washing program this feature will remain active also on the...

Page 28: ...NOTE If the door of machine is opened or power is cut off during washing program will continue when the door is closed or the power is back Press the Start Pause button After the program stops select your desired program via the Program selection button Start newly selected program by pressing Start Pause button The new program started will resume the course of the old program Press Start Pause bu...

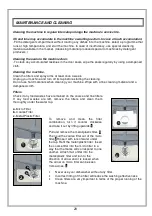
Page 29: ...ing material and a dampened cloth Filters Check if any food wastes have remained on the coarse and fine filters If any food wastes are left remove the filters and clean them thoroughly under the water tap a Micro Filter b Coarse Filter c Metal Plastic Filter To remove and clean the filter combination turn it counter clockwise and take it out by lifting upwards 1 Pull and remove the metal plastic f...

Page 30: ... is prevented by the inlet hose filter so as to avoid any damage to your machine because of any contamination sand clay rust etc that might be occasionally carried in through the mains water supply or the indoor plumbing and to forestall such complaints as yellowing and formation of deposits after washing Check the filter and the hose from time to time and clean them if necessary To clean the filt...

Page 31: ...tap Contact the service F2 The waste water in the machine cannot be discharged Water discharge hose is clogged The filters of your machine might be clogged Power off on your machine and activate the program cancellation command If the error continues contact the service F8 Heater error Contact the service F1 Alarm is active against water overflow Power off your machine and close the tap Contact th...

Page 32: ...ted The filters are clogged The programme is not finished yet If the machine stops during a wash operation Power failure Water inlet failure Program can be on standby mode If shaking and hitting noises are heard during a wash operation Dishes placed incorrectly Spray arm hitting the dishes If there are partial food wastes left on the dishes Dishes placed incorrectly into the machine sprayed water ...

Page 33: ...r clean 2 Eliminating water droplets Wash the dishes with the intensive programme Take all of the metal containers in the machine out Do not add detergent 3 If you properly place your dishes into the machine you will be using it in the best way in terms of energy consumption washing and drying performance 4 Clean all rough waste before you place dirty dishes to the machine 5 Operate the machine af...

Page 34: ... A re 1 pW 47 Freestanding Built in Freestanding Energy consumption 258 kwh per year based on 280 standard cleaning cycles using cold water fill and the consumption of low power modes Actual energy consumption will depend on how the appliance is used Water consumption 2520 liters per year based on 280 standard cleaning cycles Actual water consumption will depend on how appliance is used Drying eff...

Page 35: ...52238584 R35 ...
Reviews: