background image

LEVEL 1

LEVEL 2

LEVEL 3

LEVEL 4

LEVEL 5

LEVEL 6

LEVEL 7

LEVEL 8

LEVEL 9

MAX.


Ø140mm 
Commutator


130 W


206 W


350 W


500 W


850 W


1200 W


— 

— 

— 

— 

Ø140mm 
Commutator


180 W


470 W


790 W


850 W


1230 W


1700 W


— 

— 

— 

— 

Ø180mm Regulator


1800 W


1800 W


1800 W


1800 W


1800 W


1800 W


1800 W


1800 W


1800 W


— 

Ø140/250mm 
Ovaldual


1000 W


1000 W


1000 W


1000 W


1000 W


1000 W


1000 W


1000 W


1000 W


1800 W


Ø120/180mm 
Double


700 W


700 W


700 W


700 W


700 W


700 W


700 W


700 W


700 W


1700 W


11.3.ELECTRIC COOKER CERAN POWER RATINGS


EN I 35


Summary of Contents for OGHF 64 I PRO SV

Page 1: ...COUNTERTOP BUILT IN COOKER GAS AND ELECTRIC SERVICE MANUAL COOKING HOB OGHF 64 I PRO SV...

Page 2: ...COOKER HOTPLATE POWER RATINGS 14 5 GAS CONNECTION 15 5 1 LPG GAS CONNECTION 15 5 2 NATURAL GAS CONNECTION 16 5 3 CHECKING THE CONNECTION AGAINST LEAKAGE 17 5 3 GAS MEASUREMENT 18 6 GAS CONVERSION 19...

Page 3: ...TE POWER RATINGS 33 11 2 HOTPLATE COOKER SWITCH LEVELS 33 11 3 ELECTRIC COOKER HOT PLATE CERAN POWER RATINGS 34 11 4 INDUCTION COOKER TECHNICAL RATES 35 11 5 INDUCTION COOKER OPERATING PRINCIPLE 36 11...

Page 4: ...o not operate the appliance Due to safety risks do not extend the mains cord with additional cords and do not use extensions Plug the appliance in a grounded socket protected by a fuse conforming to t...

Page 5: ...nce with its front door glass removed or broken Ensure that the children do not come in close proximity to the appliance when it is operational Do not leave materials such as rags or towels near the a...

Page 6: ...e appliance do not drag it or slide it on the stairs 2 2 Removing Appliance Package Do not place items on the appliance Remove the packaging plastic using a knife and without damaging the Styrofoam an...

Page 7: ...during handling Carry the appliance from this side with a clamp Do not place your knee on the appliance Protect against humidity Breakable object Do not step on the appliance Carry via trolley from th...

Page 8: ...GAS HOB GROUPS 8 EN...

Page 9: ...e Mounting Place Air required for combustion is taken from the room air and gases produced are returned directly to the room Good ventilation of the room is a must for safe operation of the appliance...

Page 10: ...in 65cm It can be placed adjacent to the kitchen walls kitchen furniture or any other product in any dimension from behind or one edge The kitchen furniture in close proximity to the appliance shall b...

Page 11: ...d directly on the rough surface It shall not be placed on a storage or a base Do not install the appliance beside refrigerators or coolers Heat radiated by the appliance increases the energy consumpti...

Page 12: ...er cord and do not allow it contact the hot components of the appliance and ensure that it does not run over a hob Before conducting any operation on the electrical wiring remove the electrical connec...

Page 13: ...he Gas Pipeline In the installation environment there are certain points that shall be checked NOTE Relief valve and hose shall be provided by the customer If LPG shall be used in the appliance points...

Page 14: ...1 15 mm 1 10 mm 1 45 mm 0 85 mm 0 75 mm 0 85 mm Gas Flow 0 276 m3 h 0 276 m3 h 0 276 m3 h 211 m3 h 211 m3 h 211 g h Power 2 90 kW 2 90 kW 2 90 kW 2 90 kW 2 90 kW 2 90 kW Middle Burner Injector 0 97 mm...

Page 15: ...0W 500W 750W 1500W 180mm Rapid 175W 220W 300W 850W 1150W 2000W 4 2 GAS AND ELECTRIC COOKER CERAN POWER RATINGS LEVEL 1 LEVEL 2 LEVEL 3 LEVEL 4 LEVEL 5 LEVEL 6 LEVEL 7 LEVEL 8 LEVEL 9 MAX 140mm Commuta...

Page 16: ...hose and relief valve are renewed in installing LPG appliances Select the appropriate location based on the cylinder If required replace the conic hose tip and pipe stopper behind the cooker Place th...

Page 17: ...appliance and the spiral hose There is a flexible hose on the tip of the natural gas piping ensuring the natural gas connection of the appliance By using wrench no 22 and 24 remove the natural gas ho...

Page 18: ...he gas If the hose froths there is a leakage To remove the leak check the connection Note The appliance goes through gas tests through the production line For this reason there can be residue gas in t...

Page 19: ...nts of the appliance 5 4 Gas Measurement Gas pressure rating is measured via manometer There are 2 types of manometers Gas measurement is done by both devices with the same method Gauge Manometer Digi...

Page 20: ...the table Measurement with Gauge Manometer Measurement of 300mmSS LPG Liquid Petroleum Gas with the gas manometer Measurement of 200mmSS NG Natural Gas with the gas manometer 6 GAS CONVERSION In orde...

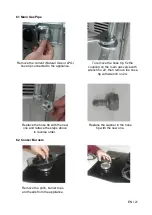
Page 21: ...the coupling on the main gas valve with wrench no 22 then remove the hose tip with wrench no 24 Replace the washer in the hose tip with the new one Replace the hose tip with the new one and retrace t...

Page 22: ...cardboard 6 3 Checking the Connections Following Conversion Apply detergent or soap bubbles on a large surface on places such as injector and hose tip connection points where a leak may surface Turn o...

Page 23: ...sion from LPG to Natural Gas or vice versa it shall be provided together with the conversion kit as a spare After determining the gas type to be utilized the required conversion kit shall be connected...

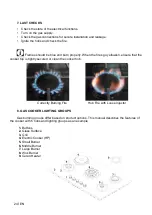
Page 24: ...owish ensure that the cooker top is tightly secured or clean the cooker hob Correctly Burning Fire Hob Fire with Loose Injector 8 GAS COOKER LIGHTING GROUPS Gas burning groups differ based on product...

Page 25: ...cuisine Wok is actually a pan that is made of sheet plate that is large and deep and used to cook chopped vegetables and meat in intense fire in a short amount of time If a pan will be used the Wok A...

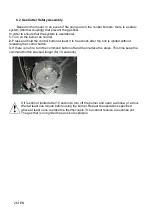
Page 26: ...Cutter Safety Assembly Based on the model in an event of fire going out on the cooker burners there is a safety system thermal coupling that prevent the gas flow In order to ensure that the system is...

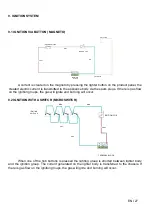
Page 27: ...a the spark plugs If there is gas flow on the ignition groups the gas will ignite and burning will occur 9 2 IGNITION WITH A SWITCH MICROSWITCH blue blue IGNITION SWITCHS IGNITION COIL blue brown blue...

Page 28: ...ELECTRIC COOKER GROUPS 28 EN...

Page 29: ...at may be used on the cooker If a hood or aspirator will be installed above the cooker follow the instructions of the manufacturer for height of mounting min 650mm The kitchen furniture near the appli...

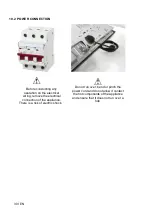
Page 30: ...cord and do not allow it contact the hot components of the appliance and ensure that it does not run over a hob Before conducting any operation on the electrical wiring remove the electrical connecti...

Page 31: ...NG THE COOKER IN PLACE 1 Remove the burners burner tops and grills from the cooker 2 Turn the stove upside down and put it on a flat floor 3 To prevent foreign materials and liquids from entering betw...

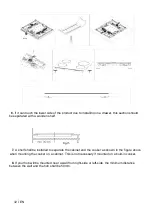
Page 32: ...ig 15 7 A shelf shall be installed to separate the cabinet and the cooker as shown in the figure above when mounting the cooker on a cabinet This is not necessary if mounted on a built in cooker 8 If...

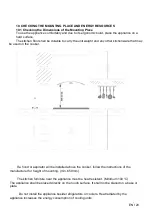
Page 33: ...IMENSIONS OF COUNTER CUT OFF AND INSTALLING THE COOKER Note the following drawings and values when installing the hob or cutting counter 30 cm Hob 45 cm Hob 70 cm Hob 60 cm Hob 90 cm Hob 100 cm Hob EN...

Page 34: ...LATE COOKER SWITCH LEVELS The cooker buttons can be turned either way in order to ensure heat control changing based on levels If there are electrical hobs with rapid heating feature these are marked...

Page 35: ...utator 180 W 470 W 790 W 850 W 1230 W 1700 W 180mm Regulator 1800 W 1800 W 1800 W 1800 W 1800 W 1800 W 1800 W 1800 W 1800 W 140 250mm Ovaldual 1000 W 1000 W 1000 W 1000 W 1000 W 1000 W 1000 W 1000 W 1...

Page 36: ...KW 1 4 160mm Heater Zone P KW 1 4 2 200mm Heater Zone KW 2 3 200mm Heater Zone P KW 2 3 3 Other Specifications Unit Rate Total Power Consumption KW 7 4 Voltage V 230 400 Package Dimensions width dept...

Page 37: ...d on the metal surfaces that are exposed to a magnetic field He observed that these currents generate a heating effect Joule effect on the metal masses Application of induction for heating is seen in...

Page 38: ...AMP HP SELECTOR SWITCH 2 brown blue IGNITION COIL blue IGNITION SWITCHS brown blue blue TERMINAL green yellow green yellow HOTPLATE 1 HOTPLATE 2 blue blue blue brown brown red red HP SIGNAL LAMP HP SI...

Page 39: ...E 4 HOTPLATE 2 HOTPLATE 3 blue brown brown red blue brown brown blue red blue red red green yellow brown brown HP SELECTOR SWITCH 4 HP SELEC TOR SWITC H 2 HP SELECTOR SWITCH 3 HP SELECTOR SWITCH 1 HP...

Page 40: ...CERAN COOKER ELECTRICAL CIRCUIT DIAGRAMS black red CERAN HP CERAN HP orange CERAN HP brown CERAN HP red TERMINAL green yellow X116 NEU TRA L X119 pe brown brown brown black EGO 40 EN...

Page 41: ...4a interior black red TERMINAL BLOCK blue 2 brown blue 2 orange orange blue brown 304 board EN I 41...

Page 42: ...CERAN HOTPLATE 1200W CERAN HOTPLATE 1200W touch control main card red black blue 2 blue 1 blue 4 orange 7 black 8 brown red 9 CERAN HOTPLATE 1800W blue 3 brown brown 6 brown 5 TERMINAL orange 42 I EN...

Page 43: ...Replace the control unit ER31 Configuration data is incorrect Induction shall be configured New configuration ER36 NTC value is incorrect NTC open or shorted Replace the control unit ER40 Secondary op...

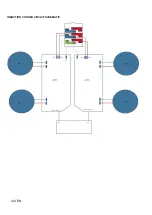
Page 44: ...INDUCTION COOKER CIRCUIT SCHEMATIC BLOCK Induction power cart coil coil coil coil induction power cart X6 OR X16OR X19 X6 OR X16OR X19 44 I EN...

Page 45: ...high Wait for cooling down Check for overheating ER22 Faulty Button evaluation The control unit will cut off the circuit after 3 5 7 5 seconds Intermittent connection between short circuit or button...

Page 46: ...tice Direzione Commerciale Amministrativa Via Francesco Crispi 17 21100 Varese ITALY Tel 39 0332 296011 fax 39 0332 296012 Sede Legale via Leone XIII n 14 20145 Milano ITALY Cap Soc Euro 2 500 000 00...

Reviews: