background image

8

BC DEFLATION USING THE RAPID EXHAUST VALVE (REV)

The Rapid Exhaust Valve (REV) is located inside the upper (shoulder) unit
of the Inflator Assembly.  It is connected to the lower (power) unit by two
Cables located inside the Corrugated Hose and coupled together inside
the Pull Connector.

The REV is operated by grasping the Pull Connector, or the lower (power)
unit and pulling it down (away) from the upper (shoulder) unit.  The
Cables pull the Exhaust Valve open, venting air from the BC through the
Vents of the upper unit of the Inflator Assembly.

The amount of air vented depends on how far open the Exhaust Valve is,
the distance you pull the inner Cable, and how long the Exhaust Valve is
open.  Short tugs vent small amounts of air for minor changes in buoy-
ancy, and a long pull will vent the entire BC in a matter of seconds.

Use of the REV eliminates water entry even if the Exhaust Valve remains
open after all air is vented from the BC.

BC INFLATION USING THE MANUAL INFLATE/DEFLATE
BUTTON

The Round Button located on the right side of the Mouthpiece is an In-
flate/Deflate manual actuator that allows air flow in to, or out of, the BC.
To inflate orally, place the Mouthpiece in your mouth, and after you be-
gin (and continue) to blow in, press the Button with your thumb.  This
procedure purges the mouthpiece cavity of water, resulting in less water
entering the BC, potentially prolonging Bladder life.

Some air may continue to leak in to the surrounding water when you are
orally inflating the BC, even after you have released the Inflate/Deflate
Button.  This is considered normal and will not impede the efficient oral
inflation of the BC.

Summary of Contents for AIR XS II

Page 1: ...AIR XS II Regulator BC Inflator System Owner s Guide OCEANIC...

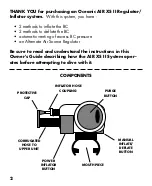
Page 2: ...enting of excess BC pressure an Alternate Air Source Regulator Be sure to read and understand the instructions in this Owner s Guide describing how the AIR XS II System oper ates before attempting to...

Page 3: ...2 COMPONENTS 2 WARRANTY 4 COPYRIGHT 4 COMPATIBILITY AND INSTALLATION 5 FEATURES 5 INFLATOR OPERATION 7 REGULATOR OPERATION 9 CARE AND MAINTENANCE 10 GUIDELINE FOR MINIMUM SERVICE INTERVALS 13 COLD WAT...

Page 4: ...d translated or reduced to any electronic medium or machine readable form without prior consent in writing from Oceanic 2002 Design Oceanic AIR XS II Owner s Guide Doc No 12 2116 2002 Design 1998 San...

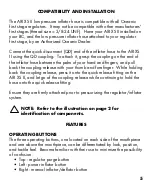
Page 5: ...d pull back the coupling release with your thumb and forefinger While holding back the coupling release press it onto the quick release fitting on the AIR XS II and let go of the coupling release whil...

Page 6: ...during ascent or if over pressurized with the Power Inflator This component of the AIR XS II operates auto matically so no instructions for its use are necessary WARNING The OPV integrated into the up...

Page 7: ...uthpiece until you hear air flowing into the BC Minor compressions of the Power Inflator Button will initiate airflow into the BC and allow small adjustments in buoyancy WARNING If you depress the Pow...

Page 8: ...s of air for minor changes in buoy ancy and a long pull will vent the entire BC in a matter of seconds Use of the REV eliminates water entry even if the Exhaust Valve remains open after all air is ven...

Page 9: ...necessary for you to share air with another diver you should offer your Primary Second Stage to the diver and you should use the AIR XS II Regulator Although the AIR XS II Regulator will function prop...

Page 10: ...n the palm of your hand and fingers pull back the Coupling Release with your thumb and forefinger and pull it off the quick release fitting of the AIR XS II Place the Protective Cap on the fitting see...

Page 11: ...e full water pressure Sand that has collected behind the Lower Power unit Cover be hind the Purge Button can be rinsed out by flushing tap water through the opening in the Cover Do not pry or lift up...

Page 12: ...or repair any components of the AIR XS II or to adjust the Regulator Doing so could cause misoperation while underwater resulting in serious injury or death It will also void the warranty Once each ye...

Page 13: ...ted and serviced as required prior to use Equipment used for dive training and or consumer rental activities Equipment should be inspected prior to every use Equipment should be serviced at least once...

Page 14: ...specialized techniques required for diving in cold water environments and failure to apply such techniques to handle situations that could result in Regulator freezing will place you in risk of serio...

Page 15: ...RVICE _____________________________________________________________ _Date Service Performed Dealer Technician_____ _____________________________________________________________ _______________________...

Page 16: ...16 2002 Davis Street San Leandro CA 94577 Tel 510 562 0500 Fax 510 569 5404 http www OceanicWorldwide com 2002 Design 2004 Doc No 12 2116 r02 9 20 04 OCEANIC...

Reviews: