background image

20

21

IV.  INSTALLATION

PLACE OF INSTALLATION

Place your refrigerator-freezer on a stable and level surface. Your appliance will be

heavy when loaded with food: it must be placed on a solid and resistant floor.

The appliance must be installed in a dry, well ventilated room at room temperature.

Veil lez leave a space of at least 10 cm around the device.

The device must not be exposed to direct sunlight.

The device must not be exposed to rain.

The appliance must not be installed next to a radiator, stove or other heat source.

The energy consumption and the efficient operation of the device are affected by the

ambient temperature.

The appliance must be installed in such a way that the power socket remains

accessible.

Make sure after instaM that it does not rest on its power cable.

Before connecting the appliance to the mains socket for the first time, please

allow it to rest for 2 hours if the appliance has been transported upright or 24

hours if the appliance has been transported in a horizontal position, in order to

allow the refrigerant gas to fall back into the compressor. Failure to do so may

damage the compressor.

CLIMATE CLASS

Install the device only in a place where the ambient temperature corresponds to the climate 

class for which it was designed (see table below).

The climate class is located on the nameplate on the outside of the unit. The table below 

shows the correct ambient temperature for each climate class:

Climatic class

Ambient temperature

Your device is class "N / ST". In deca or above indicated ambient temperature 

values, the performance of your appliance may be adversely affected with the 

risk of perennial food waste.

mm

mm

mm

m

m

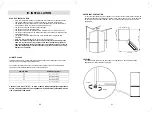
SUFFICIENT VENTILATION

To ensure proper operation of your appliance, ensure that air can circulate freely around the 

appliance. Please leave a clearance of at least 30 cm above the unit, 10 cm at the back and 

10 cm at each side (see figure below). Also, leave enough space to open the doors (see 

figure below).

LEVELING

For vibration-free operation, the unit needs to be upgraded. To do this, adjust the two 

adjustable front feet to re-balance properly.

Lower

Raise

Summary of Contents for OCEAFC167WP

Page 1: ...consultation If this unit is to be transferred to another person make sure that the user guide follows the unit so that the new user can be informed of the operation of the unit In this user guide th...

Page 2: ...ported into position horizontal in order to allow the refrigerant gas to go back down into the compressor Failure to do so may damage the compressor Intended Use This appliance is intended for home us...

Page 3: ...art your appliance make sure that the voltage of your home corresponds to that indicated on the rating plate of the appliance This unit is not grounded It must be plugged into a wall outlet equipped w...

Page 4: ...ces eg electric ice cream makers mixers etc inside the food storage compartment unless are of the type recommended by the manufacturer WARNING Containers containing flammable gases or liquids may leak...

Page 5: ...flammable During the transportation and installation of your device make sure none of the circuit components refrigeration system has been damaged If the refrigeration circuit is damaged Keep the app...

Page 6: ...nstructions below 10 11 In case of malfunction If the unit does not work properly first consult the TROUBLESHOOTING GUIDE section at the end of the operating instructions If the information it contain...

Page 7: ...ments with one two and three stars are not suitable for freezing fresh foods If the refrigeration unit remains empty for long periods of time turn it off defrost clean dry and leave the door open to p...

Page 8: ...llowing chapters of the User s Guide This user guide is available in the following languages FR original version EN translated from the original Any other translation would be a translation of the ori...

Page 9: ...7WP Model HD 221RN SN Refrigerant category 7 refrigerator freezer Energy efficiency class A Energy consumption 206 kWh per year Calculated on the basis of results for 24 hours under standard condition...

Page 10: ...ple b UNPACKING THE APPLIANCE AND DISPOSING OF THE EMBALLAGIC ELEMENTS Remove all packing material around the appliance and the protective elements inside the appliance compartments Carton board and s...

Page 11: ...pliance has been transported in a horizontal position in order to allow the refrigerant gas to fall back into the compressor Failure to do so may damage the compressor CLIMATE CLASS Install the device...

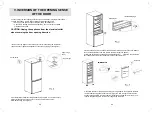
Page 12: ...e refrigerator compartment door and place it on a soft surface to avoid scratches Remove the 2 hole covers Unscrew and remove the intermediate hinge see Figure 2 Cache holes Intermediate hinge 3 Remov...

Page 13: ...a grounded AC outlet When the refrigerator door is opened the interior light will come on TEMPERATURE ADJUSTMENT The temperature control knob thermostat starts and stops the appliance It is located at...

Page 14: ...tting the thermostat If the evaporator in the refrigerator compartment bottom wall of the appliance becomes unusually frost covered appliance with too much load high ambient temperature thermostat in...

Page 15: ...ZER COMPARTMENT STORING FOOD IN THE FREEZER COMPARTMENT Your machine has the standard 4 star logo which means you can keep frozen food freeze fresh products and make ice cubes The drawer item 6 on the...

Page 16: ...HE ICE To make ice cubes pour cold water into the ice cube tray up to three quarters of its height and place it in the freezer compartment for more than 2 hours To extract the ice cubes slightly bend...

Page 17: ...ableau suivant Avant d appeler un technicien proc dez aux v rifications suivantes Problems Possible causes solutions The thermostat is on OFF stop Turn the knob thermostat the position MAX The plug is...

Page 18: ...es not cool sufficiently The food is too hot IN CASE OF EXTENDED ABSENCE OR NON USE Turn the thermostat to the OFF position Unplug empty defrost and clean the unit Keep the doors ajar to avoid odors I...

Page 19: ...EIDER CONSUMER GROUP 12 rue Jules Ferry 93110 Rosny sous Bois FRANCE The logo on the product means that it is a device whose treatment as waste within the scope of Directive 2012 19 EU of 4 July 2012...

Page 20: ...OCEAFC167WP IM_052019_V1...

Reviews: