8
2.2 Preparing a Cored Fiberglass Hull
The core (wood or foam) must be cut and sealed carefully. The core must be protected from water
seepage and we recommend that the hull be reinforced to prevent it from crushing under the locking nut
which would allow the mounting tube to become loose. If unsure, please consult your local OceanLED
representative.
Tip
: Always wear safety goggles and a dust mask.
1.
Drill a 3mm / 1/8” pilot hole perpendicular to the hull. If there is a rib, strut, or other hull irregularity
near the selected mounting location, this will need to be taken into account in the planning phase
and the location adjusted accordingly, or the obstruction safely removed or modified. If the pilot
hole is drilled in the wrong location, drill a second hole in a better location and repair first pilot hole.
2.
Using the correct sized hole saw cut the hole from outside the hull through the outer skin only. Be
sure to hold the drill plumb, so the hole will be perpendicular to the angle of the hull.
Tip
: Seal core according to boat manufacturer’s specifications.
3.
The core material can be very soft. Apply only light pressure to the hole saw after cutting through
the outer skin to cut through the material. Once you have cut through the core material, you will
need to apply more pressure to cut through the liner material on the inside of the hull.
4.
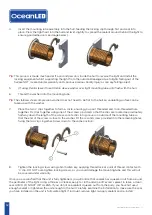
Remove the plug of core material so the core of the hull is fully exposed. Using heavy grit
sandpaper, sand and clean the inner skin, core, and the outer skin around the hole. Then using a
Dremel tool, carefully remove around ¾” of the core material from inside the outer and inner layers
of hull. Be careful at this point to not damage the outer hull layers. This process should leave a ¾”
recess.
5.
Completely seal the hull to prevent water seepage into the core. Allow enough preparation time for
several layers of epoxy to completely dry. Remember – environmental conditions can accelerate or
decelerate curing times which also varies on type of epoxy used. Consult epoxy directions and test
cure time before procedure.
6.
Using recommended filler, generously coat the inside core material with the epoxy, making sure to
evenly coat the inside surfaces.
7.
When dry, gently sand and clean the area around the hole the size of the diameter of the light
fixture using a heavy grit sandpaper, inside and outside, to remove excess epoxy buildup and also to
remove any paint to the bare hull material to ensure that the sealant will adhere properly to the hull.
If there is any petroleum residue inside the hull, remove it with acetone before sanding.
2.3 Preparing a Metal and Carbon Fibre Hull
A Delrin sleeve must be installed If mounting the light to metal or carbon fibre hulls to prevent the effects
of galvanic corrosion. To install, follow the steps below:
Tip
: Always wear safety goggles and a dust mask.
1.
Drill a 3mm / 1/8” pilot hole perpendicular to the waterline from inside the hull. If there is a rib, strut,
or other hull irregularity near the selected mounting location, this will need to be taken into account
in the planning phase and the location adjusted accordingly, or the obstruction safely removed or
modified.
2.
Using the correct sized hole saw (see table below), cut the mounting hole from outside the hull. Be
sure to hold the drill plumb, so the hole will be perpendicular to the surface of the hull.
OceanLED INSTALL / ALLURE / 240717 / 7.1


